32 minutes
Using Terraform and Cloud-Init to deploy and automatically monitor Proxmox instances
In the last two series of posts on this site, I covered using SaltStack to deploy Consul and Prometheus Exporters, and also using different Prometheus service discovery mechanisms to gather instances to monitor in each provider.
There is no Prometheus discovery mechanism for Proxmox, nor a consistent way to discover tagged instances in Proxmox (regardless of which tool queries the Proxmox API). Instead, we can implement something like Consul to discover the instances.
Also, Proxmox supports Cloud-Init, so we can bootstrap virtual machines and them register with Salt, install base packages and more without the cyclical dependency of needing to be registered to Salt to install Salt.
Prerequisites
As mentioned, we have covered some of what we are using here in different posts already: -
- Prometheus: Discovering Services with Consul - Using Consul with Prometheus to discover instances to monitor
- Configuration Seasoning: Getting started with Saltstack - A primer on SaltStack, including how to configure a basic Salt environment
- Prometheus - Auto-deploying Consul and Exporters using Saltstack Part 1: Linux - This post (and series) contains all of the Salt states we use in this post, as well as the Prometheus configuration
- Prometheus Service Discovery posts on AWS, Azure and Google Cloud Platform, Digital Ocean and OpenStack - This post cover using Terraform with various cloud providers, as well as making use of Cloud-Init
By using elements of each of the above, we can treat Proxmox almost like another Cloud environment/provider.
Setting up Proxmox
Proxmox can be installed using the ISOs provided on the Proxmox website. Full instructions for how to install the Virtualisation Environment are available here.
The following videos also do a good job of explaining it too: -
Once installed, you should be able to view the Proxmox GUI on https://$IP_OF_HOST:8006: -

You can create Proxmox hosts in either standalone mode or multiple hosts in a cluster. The latter allows you to manage all of your instances from the UI of any host in the cluster. It also allows live migration of instances between Proxmox hosts (seamlessly, if using shared storage).
Terraform
Once Proxmox is installed, we can configure the Terraform Proxmox provider.
For information on how to install Terraform and an example project structure, see here.
Install the provider
As the provider is from a third party, and not an official Terraform provider, you need to install the provider manually on your machine. Full instructions for this are available here, but to summarize the steps: -
# Clone the repository
$ git clone https://github.com/Telmate/terraform-provider-proxmox

# Go Install the provider and provisioner (requires a working Goland installation)
$ cd terraform-provider-proxmox
$ go install github.com/Telmate/terraform-provider-proxmox/cmd/terraform-provider-proxmox
$ go install github.com/Telmate/terraform-provider-proxmox/cmd/terraform-provisioner-proxmox

# Run the Makefile
$ make

# Create the Terraform plugins directory and move the generated plugins to it
$ mkdir ~/.terraform.d/plugins
$ cp bin/terraform-provider-proxmox ~/.terraform.d/plugins
$ cp bin/terraform-provisioner-proxmox ~/.terraform.d/plugins
The provider will now be available to use within your Terraform environment.
Create a Terraform user in Proxmox
Terraform requires a user to authenticate against the Proxmox API. You can create the user via the GUI, but you will need to use the CLI to assign it to the correct roles. Alternatively, you can create the user and assign roles with the CLI: -
# Create the user
pveum user add terraform-prov@pve --password $PASSWORD

# Assign the user the correct role
pveum aclmod / -user terraform-prov@pve -role Administrator
Configure the Proxmox provider
Within your Terraform directory, create a directory called proxmox and then add a provider.tf file: -
provider "proxmox" {
  pm_api_url = "https://$IP_OF_HOST:8006/api2/json"
  pm_user = "terraform-prov@pve"
  pm_tls_insecure = true
}
You also need to supply the password, however it is not advisable to supply this as part of the configuration. Sensitive credentials should not be committed to a version control system (like Git). Instead, you can use an environment variable: -
$ export PM_PASS="PR0M0X_P8SS"
You should now be able to configure instances in Proxmox using Terraform.
Creating a template
The Terraform provider can create instances using either the iso option (i.e. a CD-based installer) or via a clone (i.e. a copy of another instance). The former provides little benefit over installing via the GUI. Instead we can create a template instance ready to be cloned, with all the necessary dependencies for Cloud-Init.
There are two ways to achieve this: -
- Create your own instance, install the necessary dependencies and convert to a template
- Use an image with the dependencies installed already.
Proxmox recommend using the same images used for OpenStack, as OpenStack supports Cloud-Init. Also, Proxmox and OpenStack both use KVM for virtualisation, meaning the images use common dependencies and kernel modules.
To create the template, obtain one of the OpenStack images (I am using Debian Buster): -
# Navigate to the ISO directory for Proxmox
$ cd /var/lib/vz/templates/isos

# Source the image
$ wget http://cdimage.debian.org/cdimage/openstack/current-10/debian-10-openstack-amd64.qcow2
Use the following commands to create a template within Proxmox, ready to be cloned: -
# Create the instance
qm create 9000 -name debian-cloudinit -memory 1024 -net0 virtio,bridge=vmbr0 -cores 1 -sockets 1

# Import the OpenStack disk image to Proxmox storage
qm importdisk 9000 debian-10-openstack-amd64.qcow2 local-lvm

# Attach the disk to the virtual machine
qm set 9000 -scsihw virtio-scsi-pci -virtio0 local-lvm:vm-9000-disk-0

# Add a serial output
qm set 9000 -serial0 socket

# Set the bootdisk to the imported Openstack disk
qm set 9000 -boot c -bootdisk virtio0

# Enable the Qemu agent
qm set 9000 -agent 1

# Allow hotplugging of network, USB and disks
qm set 9000 -hotplug disk,network,usb

# Add a single vCPU (for now)
qm set 9000 -vcpus 1

# Add a video output
qm set 9000 -vga qxl

# Set a second hard drive, using the inbuilt cloudinit drive
qm set 9000 -ide2 local-lvm:cloudinit

# Resize the primary boot disk (otherwise it will be around 2G by default)
# This step adds another 8G of disk space, but change this as you need to
qm resize 9000 virtio0 +8G

# Convert the VM to the template
qm template 9000
This template will now be usable with Terraform with the name debian-cloudinit (i.e. the name specified when creating the instance).
Define an instance
You can now create the configuration files for your first Proxmox instance. The below is from the file vm.tf in the terraform/proxmox directory: -
# Source the Cloud Init Config file
data "template_file" "cloud_init_deb10_vm-01" {
  template  = "${file("${path.module}/files/cloud_init_deb10.cloud_config")}"

  vars = {
    ssh_key = file("~/.ssh/id_rsa.pub")
    hostname = "vm-01"
    domain = "yetiops.lab"
  }
}

# Create a local copy of the file, to transfer to Proxmox
resource "local_file" "cloud_init_deb10_vm-01" {
  content   = data.template_file.cloud_init_deb10_vm-01.rendered
  filename  = "${path.module}/files/user_data_cloud_init_deb10_vm-01.cfg"
}

# Transfer the file to the Proxmox Host
resource "null_resource" "cloud_init_deb10_vm-01" {
  connection {
    type    = "ssh"
    user    = "root"
    private_key = file("~/.ssh/id_rsa")
    host    = "10.15.31.7"
  }

  provisioner "file" {
    source       = local_file.cloud_init_deb10_vm-01.filename
    destination  = "/var/lib/vz/snippets/cloud_init_deb10_vm-01.yml"
  }
}


# Create the VM
resource "proxmox_vm_qemu" "vm-01" {
  ## Wait for the cloud-config file to exist

  depends_on = [
    null_resource.cloud_init_deb10_vm-01
  ]

  name = "vm-01"
  target_node = "pve-01"

  # Clone from debian-cloudinit template
  clone = "debian-cloudinit"
  os_type = "cloud-init"

  # Cloud init options
  cicustom = "user=local:snippets/cloud_init_deb10_vm-01.yml"
  ipconfig0 = "ip=10.15.31.99/24,gw=10.15.31.253"

  memory       = 512
  agent        = 1

  # Set the boot disk paramters
  bootdisk = "scsi0"
  scsihw       = "virtio-scsi-pci"

  disk {
    id              = 0
    size            = 10
    type            = "scsi"
    storage         = "local-lvm"
    storage_type    = "lvm"
    iothread        = true
  }

  # Set the network
  network {
    id = 0
    model = "virtio"
    bridge = "vmbr0"
  }

  # Ignore changes to the network
  ## MAC address is generated on every apply, causing
  ## TF to think this needs to be rebuilt on every apply
  lifecycle {
     ignore_changes = [
       network
     ]
  }
}
To summarize the steps being taken here, we are: -
- Source the
cloud-configfile, with steps that the instance should take at first boot- We also supply variables to set the hostname, domain and our SSH key to the instance
- We generate a local file of the template with the variables applied
- We use a
null_resourcein Terraform to copy the file to the Proxmox host- Null Resources are used instead of an existing provider
- The provisioner is used to place the file in the remote location (i.e. the Proxmox host)
- We create a QEMU-based virtual machine
- This depends on the
cloud-configfile being generated and transferred to the Proxmox host - We specify the Proxmox node to build it on
- We tell it to clone the
debian-cloudinitimage (from the Creating a template section) - We use the
cicustomoption to specify ourcloud-configtemplate - We use
ipconfig0to specify the IP of the first network interface - We tell it to have a disk size of 10G
- We create the network, with an ID of 0 (which matches the
ipconfig0ID) - We ignore changes to the network
- This depends on the
The last step is because the Proxmox provider wants to recreate the interface on every apply, as the MAC address is randomly generated each time. You either need to ignore changes so that it doesn’t want to recreate the interface, or specify the MAC address in the network block using the macaddr field, e.g.: -
  # Set the network
  network {
    id = 0
    model = "virtio"
    macaddr = "5a:fe:6c:96:40:61"
    bridge = "vmbr0"
  }
For standalone Proxmox hosts, the target_node will never change. To build on another host, you would need to use a different provider.tf file. If however you are administering a Proxmox cluster (where multiple Proxmox hosts are managed through the same management plane, you can specify a different target_node to the node that Terraform is communicating with.
The target_node name itself can be seen either in Proxmox UI, or by checking the hostname -a command: -
$ hostname -a
pve-01
If you are running a cluster, you can see the available nodes using pvecm nodes: -
$ pvecm nodes

Membership information
~~~~~~~~~~~~~~~~~~~~~~
    Nodeid      Votes Name
         1          1 pve-01
         2          1 pve-02 (local)
Cloud Config
The contents of the cloud-config file are: -
#cloud-config

package_update: true
package_upgrade: true

# APT fails to acquire GPG keys if package dirmngr is missing
bootcmd:
  - [ cloud-init-per, once, dirmngr-aptupdate, apt-get, update ]
  - [ cloud-init-per, once, dirmngr-aptinstall, apt-get, install, dirmngr, -y ]
  - [ cloud-init-per, once, dirmngr-aptinstall, apt-get, install, gnupg2, -y ]

apt:
  sources:
    saltstack.list:
      source: "deb http://repo.saltstack.com/py3/debian/10/amd64/latest buster main"
      filename: saltstack.list
      key: |
        -----BEGIN PGP PUBLIC KEY BLOCK-----
        Version: GnuPG v2

        mQENBFOpvpgBCADkP656H41i8fpplEEB8IeLhugyC2rTEwwSclb8tQNYtUiGdna9
        m38kb0OS2DDrEdtdQb2hWCnswxaAkUunb2qq18vd3dBvlnI+C4/xu5ksZZkRj+fW
        tArNR18V+2jkwcG26m8AxIrT+m4M6/bgnSfHTBtT5adNfVcTHqiT1JtCbQcXmwVw
        WbqS6v/LhcsBE//SHne4uBCK/GHxZHhQ5jz5h+3vWeV4gvxS3Xu6v1IlIpLDwUts
        kT1DumfynYnnZmWTGc6SYyIFXTPJLtnoWDb9OBdWgZxXfHEcBsKGha+bXO+m2tHA
        gNneN9i5f8oNxo5njrL8jkCckOpNpng18BKXABEBAAG0MlNhbHRTdGFjayBQYWNr
        YWdpbmcgVGVhbSA8cGFja2FnaW5nQHNhbHRzdGFjay5jb20+iQE4BBMBAgAiBQJT
        qb6YAhsDBgsJCAcDAgYVCAIJCgsEFgIDAQIeAQIXgAAKCRAOCKFJ3le/vhkqB/0Q
        WzELZf4d87WApzolLG+zpsJKtt/ueXL1W1KA7JILhXB1uyvVORt8uA9FjmE083o1
        yE66wCya7V8hjNn2lkLXboOUd1UTErlRg1GYbIt++VPscTxHxwpjDGxDB1/fiX2o
        nK5SEpuj4IeIPJVE/uLNAwZyfX8DArLVJ5h8lknwiHlQLGlnOu9ulEAejwAKt9CU
        4oYTszYM4xrbtjB/fR+mPnYh2fBoQO4d/NQiejIEyd9IEEMd/03AJQBuMux62tjA
        /NwvQ9eqNgLw9NisFNHRWtP4jhAOsshv1WW+zPzu3ozoO+lLHixUIz7fqRk38q8Q
        9oNR31KvrkSNrFbA3D89uQENBFOpvpgBCADJ79iH10AfAfpTBEQwa6vzUI3Eltqb
        9aZ0xbZV8V/8pnuU7rqM7Z+nJgldibFk4gFG2bHCG1C5aEH/FmcOMvTKDhJSFQUx
        uhgxttMArXm2c22OSy1hpsnVG68G32Nag/QFEJ++3hNnbyGZpHnPiYgej3FrerQJ
        zv456wIsxRDMvJ1NZQB3twoCqwapC6FJE2hukSdWB5yCYpWlZJXBKzlYz/gwD/Fr
        GL578WrLhKw3UvnJmlpqQaDKwmV2s7MsoZogC6wkHE92kGPG2GmoRD3ALjmCvN1E
        PsIsQGnwpcXsRpYVCoW7e2nW4wUf7IkFZ94yOCmUq6WreWI4NggRcFC5ABEBAAGJ
        AR8EGAECAAkFAlOpvpgCGwwACgkQDgihSd5Xv74/NggA08kEdBkiWWwJZUZEy7cK
        WWcgjnRuOHd4rPeT+vQbOWGu6x4bxuVf9aTiYkf7ZjVF2lPn97EXOEGFWPZeZbH4
        vdRFH9jMtP+rrLt6+3c9j0M8SIJYwBL1+CNpEC/BuHj/Ra/cmnG5ZNhYebm76h5f
        T9iPW9fFww36FzFka4VPlvA4oB7ebBtquFg3sdQNU/MmTVV4jPFWXxh4oRDDR+8N
        1bcPnbB11b5ary99F/mqr7RgQ+YFF0uKRE3SKa7a+6cIuHEZ7Za+zhPaQlzAOZlx
        fuBmScum8uQTrEF5+Um5zkwC7EXTdH1co/+/V/fpOtxIg4XO4kcugZefVm5ERfVS
        MA==
        =dtMN
        -----END PGP PUBLIC KEY BLOCK-----

packages:
  - jq
  - curl
  - qemu-guest-agent
  - salt-minion

users:
- name: stuart
  groups: sudo
  shell: /bin/bash
  sudo: ['ALL=(ALL) NOPASSWD:ALL']
  ssh_authorized_keys:
    - ${ssh_key}

preserve_hostname: false
manage_etc_hosts: false
fqdn: ${hostname}.${domain}

configsalt:
  - &config_salt |
    echo "master: salt-master.${domain}" >> /etc/salt/minion
    echo "domain: ${domain}" >> /etc/salt/grains
    echo "startup_states: 'highstate'" >> /etc/salt/minion
    echo "id: ${hostname}.${domain}" >> /etc/salt/minion
    hostnamectl set-hostname "${hostname}.${domain}" > /etc/hostname

restartsalt:
  - &restart_salt |
    systemctl restart salt-minion.service

runcmd:
 - [ sh, -c, *config_salt ]
 - [ sh, -c, *restart_salt ]
There are a few points to note in this: -
- The
bootcmdsection specifies commands that run before any other section- This is required here because Debian Cloud images do not include
gnupg2ordirmngrby default, meaning adding GPG keys for additional repositories (like the Salt repository) will fail
- This is required here because Debian Cloud images do not include
- We add the official Salt Debian repository to get the latest version of the Salt Minion
- The
runcmdsection will run user-created sections, which will always run last- This means that we can install packages and then configure them afterwards, without worrying about whether the package installation will override the configuration files
I also add myself as a user, so that if the cloud-config file fails, it is possible to troubleshoot. By default, the Debian image has no default password you can use, requiring SSH keys for the primary user.
We also configure Salt, ready for joining to our existing Salt server.
Build the instance
Now that we have defined the instance within Terraform, we can go ahead and build it: -
$ terraform apply
data.template_file.cloud_init_deb10_vm-01: Refreshing state...

An execution plan has been generated and is shown below.
Resource actions are indicated with the following symbols:
  + create

Terraform will perform the following actions:

  # local_file.cloud_init_deb10_vm-01 will be created
  + resource "local_file" "cloud_init_deb10_vm-01" {
      + content              = <<~EOT
            #cloud-config

            package_update: true
            package_upgrade: true

            # APT fails to acquire GPG keys if package dirmngr is missing
            bootcmd:
              - [ cloud-init-per, once, dirmngr-aptupdate, apt-get, update ]
              - [ cloud-init-per, once, dirmngr-aptinstall, apt-get, install, dirmngr, -y ]
              - [ cloud-init-per, once, dirmngr-aptinstall, apt-get, install, gnupg2, -y ]

            apt:
              sources:
                saltstack.list:
                  source: "deb http://repo.saltstack.com/py3/debian/10/amd64/latest buster main"
                  filename: saltstack.list
                  key: |
                    -----BEGIN PGP PUBLIC KEY BLOCK-----
                    Version: GnuPG v2

                    mQENBFOpvpgBCADkP656H41i8fpplEEB8IeLhugyC2rTEwwSclb8tQNYtUiGdna9
                    m38kb0OS2DDrEdtdQb2hWCnswxaAkUunb2qq18vd3dBvlnI+C4/xu5ksZZkRj+fW
                    tArNR18V+2jkwcG26m8AxIrT+m4M6/bgnSfHTBtT5adNfVcTHqiT1JtCbQcXmwVw
                    WbqS6v/LhcsBE//SHne4uBCK/GHxZHhQ5jz5h+3vWeV4gvxS3Xu6v1IlIpLDwUts
                    kT1DumfynYnnZmWTGc6SYyIFXTPJLtnoWDb9OBdWgZxXfHEcBsKGha+bXO+m2tHA
                    gNneN9i5f8oNxo5njrL8jkCckOpNpng18BKXABEBAAG0MlNhbHRTdGFjayBQYWNr
                    YWdpbmcgVGVhbSA8cGFja2FnaW5nQHNhbHRzdGFjay5jb20+iQE4BBMBAgAiBQJT
                    qb6YAhsDBgsJCAcDAgYVCAIJCgsEFgIDAQIeAQIXgAAKCRAOCKFJ3le/vhkqB/0Q
                    WzELZf4d87WApzolLG+zpsJKtt/ueXL1W1KA7JILhXB1uyvVORt8uA9FjmE083o1
                    yE66wCya7V8hjNn2lkLXboOUd1UTErlRg1GYbIt++VPscTxHxwpjDGxDB1/fiX2o
                    nK5SEpuj4IeIPJVE/uLNAwZyfX8DArLVJ5h8lknwiHlQLGlnOu9ulEAejwAKt9CU
                    4oYTszYM4xrbtjB/fR+mPnYh2fBoQO4d/NQiejIEyd9IEEMd/03AJQBuMux62tjA
                    /NwvQ9eqNgLw9NisFNHRWtP4jhAOsshv1WW+zPzu3ozoO+lLHixUIz7fqRk38q8Q
                    9oNR31KvrkSNrFbA3D89uQENBFOpvpgBCADJ79iH10AfAfpTBEQwa6vzUI3Eltqb
                    9aZ0xbZV8V/8pnuU7rqM7Z+nJgldibFk4gFG2bHCG1C5aEH/FmcOMvTKDhJSFQUx
                    uhgxttMArXm2c22OSy1hpsnVG68G32Nag/QFEJ++3hNnbyGZpHnPiYgej3FrerQJ
                    zv456wIsxRDMvJ1NZQB3twoCqwapC6FJE2hukSdWB5yCYpWlZJXBKzlYz/gwD/Fr
                    GL578WrLhKw3UvnJmlpqQaDKwmV2s7MsoZogC6wkHE92kGPG2GmoRD3ALjmCvN1E
                    PsIsQGnwpcXsRpYVCoW7e2nW4wUf7IkFZ94yOCmUq6WreWI4NggRcFC5ABEBAAGJ
                    AR8EGAECAAkFAlOpvpgCGwwACgkQDgihSd5Xv74/NggA08kEdBkiWWwJZUZEy7cK
                    WWcgjnRuOHd4rPeT+vQbOWGu6x4bxuVf9aTiYkf7ZjVF2lPn97EXOEGFWPZeZbH4
                    vdRFH9jMtP+rrLt6+3c9j0M8SIJYwBL1+CNpEC/BuHj/Ra/cmnG5ZNhYebm76h5f
                    T9iPW9fFww36FzFka4VPlvA4oB7ebBtquFg3sdQNU/MmTVV4jPFWXxh4oRDDR+8N
                    1bcPnbB11b5ary99F/mqr7RgQ+YFF0uKRE3SKa7a+6cIuHEZ7Za+zhPaQlzAOZlx
                    fuBmScum8uQTrEF5+Um5zkwC7EXTdH1co/+/V/fpOtxIg4XO4kcugZefVm5ERfVS
                    MA==
                    =dtMN
                    -----END PGP PUBLIC KEY BLOCK-----

            packages:
              - jq
              - curl
              - qemu-guest-agent
              - salt-minion

            users:
            - name: stuart
              groups: sudo
              shell: /bin/bash
              sudo: ['ALL=(ALL) NOPASSWD:ALL']
              ssh_authorized_keys:
                - ssh-rsa ###SSH PUBLIC KEY### stuh84@symphonyx


            preserve_hostname: false
            manage_etc_hosts: false
            fqdn: vm-01.yetiops.lab

            configsalt:
              - &config_salt |
                echo "master: salt-master.yetiops.lab" >> /etc/salt/minion
                echo "domain: yetiops.lab" >> /etc/salt/grains
                echo "startup_states: 'highstate'" >> /etc/salt/minion
                echo "id: vm-01.yetiops.lab" >> /etc/salt/minion
                hostnamectl set-hostname "vm-01.yetiops.lab" > /etc/hostname

            restartsalt:
              - &restart_salt |
                systemctl restart salt-minion.service

            runcmd:
             - [ sh, -c, *config_salt ]
             - [ sh, -c, *restart_salt ]
        EOT
      + directory_permission = "0777"
      + file_permission      = "0777"
      + filename             = "./files/user_data_cloud_init_deb10_vm-01.cfg"
      + id                   = (known after apply)
    }

  # null_resource.cloud_init_deb10_vm-01 will be created
  + resource "null_resource" "cloud_init_deb10_vm-01" {
      + id = (known after apply)
    }

  # proxmox_vm_qemu.vm-01 will be created
  + resource "proxmox_vm_qemu" "vm-01" {
      + agent        = 0
      + balloon      = 0
      + bios         = "seabios"
      + boot         = "cdn"
      + bootdisk     = "scsi0"
      + cicustom     = "user=local:snippets/cloud_init_deb10_vm-01.yml"
      + clone        = "debian-cloudinit"
      + clone_wait   = 15
      + cores        = 1
      + cpu          = "host"
      + force_create = false
      + full_clone   = true
      + hotplug      = "network,disk,usb"
      + id           = (known after apply)
      + ipconfig0    = "ip=10.15.31.99/24,gw=10.15.31.253"
      + kvm          = true
      + memory       = 512
      + name         = "vm-01"
      + numa         = false
      + onboot       = true
      + os_type      = "cloud-init"
      + preprovision = true
      + scsihw       = "virtio-scsi-pci"
      + sockets      = 1
      + ssh_host     = (known after apply)
      + ssh_port     = (known after apply)
      + target_node  = "pve-01"
      + vcpus        = 0
      + vlan         = -1
      + vmid         = 0

      + disk {
          + backup       = false
          + cache        = "none"
          + format       = "raw"
          + id           = 0
          + iothread     = true
          + mbps         = 0
          + mbps_rd      = 0
          + mbps_rd_max  = 0
          + mbps_wr      = 0
          + mbps_wr_max  = 0
          + replicate    = false
          + size         = "10"
          + storage      = "local-lvm"
          + storage_type = "lvm"
          + type         = "scsi"
        }

      + network {
          + bridge    = "vmbr0"
          + firewall  = false
          + id        = 0
          + link_down = false
          + macaddr   = (known after apply)
          + model     = "virtio"
          + queues    = -1
          + rate      = -1
          + tag       = -1
        }
    }

Plan: 3 to add, 0 to change, 0 to destroy.

Do you want to perform these actions?
  Terraform will perform the actions described above.
  Only 'yes' will be accepted to approve.

  Enter a value: yes

local_file.cloud_init_deb10_vm-01: Creating...
local_file.cloud_init_deb10_vm-01: Creation complete after 0s [id=ba8ba5e0ff96906173046a818ba8305964d84315]
null_resource.cloud_init_deb10_vm-01: Creating...
null_resource.cloud_init_deb10_vm-01: Provisioning with 'file'...
null_resource.cloud_init_deb10_vm-01: Creation complete after 0s [id=6696639824705285611]
proxmox_vm_qemu.vm-01: Creating...
proxmox_vm_qemu.vm-01: Still creating... [10s elapsed]
proxmox_vm_qemu.vm-01: Still creating... [20s elapsed]
proxmox_vm_qemu.vm-01: Still creating... [30s elapsed]
proxmox_vm_qemu.vm-01: Still creating... [40s elapsed]
proxmox_vm_qemu.vm-01: Still creating... [50s elapsed]
proxmox_vm_qemu.vm-01: Creation complete after 56s [id=pve-01/qemu/100]

Apply complete! Resources: 3 added, 0 changed, 0 destroyed.
We can double check that Terraform is managing these resources now with terraform state list: -
$ terraform state list
data.template_file.cloud_init_deb10_vm-01
local_file.cloud_init_deb10_vm-01
null_resource.cloud_init_deb10_vm-01
proxmox_vm_qemu.vm-01
There are far fewer resources created than in some recent posts (like the OpenStack post). This is because we are only managing the hypervisor. Any security groups, firewall policies, public IP allocations and otherwise are managed by other infrastructure in your network.
We can check to see if the instance is in the Proxmox UI: -
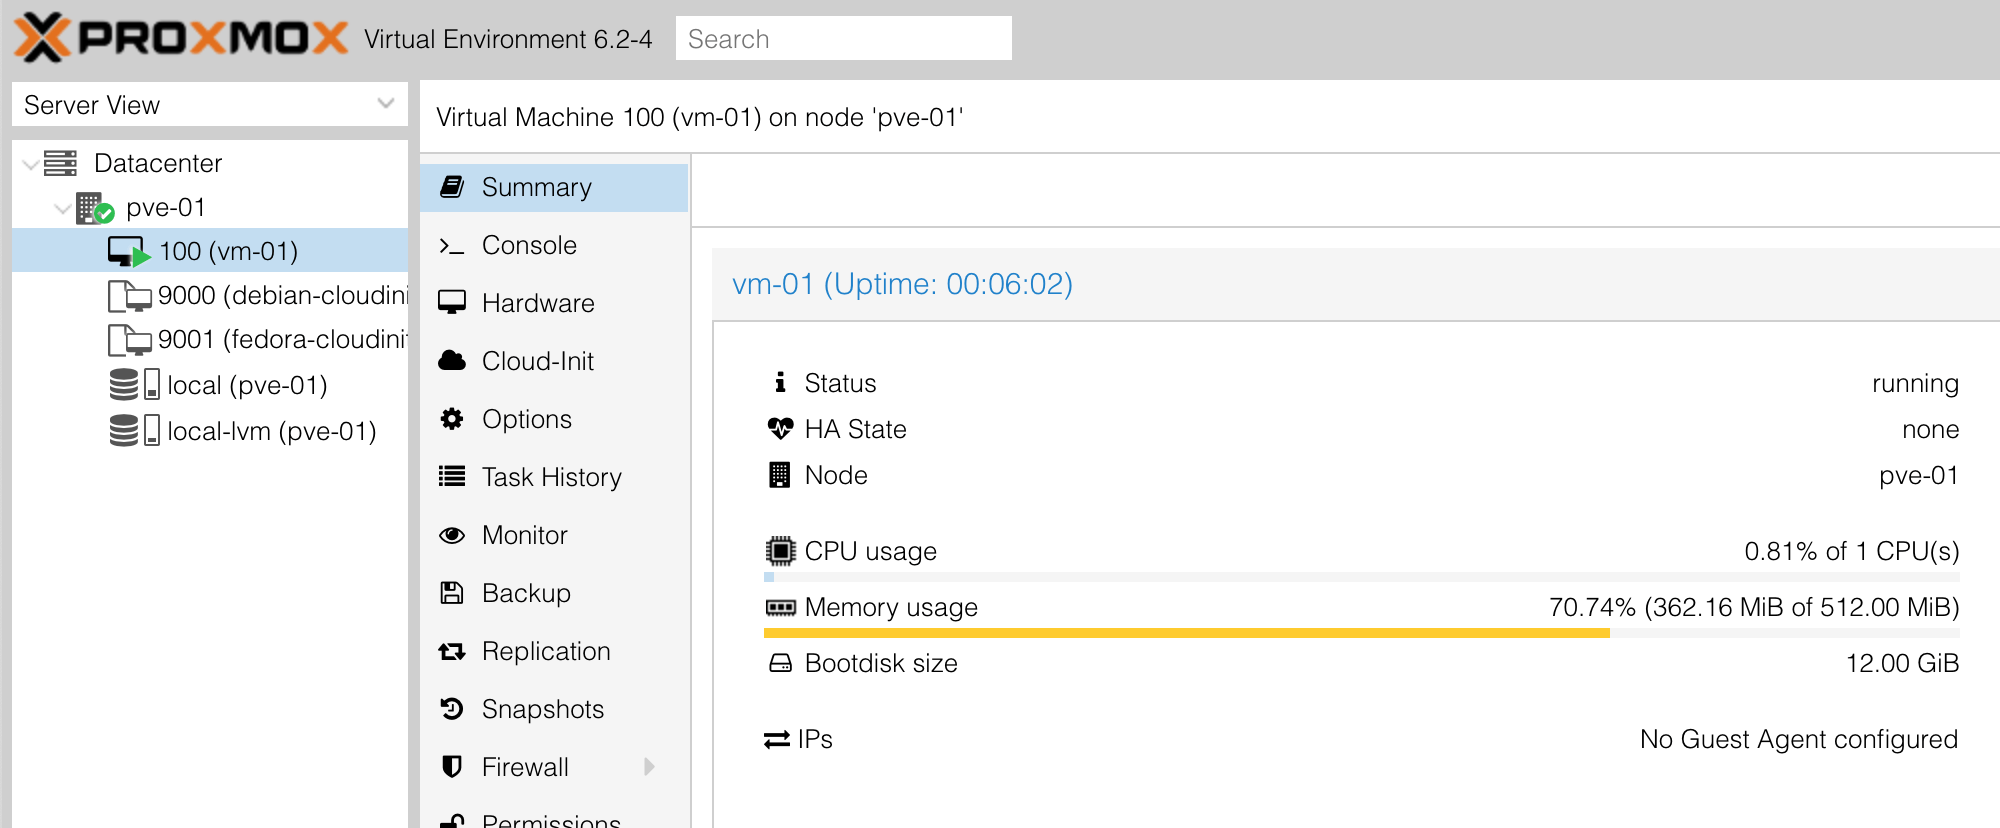
Alternatively, we can verify this with qm list on the Proxmox node: -
$ qm list
      VMID NAME                 STATUS     MEM(MB)    BOOTDISK(GB) PID
       100 vm-01                running    512               12.00 1888
      9000 debian-cloudinit     stopped    1024              12.00 0
      9001 fedora-cloudinit     stopped    1024              12.00 0
Salt
The Salt setup and states are the same as we used in this post. We use Salt to: -
- Turn the Salt server itself into a Consul server as well
- Deploy the Consul and Node Exporter SystemD states to the Debian instance deployed on Proxmox in the previous steps
In the Terraform section, we used cloud-config to deploy the latest version of Salt and to customise the Minion configuration. The generated configuration would be: -
/etc/salt/minion
master: salt-master.yetiops.lab
startup_states: 'highstate'
id: vm-01.yetiops.lab
/etc/salt/grains
domain: yetiops.lab
This will: -
- Register the instance with the Salt server (
salt-master.yetiops.lab) - Use the
idofvm-01.yetiops.lab - Assign a grain (similar to a fact in Ansible) of the domain (
yetiops.lab) - Run a highstate as a startup state
The latter means that when the minion on the instance is registered and accepted by the Salt server, it will automatically run a highstate (i.e. run all matching Salt states)
Accept the key
To accept the minion on the master, we need to check that it has registered first: -
$ sudo salt-key -L
Accepted Keys:
pve-01.yetiops.lab
salt-master.yetiops.lab
Denied Keys:
Unaccepted Keys:
vm-01.yetiops.lab <----
Rejected Keys:
Now we can accept the key: -
$ sudo salt-key -a 'vm-01*'
The following keys are going to be accepted:
Unaccepted Keys:
vm-01.yetiops.lab
Proceed? [n/Y] y
Key for minion vm-01.yetiops.lab accepted.
We can check what states will be applied to this minion as well: -
$ sudo salt 'vm-01*' state.show_states
vm-01.yetiops.lab:
    - consul
    - exporters.node_exporter.systemd
Verify the highstate
As mentioned, the Minion configuration specifies that it will run a highstate when the key is accepted. We can verify this by looking at if it has registered with Consul and the Node Exporter is running: -
$ consul members
Node               Address            Status  Type    Build  Protocol  DC       Segment
salt-master        10.15.31.249:8301  alive   server  1.8.1  2         yetiops  <all>
pve-01             10.15.31.7:8301    alive   client  1.8.1  2         yetiops  <default>
vm-01.yetiops.lab  10.15.31.154:8301  alive   client  1.8.1  2         yetiops  <default>

$ curl 10.15.31.99:9100/metrics | grep -i uname
# HELP node_uname_info Labeled system information as provided by the uname system call.
# TYPE node_uname_info gauge
node_uname_info{domainname="(none)",machine="x86_64",nodename="vm-01.yetiops.lab",release="4.19.0-10-cloud-amd64",sysname="Linux",version="#1 SMP Debian 4.19.132-1 (2020-07-24)"} 1
Looks like it has! Interestingly though, the machine has two different IPv4 addresses. This is because the machine has obtained an IPv4 address from DHCP, while also having an IPv4 address configured by cloud-init (the ipconfig0 field in Terraform).
As a last step of verification, we can run another highstate to ensure that no configuration files change, or any other packages are due to be installed: -
$ sudo salt 'vm-01*' state.highstate
vm-01.yetiops.lab:
----------
          ID: consul_binary
    Function: archive.extracted
        Name: /usr/local/bin
      Result: True
     Comment: Path /usr/local/bin/consul exists
     Started: 18:50:01.095502
    Duration: 1.162 ms
     Changes:
----------
          ID: consul_user
    Function: user.present
        Name: consul
      Result: True
     Comment: User consul is present and up to date
     Started: 18:50:01.097816
    Duration: 20.027 ms
     Changes:
----------
          ID: consul_group
    Function: group.present
        Name: consul
      Result: True
     Comment: Group consul is present and up to date
     Started: 18:50:01.118905
    Duration: 5.06 ms
     Changes:
----------
          ID: /etc/systemd/system/consul.service
    Function: file.managed
      Result: True
     Comment: File /etc/systemd/system/consul.service is in the correct state
     Started: 18:50:01.127738
    Duration: 23.481 ms
     Changes:
----------
          ID: /opt/consul
    Function: file.directory
      Result: True
     Comment: The directory /opt/consul is in the correct state
     Started: 18:50:01.151374
    Duration: 1.958 ms
     Changes:
----------
          ID: /etc/consul.d
    Function: file.directory
      Result: True
     Comment: The directory /etc/consul.d is in the correct state
     Started: 18:50:01.153452
    Duration: 1.072 ms
     Changes:
----------
          ID: /etc/consul.d/consul.hcl
    Function: file.managed
      Result: True
     Comment: File /etc/consul.d/consul.hcl is in the correct state
     Started: 18:50:01.154636
    Duration: 14.47 ms
     Changes:
----------
          ID: consul_service
    Function: service.running
        Name: consul
      Result: True
     Comment: The service consul is already running
     Started: 18:50:01.191179
    Duration: 56.911 ms
     Changes:
----------
          ID: /etc/consul.d/node_exporter.hcl
    Function: file.managed
      Result: True
     Comment: File /etc/consul.d/node_exporter.hcl is in the correct state
     Started: 18:50:01.248345
    Duration: 22.7 ms
     Changes:
----------
          ID: consul_reload_node_exporter
    Function: cmd.run
        Name: consul reload
      Result: True
     Comment: Command "consul reload" run
     Started: 18:50:01.272477
    Duration: 236.698 ms
     Changes:
              ----------
              pid:
                  3396
              retcode:
                  0
              stderr:
              stdout:
                  Configuration reload triggered
----------
          ID: node_exporter_user
    Function: user.present
        Name: node_exporter
      Result: True
     Comment: User node_exporter is present and up to date
     Started: 18:50:01.509440
    Duration: 4.356 ms
     Changes:
----------
          ID: node_exporter_group
    Function: group.present
        Name: node_exporter
      Result: True
     Comment: Group node_exporter is present and up to date
     Started: 18:50:01.513927
    Duration: 0.839 ms
     Changes:
----------
          ID: /opt/prometheus/exporters/dist/textfile
    Function: file.directory
      Result: True
     Comment: The directory /opt/prometheus/exporters/dist/textfile is in the correct state
     Started: 18:50:01.514882
    Duration: 2.038 ms
     Changes:
----------
          ID: /etc/systemd/system/node_exporter.service
    Function: file.managed
      Result: True
     Comment: File /etc/systemd/system/node_exporter.service is in the correct state
     Started: 18:50:01.517043
    Duration: 12.165 ms
     Changes:
----------
          ID: node_exporter_service_reload
    Function: cmd.run
        Name: systemctl daemon-reload
      Result: True
     Comment: Command "systemctl daemon-reload" run
     Started: 18:50:01.529790
    Duration: 200.263 ms
     Changes:
              ----------
              pid:
                  3410
              retcode:
                  0
              stderr:
              stdout:
----------
          ID: node_exporter_service
    Function: service.running
        Name: node_exporter
      Result: True
     Comment: The service node_exporter is already running
     Started: 18:50:01.730351
    Duration: 22.961 ms
     Changes:

Summary for vm-01.yetiops.lab
-------------
Succeeded: 16 (changed=2)
Failed:     0
-------------
Total states run:     16
Total run time:  626.161 ms
The only changes are two states which reload both Consul itself, and also running a systemctl daemon-reload (which is used for when SystemD unit files change). We could further improve the state files so that these only run when other files change.
Monitoring the hypervisor
Not only can you monitor the instances running on Proxmox, but you can monitor Proxmox itself. Proxmox is based upon Debian, the current version (6.2 at the time of writing) running on Debian Buster. As far as our current Salt states are concerned, it is configured the same way as any other Debian machine.
This means we can install Consul on the Proxmox hosts, register them with the Consul server, and also run the Prometheus Node Exporter on them to retrieve node metrics: -
/etc/salt/minion
master: salt-master.yetiops.lab
id: pve-01.yetiops.lab
nodename: pve-01
Accept the key in Salt
$ sudo salt-key -L
Accepted Keys:
vm-01.yetiops.lab
salt-master.yetiops.lab
Denied Keys:
Unaccepted Keys:
pve-01.yetiops.lab
Rejected Keys:

$ sudo salt-key -a 'pve-01*'
The following keys are going to be accepted:
Unaccepted Keys:
pve-01.yetiops.lab
Proceed? [n/Y] y
Key for minion pve-01.yetiops.lab accepted.
Check the applied states
$ sudo salt 'pve-01*' state.show_states
pve-01.yetiops.lab:
    - consul
    - exporters.node_exporter.systemd
Check that Consul and Node Exporter works as expected
$ consul members
Node               Address            Status  Type    Build  Protocol  DC       Segment
salt-master        10.15.31.249:8301  alive   server  1.8.1  2         yetiops  <all>
pve-01             10.15.31.7:8301    alive   client  1.8.1  2         yetiops  <default>
vm-01.yetiops.lab  10.15.31.154:8301  alive   client  1.8.1  2         yetiops  <default>

$ curl 10.15.31.7:9100/metrics | grep -i uname
# HELP node_uname_info Labeled system information as provided by the uname system call.
# TYPE node_uname_info gauge
node_uname_info{domainname="(none)",machine="x86_64",nodename="pve-01",release="5.4.34-1-pve",sysname="Linux",version="#1 SMP PVE 5.4.34-2 (Thu, 07 May 2020 10:02:02 +0200)"} 1
Proxmox Metrics
In addition, we can also use the Prometheus PVE Exporter to monitor Proxmox-specific metrics. This is deployed like so: -
Salt State
install_pve_exporter:
  pip.installed:
    - name: prometheus-pve-exporter
    - user: root
    - reload_modules: True

prometheus_user:
  user.present:
    - name: prometheus
    - fullname: Prometheus
    - shell: /bin/false

/etc/prometheus/exporters:
  file.directory:
    - user: prometheus
    - group: prometheus
    - mode: 755
    - makedirs: True

/etc/prometheus/exporters/pve.yaml:
  file.managed:
    - source: salt://exporters/pve_exporter/files/pve.yaml.j2
    - user: prometheus
    - group: prometheus
    - mode: 0644
    - template: jinja

/etc/systemd/system/pve_exporter.service:
  file.managed:
    - source: salt://exporters/pve_exporter/files/pve_exporter.service.j2
    - user: root
    - group: root
    - mode: 0644
    - template: jinja

pve_exporter_service_reload:
  cmd.run:
    - name: systemctl daemon-reload
    - watch:
      - file: /etc/systemd/system/pve_exporter.service

pve_exporter_service:
  service.running:
  - name: pve_exporter
  - enable: True
The exporter is built using Python, which can be installed using Python’s PIP package/module management utility. We also include a state that will install PIP if it is not present already: -
/srv/salt/states/pip/init.sls
python3-pip:
  pkg.installed
The service file is a SystemD unit file: -
/srv/salt/states/exporters/pve_exporter/files/pve_exporter.service.j2
[Unit]
Description=Prometheus PVE Exporter
After=network.target

[Service]
User=prometheus
Group=prometheus
Type=simple
ExecStart=/usr/local/bin/pve_exporter /etc/prometheus/exporters/pve.yaml

[Install]
WantedBy=multi-user.target
The pve_exporter uses a YAML configuration file of its own. This defines the Proxmox user and password that is used to authenticate against the Proxmox API. We also use verify_ssl: false because we are using self-signed certificates for the Proxmox API (it is recommended to use a certificate signed by a verified certificate authority in production): -
/srv/salt/states/exporters/pve_exporter/files/pve.yaml.j2
$ cat files/pve.yaml.j2
default:
  user: {{ pillar['exporters']['pve_exporter']['username'] }}
  password: {{ pillar['exporters']['pve_exporter']['password'] }}
  verify_ssl: false
The pillars specific to this are: -
/srv/salt/pillars/exporters/proxmox.sls
exporters:
  pve_exporter:
    username: 'pve_monitor@pve'
    password: '###PASSWORD###'
You can create this user with the below: -
# Create the user
pveum user add pve_monitor@pve --password $PASSWORD

# Assign the user the correct role
pveum aclmod / -user pve_monitor@pve -role PVEAuditor
The PVEAuditor role is read-only, which is more than sufficient for monitoring.
Finally, we apply the following Consul pillar to Proxmox: -
/srv/salt/pillars/consul/consul-proxmox.sls
consul:
  prometheus_services:
  - pve_exporter
  - node_exporter
This means that when the Consul state is applied, it deploys both the node_exporter.hcl Consul service file, and the pve_exporter.hcl Consul service file: -
/srv/salt/states/consul/services/files/pve_exporter.hcl
{"service":
  {"name": "pve_exporter",
   "tags": ["pve_exporter", "prometheus-pve"],
   "port": 9221
  }
}
We can verify if this service is available in Consul like so: -
$ consul catalog services -node=pve-01
node_exporter
pve_exporter

$ consul catalog nodes -service=pve_exporter
Node    ID        Address     DC
pve-01  1e41c350  10.15.31.7  yetiops
Prometheus
Proxmox Instances
We use the mostly the same Prometheus configuration as in this post. This uses Consul for service discovery, as well as monitoring Prometheus itself: -
global:
  scrape_interval:     15s
  evaluation_interval: 15s

alerting:
  alertmanagers:
  - static_configs:
    - targets:
      - localhost:9093

rule_files:
  - 'alerts/*.yml'
  - 'rules/*.yml'

scrape_configs:
  - job_name: 'prometheus'
    static_configs:
    - targets:
      - 'localhost:9090'
  - job_name: 'consul'
    consul_sd_configs:
      - server: '10.15.31.249:8500'
    relabel_configs:
      - source_labels: [__meta_consul_tags]
        regex: .*,prometheus,.*
        action: keep
      - source_labels: [__meta_consul_service]
        target_label: job
      - action: labelmap
        regex: __meta_consul_(.+)
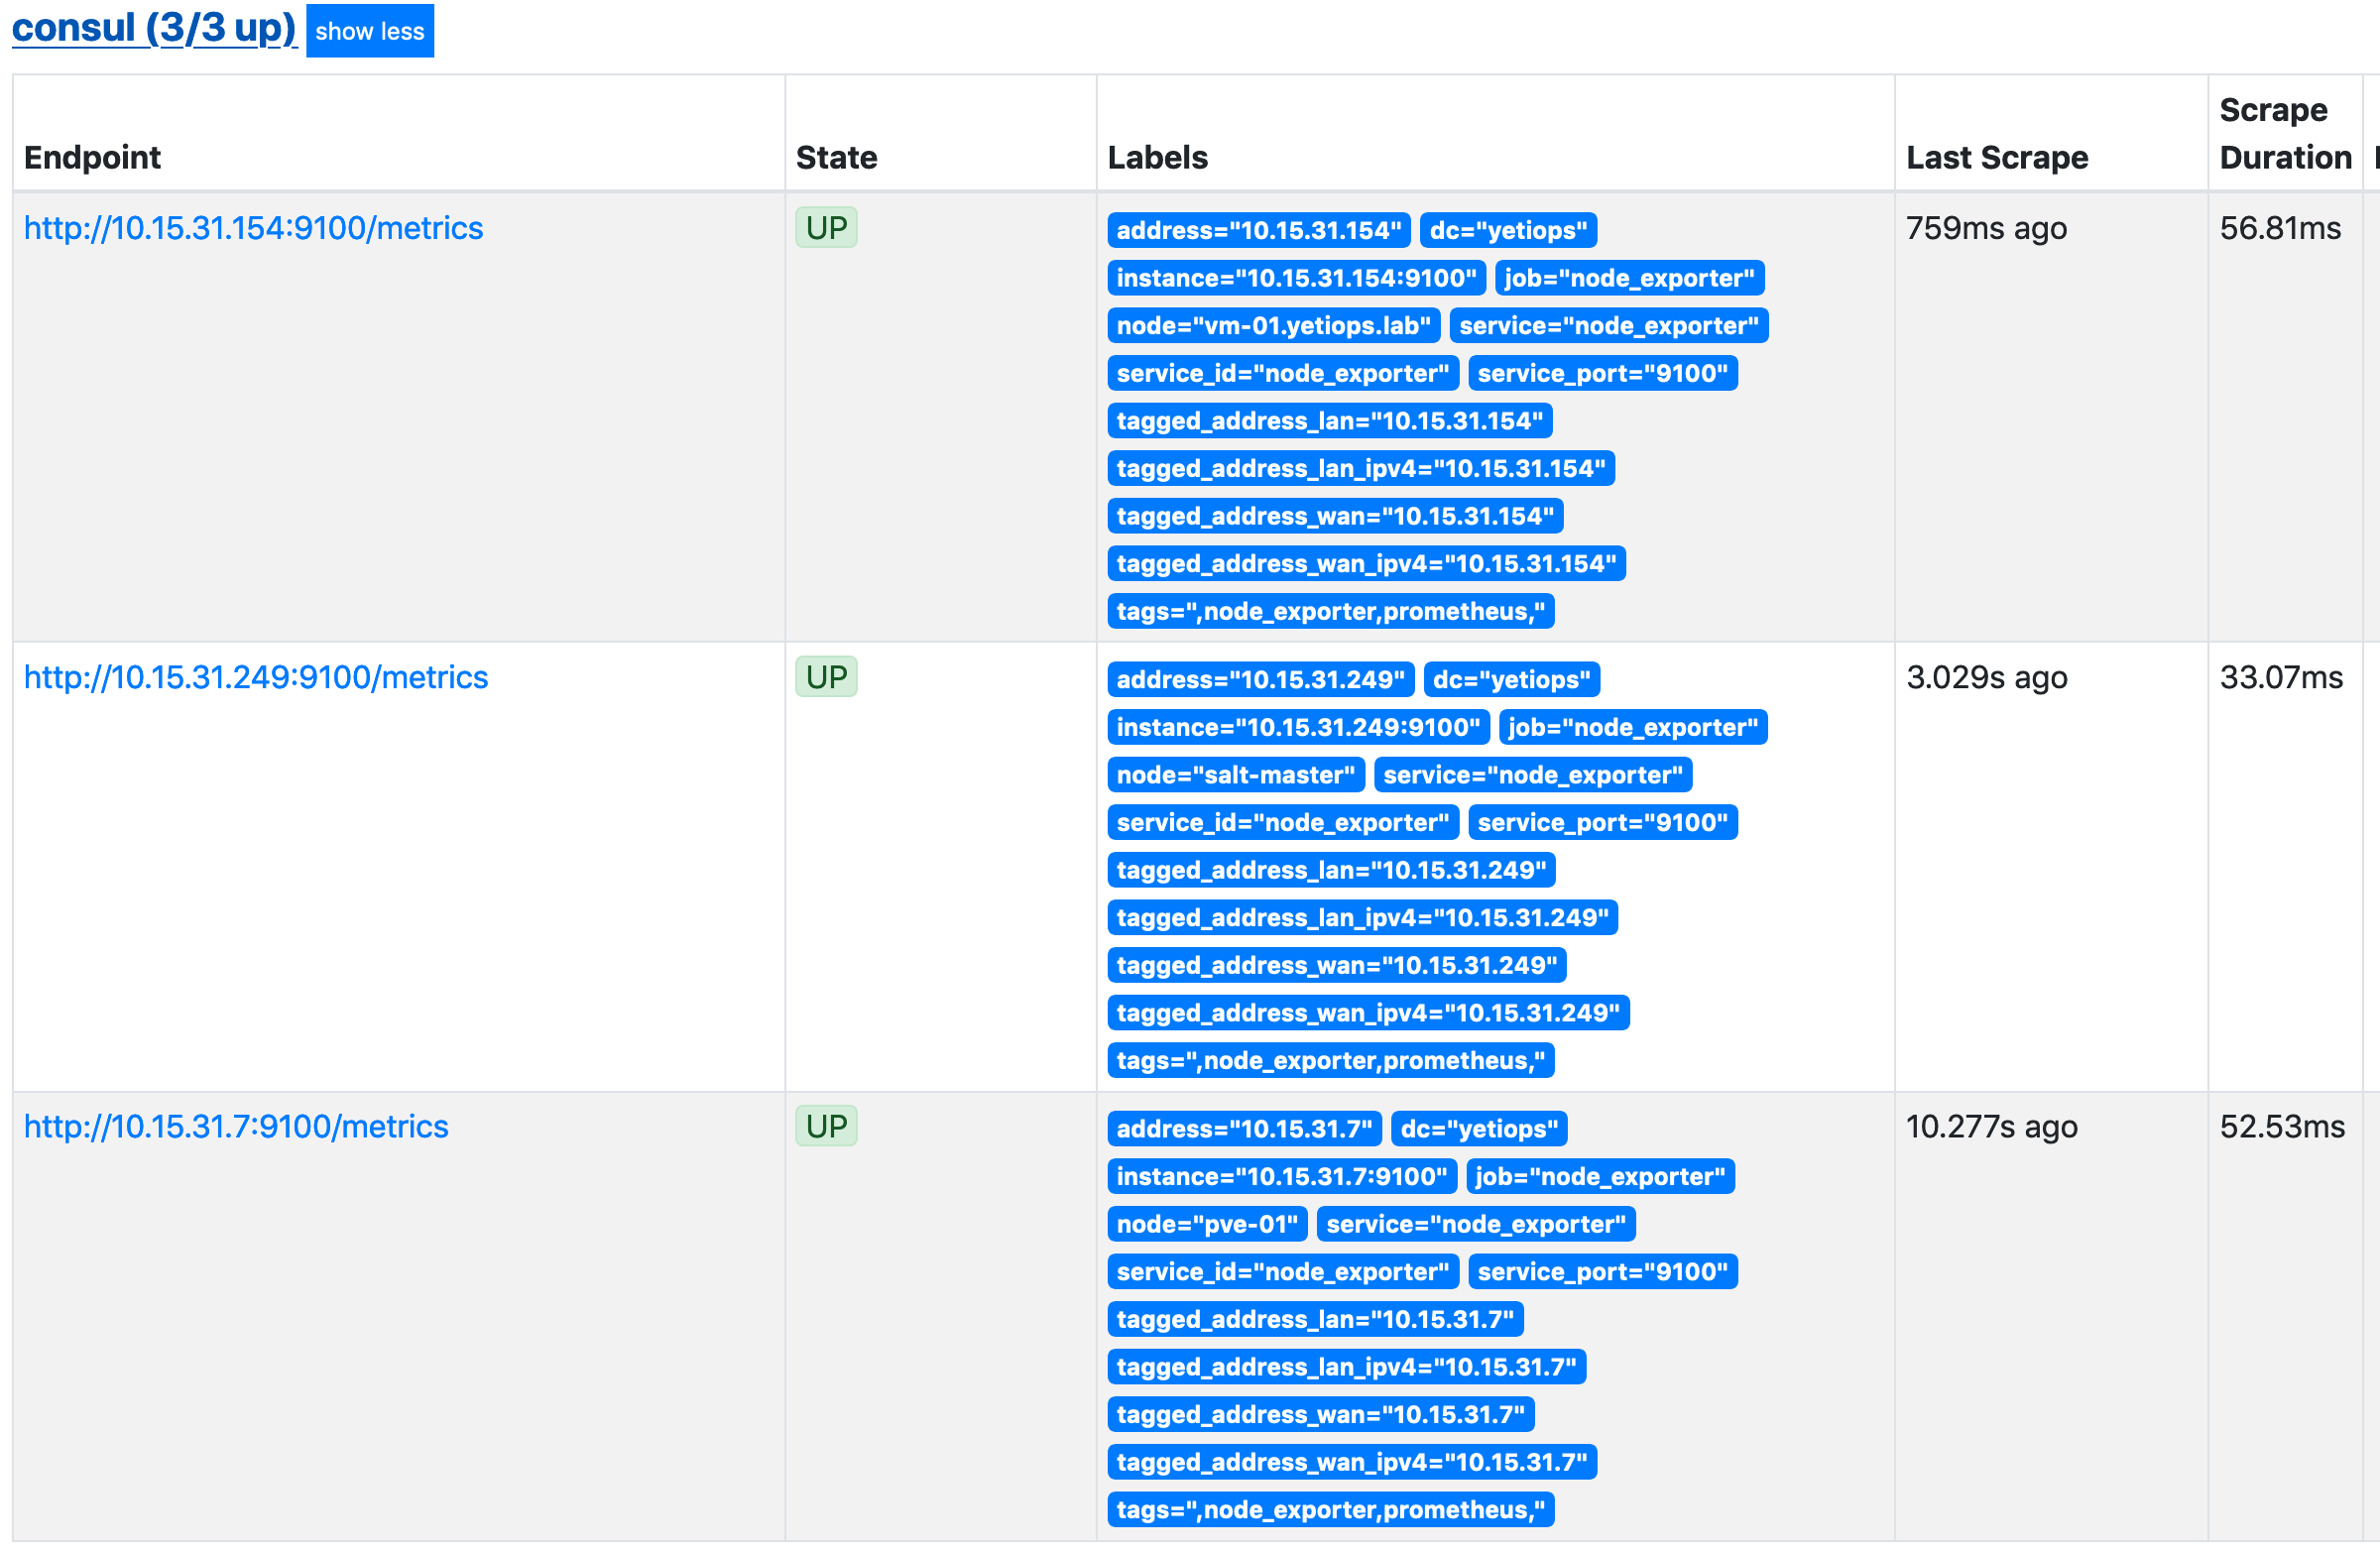
As SaltStack has already deployed Consul and the Node Exporter for us, we should already be able to see the vm-01 instance in our Prometheus targets: -
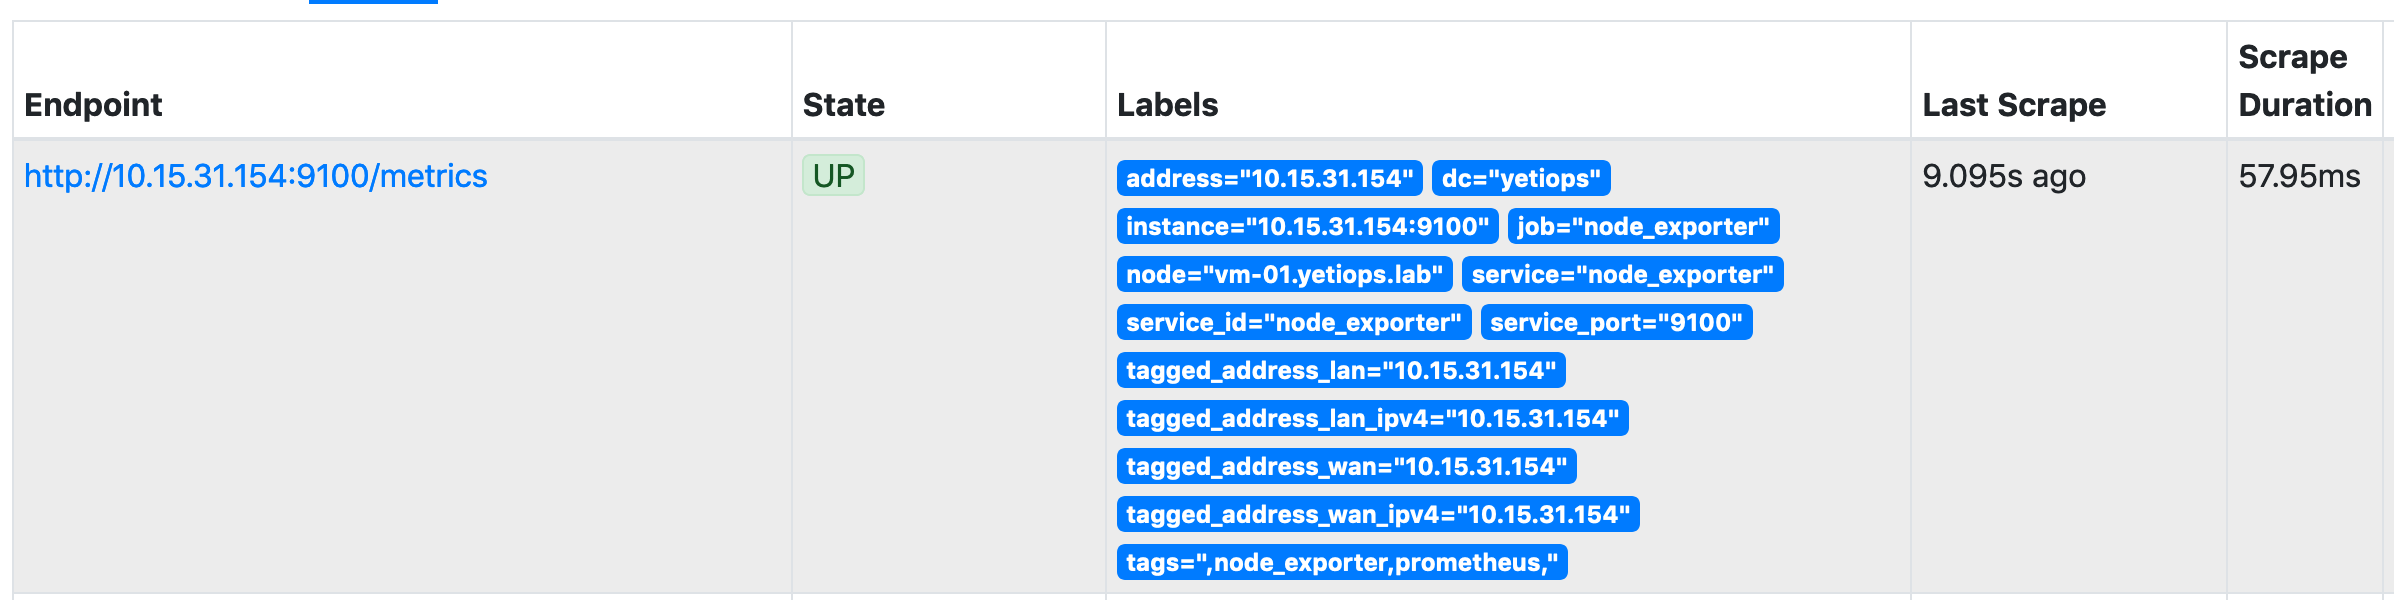
I have also added the labelmap relabelling configuration (discussed here) so that all metadata received from Consul will be added as a label to each discovered metric: -
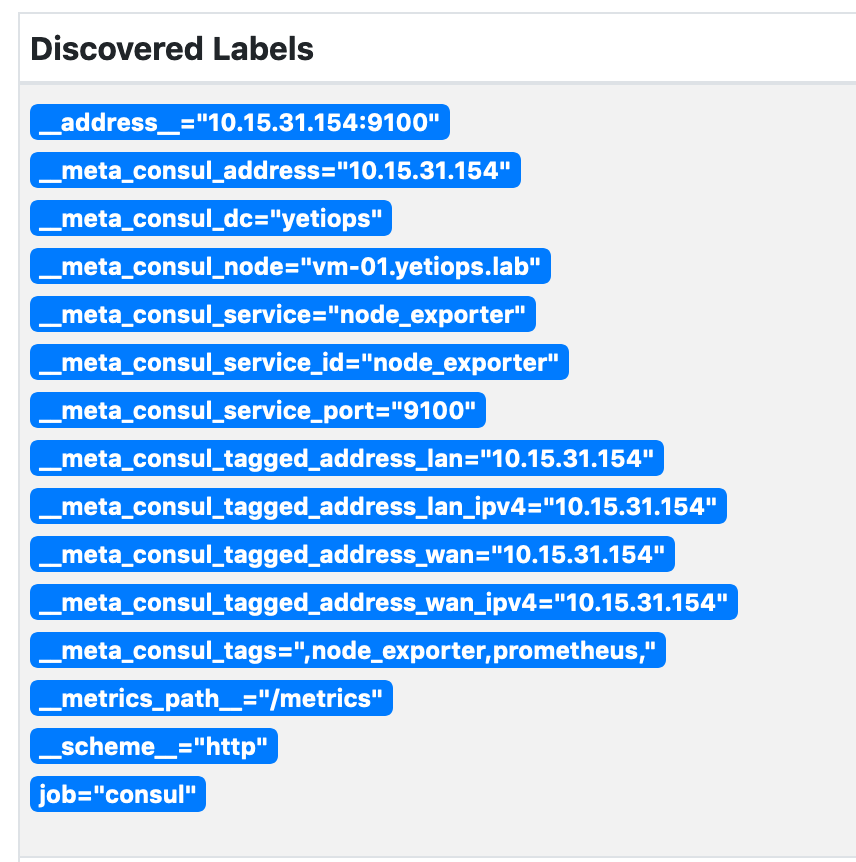
Each tag that starts __meta_consul_ will be added as a label, but with the __meta_consul_ prefix removed: -
node_uname_info{address="10.15.31.154",dc="yetiops",domainname="(none)",
  instance="10.15.31.154:9100",job="node_exporter",machine="x86_64",
  node="vm-01.yetiops.lab",nodename="vm-01.yetiops.lab",
  release="4.19.0-10-cloud-amd64",service="node_exporter",
  service_id="node_exporter",service_port="9100",sysname="Linux",
  tagged_address_lan="10.15.31.154",tagged_address_lan_ipv4="10.15.31.154",
  tagged_address_wan="10.15.31.154",tagged_address_wan_ipv4="10.15.31.154",tags=",
  node_exporter,prometheus,",version="#1 SMP Debian 4.19.132-1 (2020-07-24)"}
This might seem like a lot of labels for a single metric, and may be unnecessary for most implementations. It does however allow additional flexibility in how you match/ignore metrics with PromQL queries.
Proxmox Hosts
In addition to monitoring the instances, we can monitor the Proxmox host itself. The node_exporter service will be discovered from Consul by the job_name: consul: -
The last target in the list is our Proxmox host.
For the PVE Exporter, we need to use a different job for two reasons: -
- The metrics path is different from the default Prometheus metrics path (
/pverather than/metrics) - The Proxmox API can take a few seconds to return the metrics to the exporter, meaning that scraping it every 15 seconds may either miss metrics or overload the API/Exporter
Therefore we add the following job configuration: -
  - job_name: 'consul-pve'
    scrape_interval: 30s
    metrics_path: /pve
    consul_sd_configs:
      - server: '10.15.31.249:8500'
    relabel_configs:
      - source_labels: [__meta_consul_tags]
        regex: .*,prometheus-pve,.*
        action: keep
      - source_labels: [__meta_consul_service]
        target_label: job
This job matches on the prometheus-pve tag (rather than just prometheus), increases the scrape interval (i.e. the time between polling the exporter for metrics) to 30 seconds, and changes the metrics_path to pve.
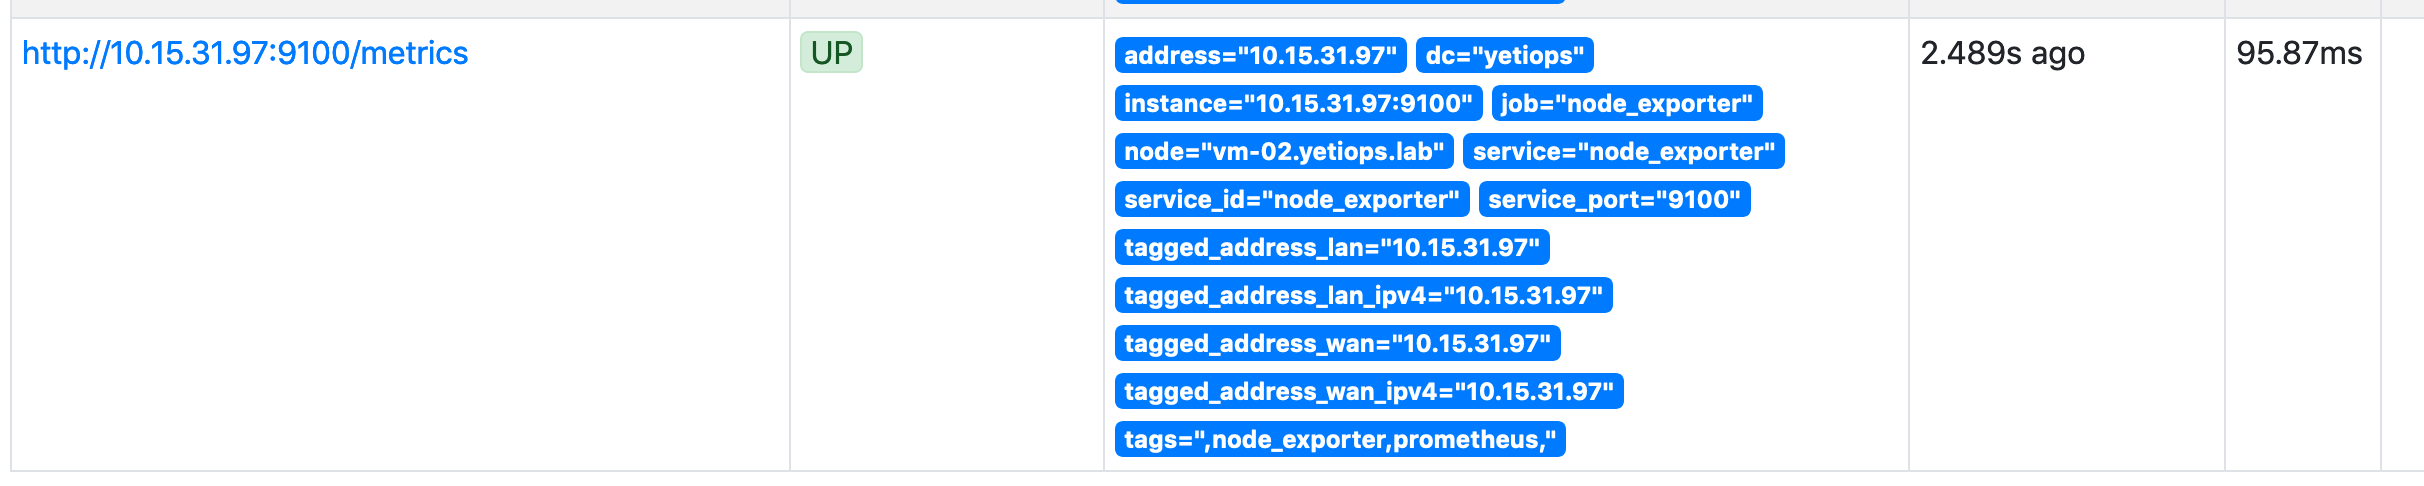
We can verify the target is available with the below: -

Grafana
Now that we have discovered the instances and the Proxmox hosts, we can start using dashboard in Grafana to view their metrics.
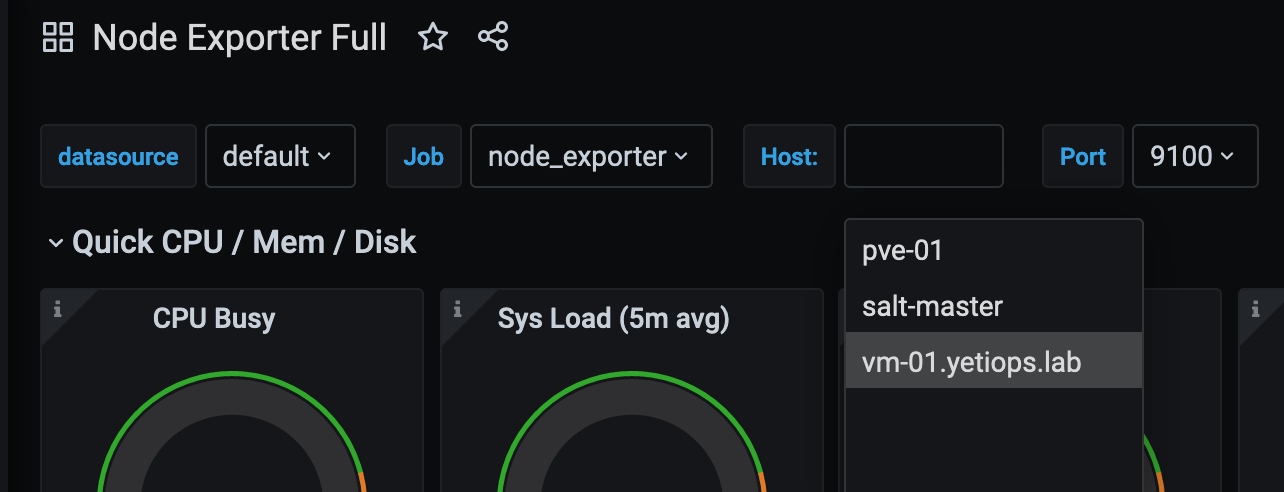
Node Exporter
For the Node Exporter, metrics, we can use the Node Exporter Full dashboard that we have used in previous posts: -
Listing the instances
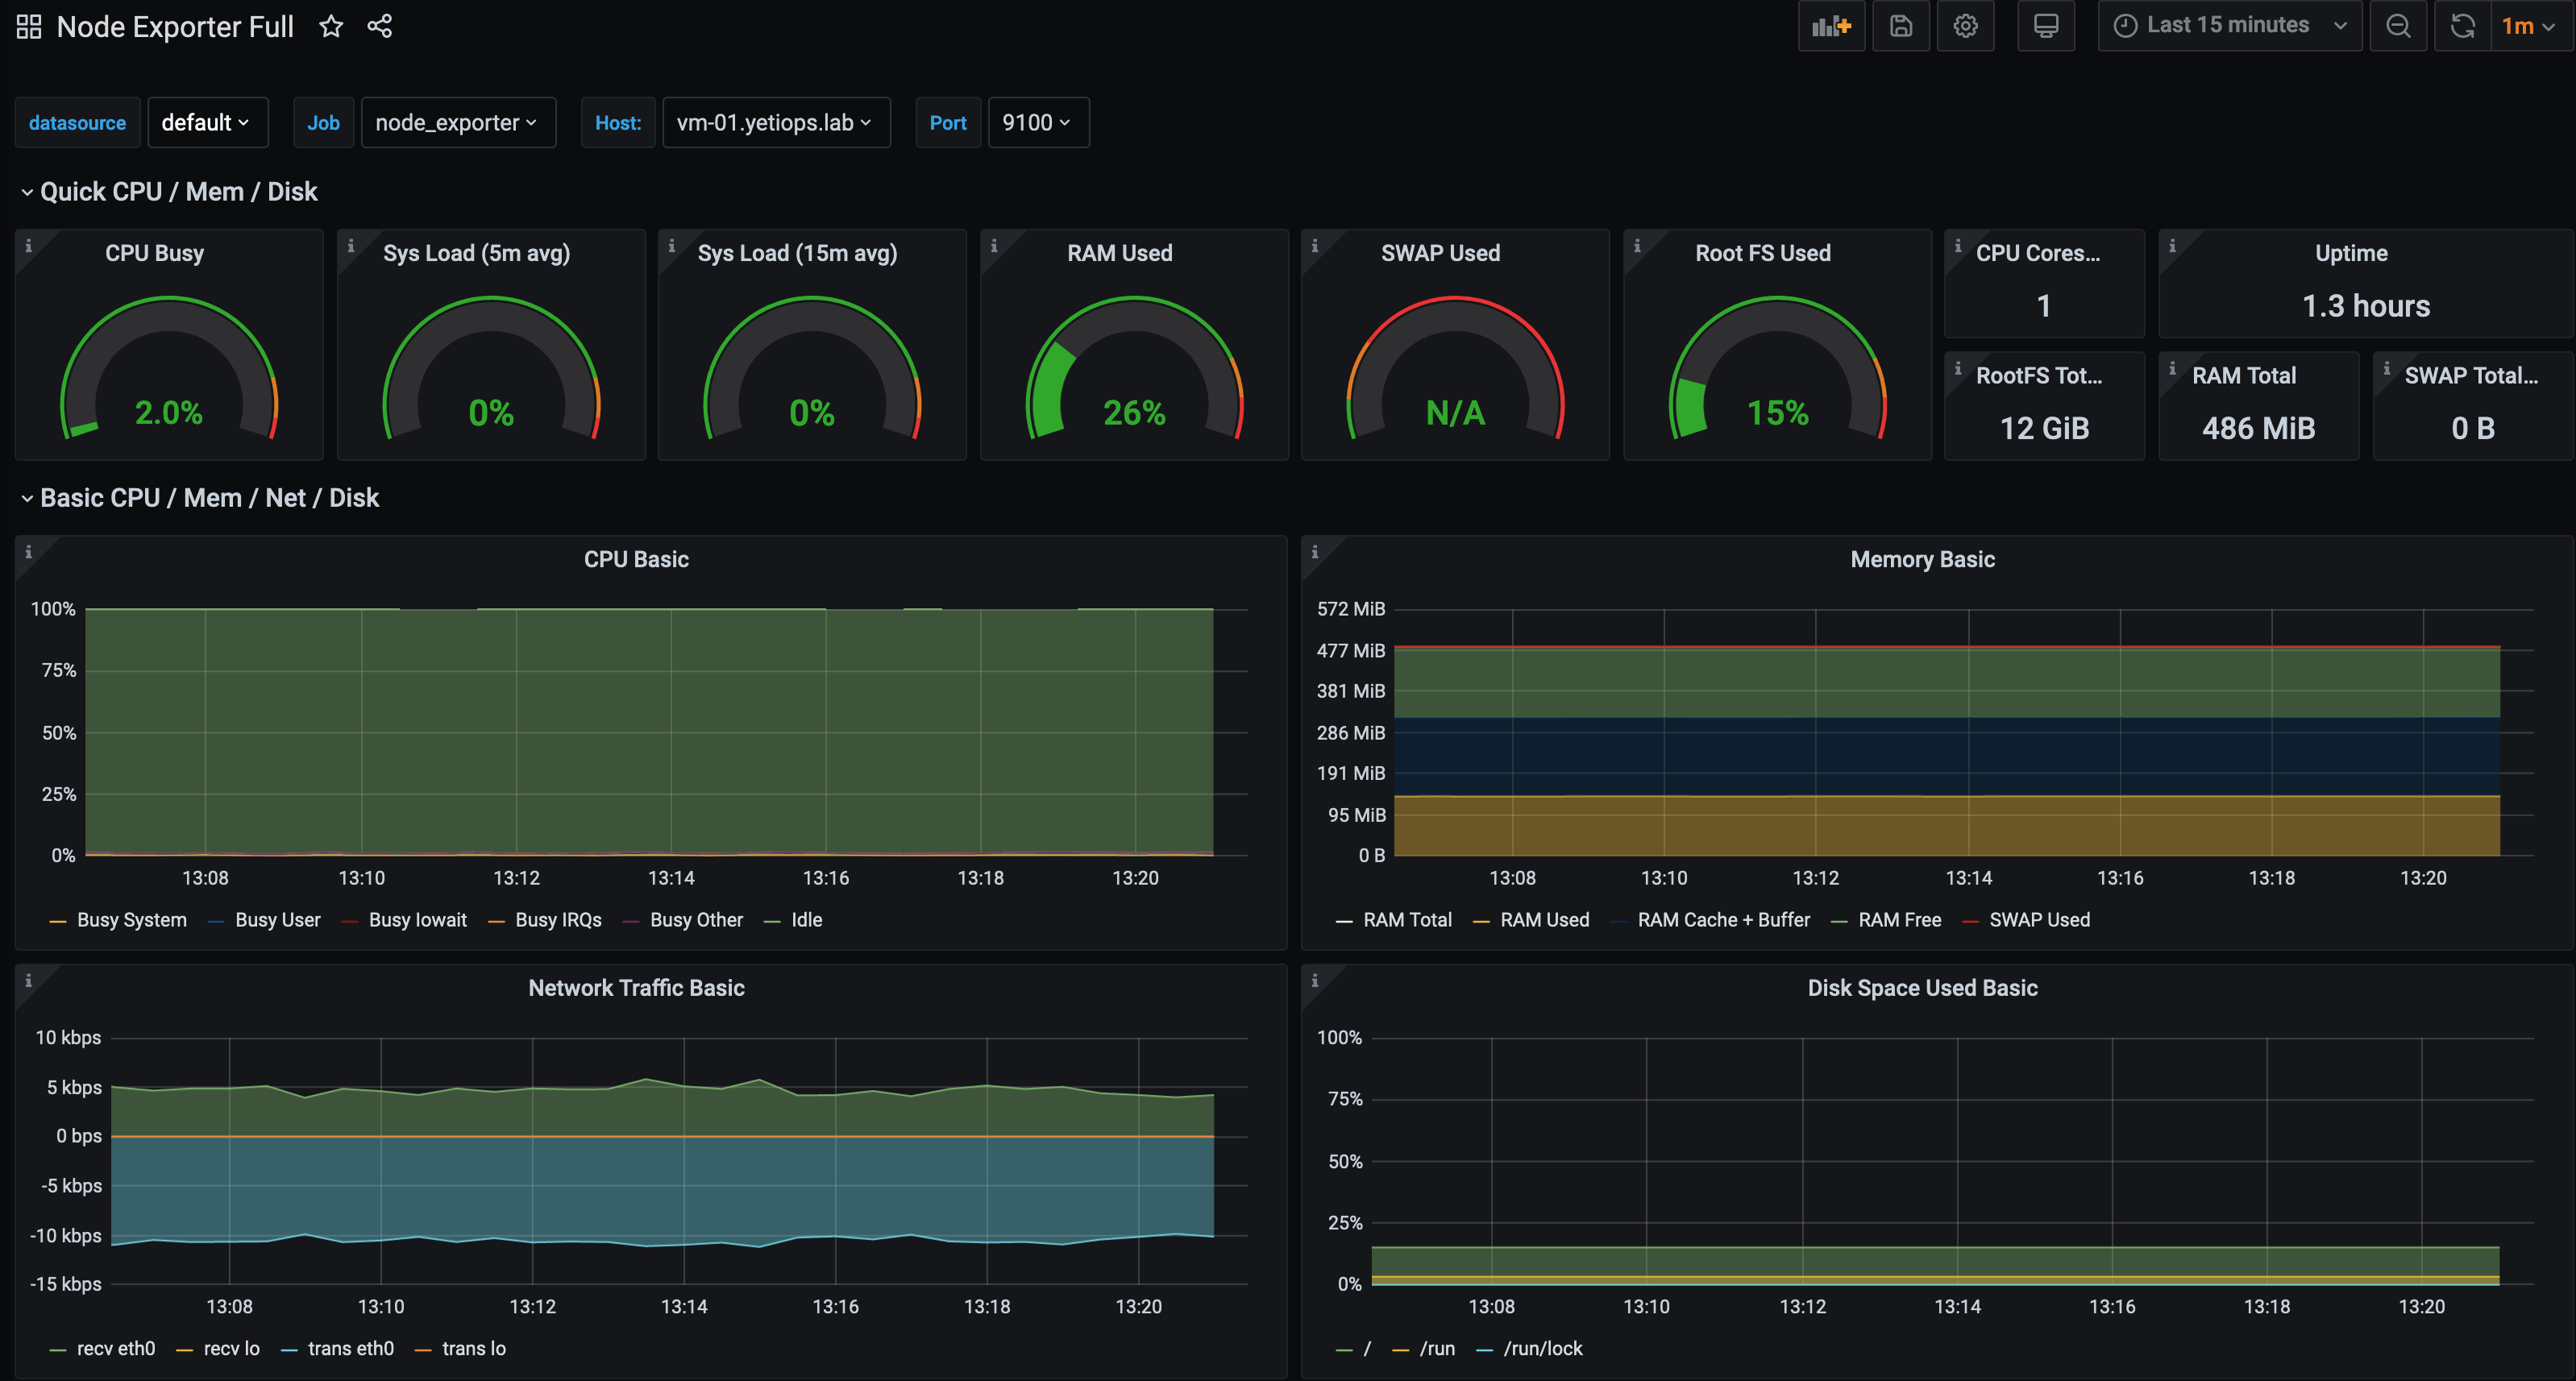
Metrics for vm-01
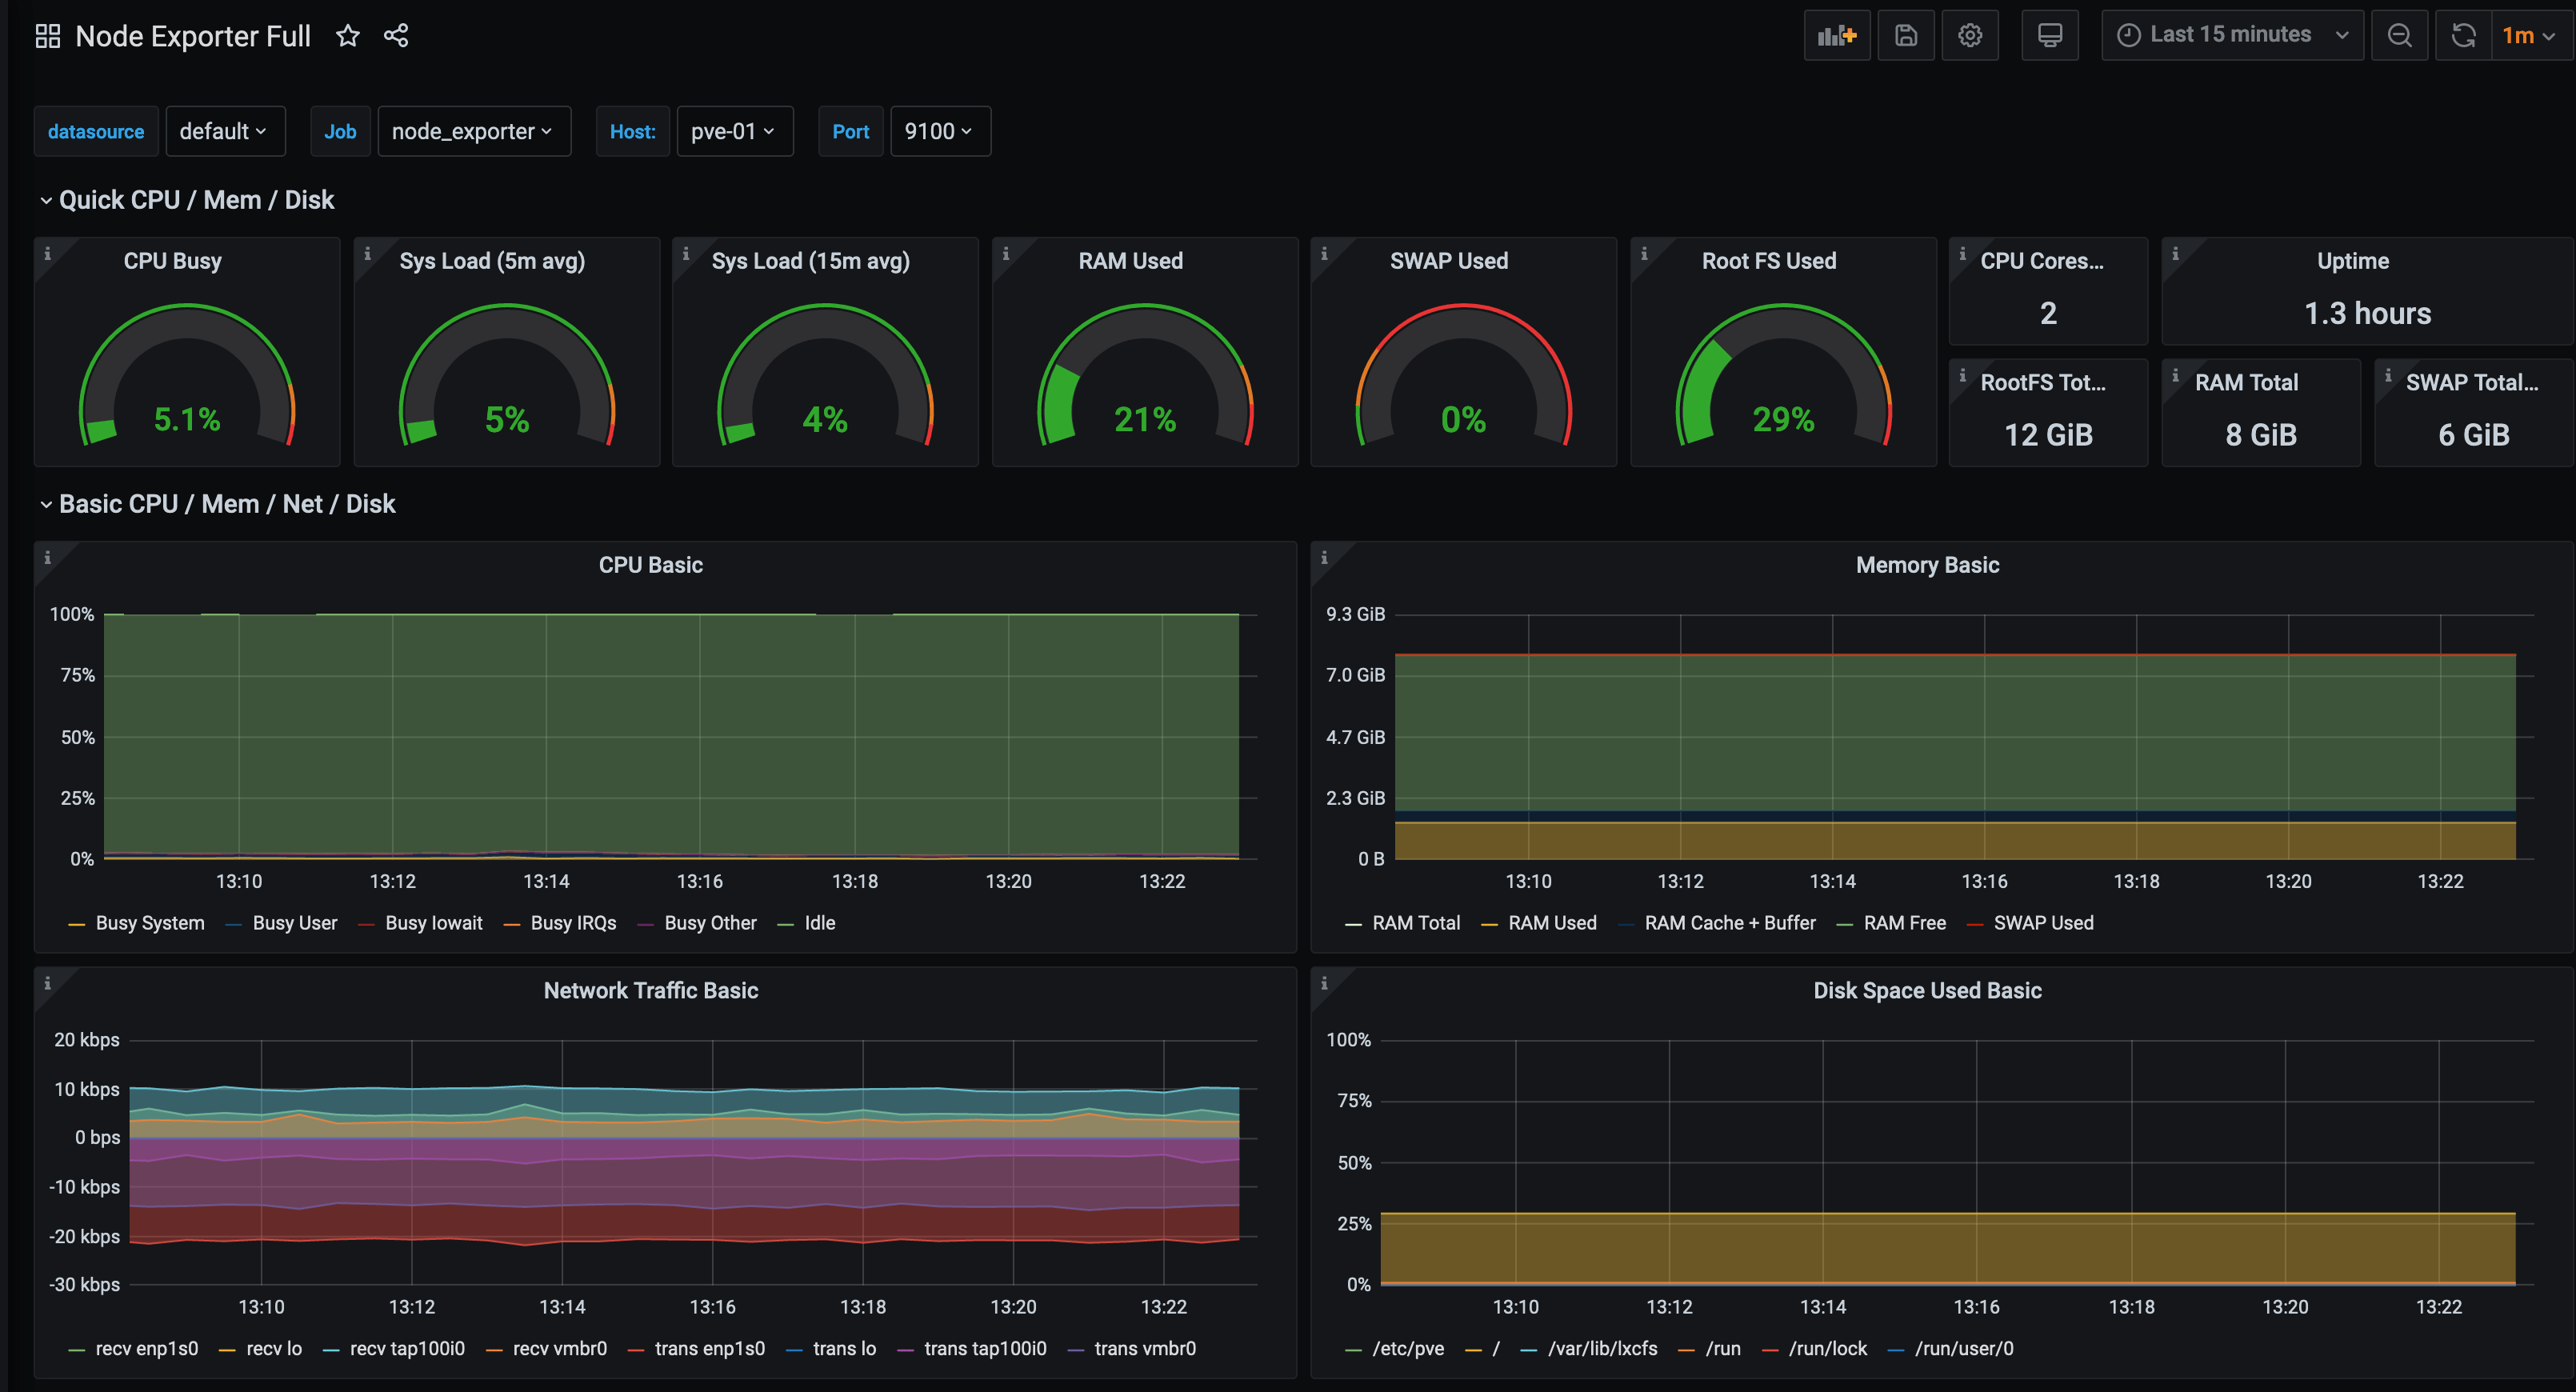
Metrics for pve-01 (Proxmox host)
PVE Exporter
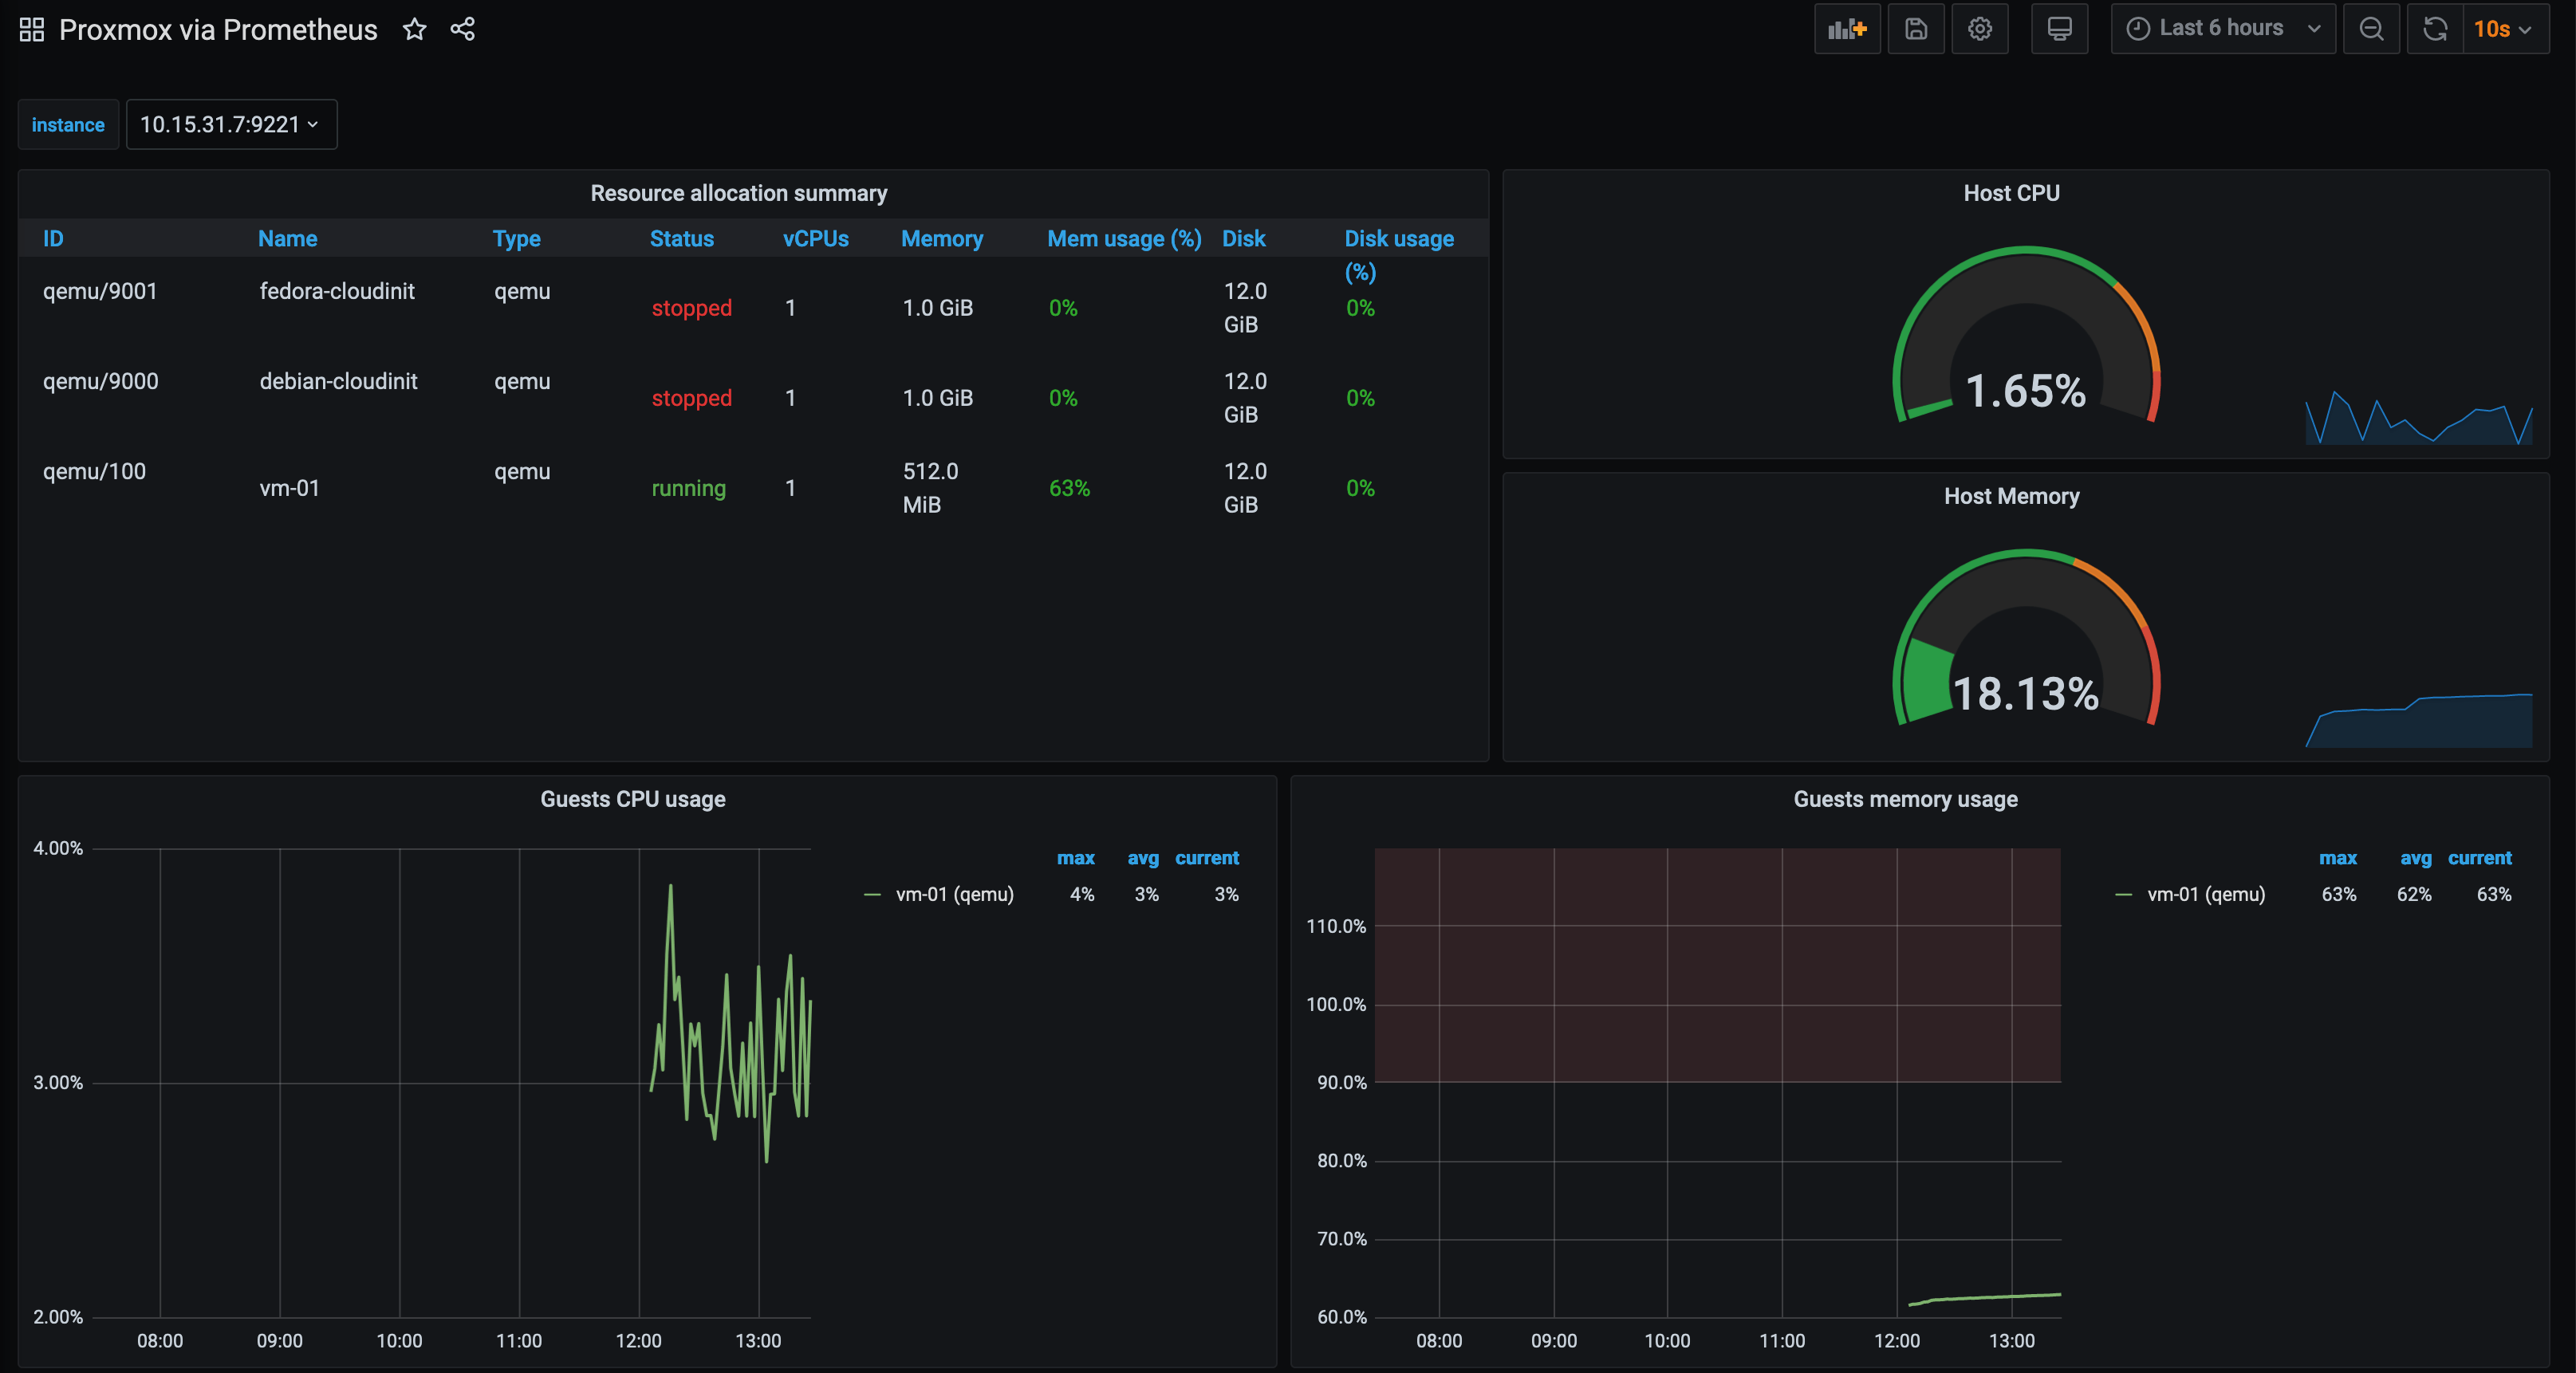
The PVE Exporter also has dashboards available, like the Proxmox via Prometheus dashboard. You can view the configured instances, memory/CPU/network/disk usage per instance, the Proxmox host storage and more: -
What about other distributions?
Cloud-Init and cloud-config is available for multiple operating systems (not just Debian derivatives). Most of the cloud-config syntax will be identical across different systems, with the only real differences being when adding extra repositories for their respective package managers (e.g. using yum or dnf rather than apt).
We will now apply the same steps as for the Debian instance, except this time for a Fedora-based instance: -
Create the template
To create the template, we use the same commands as before, but using a Fedora image (available from here). We are using the “Cloud Base image for Openstack”. This image is for x86_64 systems that includes Cloud-Init and other dependencies: -
qm create 9001 -name fedora-cloudinit -memory 1024 -net0 virtio,bridge=vmbr0 -cores 1 -sockets 1
qm importdisk 9001 Fedora-Cloud-Base-32-1.6.x86_64.qcow2 local-lvm
qm set 9001 -scsihw virtio-scsi-pci -virtio0 local-lvm:vm-9001-disk-0
qm set 9001 -serial0 socket
qm set 9001 -boot c -bootdisk virtio0
qm set 9001 -agent 1
qm set 9001 -hotplug disk,network,usb
qm set 9001 -vcpus 1
qm set 9001 -vga qxl
qm set 9001 -ide2 local-lvm:cloudinit
qm resize 9001 virtio0 +8G
qm template 9001
We can verify this has been created with qm list: -
root@pve-01:~# qm list
      VMID NAME                 STATUS     MEM(MB)    BOOTDISK(GB) PID
       100 vm-01                running    512               12.00 1711
      9000 debian-cloudinit     stopped    1024              12.00 0
      9001 fedora-cloudinit     stopped    1024              12.00 0 <-----
Define an instance
We define the instance similarly to before, except with a couple of key differences: -
- The
cloud-configfile has some minor changes - We need to reference the Fedora
cloud-configfile in the Terraform configuration - The instance requires 1G of memory, otherwise you will hit Out-Of-Memory (OOM) conditions when attempting to install/upgrade packages
cloud-config
#cloud-config

package_update: true
package_upgrade: true

packages:
  - jq
  - curl
  - qemu-guest-agent
  - salt-minion
  - wget
  - policycoreutils-python-utils

users:
- name: stuart
  groups: wheel
  shell: /bin/bash
  sudo: ['ALL=(ALL) NOPASSWD:ALL']
  ssh_authorized_keys:
    - ${ssh_key}

preserve_hostname: false
manage_etc_hosts: false
fqdn: ${hostname}.${domain}

configsalt:
  - &config_salt |
    echo "master: salt-master.${domain}" >> /etc/salt/minion
    echo "domain: ${domain}" >> /etc/salt/grains
    echo "startup_states: 'highstate'" >> /etc/salt/minion
    echo "id: ${hostname}.${domain}" >> /etc/salt/minion
    hostnamectl set-hostname "${hostname}.${domain}" > /etc/hostname

restartsalt:
  - &restart_salt |
    systemctl restart salt-minion.service

runcmd:
 - [ sh, -c, *config_salt ]
 - [ sh, -c, *restart_salt ]
The differences from the Debian cloud-config file are: -
wgetis not installed by default, so we add it topackageslist- Salt requires
policycoreutils-python-utilsto manage SELinux policies as Fedora uses SELinux by default - There is no official Salt repository for Fedora currently, so we install the
salt-minionpackage from the Fedora package repositories wheelis the group used by privileged users in Fedora, rather thansudo(like Debian, Ubuntu and derivatives)
vm-02.tf
# Source the Cloud Init Config file
data "template_file" "cloud_init_fedora_vm-02" {
  template  = "${file("${path.module}/files/cloud_init_fedora.cloud_config")}"

  vars = {
    ssh_key = file("~/.ssh/id_rsa.pub")
    hostname = "vm-02"
    domain = "yetiops.lab"
  }
}

# Create a local copy of the file, to transfer to Proxmox
resource "local_file" "cloud_init_fedora_vm-02" {
  content   = data.template_file.cloud_init_fedora_vm-02.rendered
  filename  = "${path.module}/files/user_data_cloud_init_fedora_vm-02.cfg"
}

# Transfer the file to the Proxmox Host
resource "null_resource" "cloud_init_fedora_vm-02" {
  connection {
    type    = "ssh"
    user    = "root"
    private_key = file("~/.ssh/id_rsa")
    host    = "10.15.31.7"
  }

  provisioner "file" {
    source       = local_file.cloud_init_fedora_vm-02.filename
    destination  = "/var/lib/vz/snippets/cloud_init_fedora_vm-02.yml"
  }
}


# Create the VM
resource "proxmox_vm_qemu" "vm-02" {
  ## Wait for the cloud-config file to exist

  depends_on = [
    null_resource.cloud_init_fedora_vm-02
  ]

  name = "vm-02"
  target_node = "pve-01"

  # Clone from debian-cloudinit template
  clone = "fedora-cloudinit"
  os_type = "cloud-init"

  # Cloud init options
  cicustom = "user=local:snippets/cloud_init_fedora_vm-02.yml"
  ipconfig0 = "ip=10.15.31.97/24,gw=10.15.31.253"

  memory       = 1024
  agent        = 1

  # Set the boot disk paramters
  bootdisk = "scsi0"
  scsihw       = "virtio-scsi-pci"

  disk {
    id              = 0
    size            = 10
    type            = "scsi"
    storage         = "local-lvm"
    storage_type    = "lvm"
    iothread        = true
  }

  # Set the network
  network {
    id = 0
    model = "virtio"
    bridge = "vmbr0"
  }

  # Ignore changes to the network
  ## MAC address is generated on every apply, causing
  ## TF to think this needs to be rebuilt on every apply
  lifecycle {
     ignore_changes = [
       network
     ]
  }
}
As noted, the differences here are: -
- We reference the Fedora
cloud-configfile - The memory is increased to 1G
Build the instance
We can now build the Fedora instance, and see if it attempts to register with Salt: -
data.template_file.cloud_init_fedora_vm-02: Refreshing state...
data.template_file.cloud_init_deb10_vm-01: Refreshing state...
local_file.cloud_init_deb10_vm-01: Refreshing state... [id=ba8ba5e0ff96906173046a818ba8305964d84315]
null_resource.cloud_init_deb10_vm-01: Refreshing state... [id=6696639824705285611]
proxmox_vm_qemu.vm-01: Refreshing state... [id=pve-01/qemu/100]

An execution plan has been generated and is shown below.
Resource actions are indicated with the following symbols:
  + create

Terraform will perform the following actions:

  # local_file.cloud_init_fedora_vm-02 will be created
  + resource "local_file" "cloud_init_fedora_vm-02" {
      + content              = <<~EOT
            #cloud-config

            package_update: true
            package_upgrade: true

            packages:
              - jq
              - curl
              - qemu-guest-agent
              - salt-minion
              - wget
              - policycoreutils-python-util

            users:
            - name: stuart
              groups: wheel
              shell: /bin/bash
              sudo: ['ALL=(ALL) NOPASSWD:ALL']
              ssh_authorized_keys:
                - ssh-rsa AAAAB3NzaC1yc2EAAAADAQABAAABAQC7kFxH6D3tU3vL+O1PMhgmdB7Hh4pIWzVyxamtPmqDosgwcchAfaW5hvbb2apCCRN8wop/pCfXkCNhDFkAuOND7pl8eO2coX4yQEViye9MuFu4hIf3pxBkKrSunKCxesi27rW7QUN2XRercM5CrtuFcCwS9+/JxKm/oScSgs4wEnPZOfcHaUQOnBw/oZBv5z//D8exnmrr2EE7VF5bAQixrM5Wkks4+t6nKmtdDmVcOiYfe2RUzNFZ5xrg0AZgJdY1e6jOJwFXUKv/OOW29oTA6BR5kULSDHdifihpY5keRcW+cvEo4zj65TrRtUiOIO1LUfsHDBK6kM3v3IvKNHyZ stuh84@symphonyx


            preserve_hostname: false
            manage_etc_hosts: false
            fqdn: vm-02.yetiops.lab

            configsalt:
              - &config_salt |
                echo "master: salt-master.yetiops.lab" >> /etc/salt/minion
                echo "domain: yetiops.lab" >> /etc/salt/grains
                echo "startup_states: 'highstate'" >> /etc/salt/minion
                echo "id: vm-02.yetiops.lab" >> /etc/salt/minion
                hostnamectl set-hostname "vm-02.yetiops.lab" > /etc/hostname

            restartsalt:
              - &restart_salt |
                systemctl restart salt-minion.service

            runcmd:
             - [ sh, -c, *config_salt ]
             - [ sh, -c, *restart_salt ]
        EOT
      + directory_permission = "0777"
      + file_permission      = "0777"
      + filename             = "./files/user_data_cloud_init_fedora_vm-02.cfg"
      + id                   = (known after apply)
    }

  # null_resource.cloud_init_fedora_vm-02 will be created
  + resource "null_resource" "cloud_init_fedora_vm-02" {
      + id = (known after apply)
    }

  # proxmox_vm_qemu.vm-02 will be created
  + resource "proxmox_vm_qemu" "vm-02" {
      + agent        = 1
      + balloon      = 0
      + bios         = "seabios"
      + boot         = "cdn"
      + bootdisk     = "scsi0"
      + cicustom     = "user=local:snippets/cloud_init_fedora_vm-02.yml"
      + clone        = "fedora-cloudinit"
      + clone_wait   = 15
      + cores        = 1
      + cpu          = "host"
      + force_create = false
      + full_clone   = true
      + hotplug      = "network,disk,usb"
      + id           = (known after apply)
      + ipconfig0    = "ip=10.15.31.97/24,gw=10.15.31.253"
      + kvm          = true
      + memory       = 1024
      + name         = "vm-02"
      + numa         = false
      + onboot       = true
      + os_type      = "cloud-init"
      + preprovision = true
      + scsihw       = "virtio-scsi-pci"
      + sockets      = 1
      + ssh_host     = (known after apply)
      + ssh_port     = (known after apply)
      + target_node  = "pve-01"
      + vcpus        = 0
      + vlan         = -1
      + vmid         = 0

      + disk {
          + backup       = false
          + cache        = "none"
          + format       = "raw"
          + id           = 0
          + iothread     = true
          + mbps         = 0
          + mbps_rd      = 0
          + mbps_rd_max  = 0
          + mbps_wr      = 0
          + mbps_wr_max  = 0
          + replicate    = false
          + size         = "10"
          + storage      = "local-lvm"
          + storage_type = "lvm"
          + type         = "scsi"
        }

      + network {
          + bridge    = "vmbr0"
          + firewall  = false
          + id        = 0
          + link_down = false
          + macaddr   = (known after apply)
          + model     = "virtio"
          + queues    = -1
          + rate      = -1
          + tag       = -1
        }
    }

Plan: 3 to add, 0 to change, 0 to destroy.

Do you want to perform these actions?
  Terraform will perform the actions described above.
  Only 'yes' will be accepted to approve.

  Enter a value: yes

local_file.cloud_init_fedora_vm-02: Creating...
local_file.cloud_init_fedora_vm-02: Creation complete after 0s [id=d1529d4e3dbfdbe4e397695cbcfeb8468db09823]
null_resource.cloud_init_fedora_vm-02: Creating...
null_resource.cloud_init_fedora_vm-02: Provisioning with 'file'...
null_resource.cloud_init_fedora_vm-02: Creation complete after 0s [id=5678816832361784306]
proxmox_vm_qemu.vm-02: Creating...
proxmox_vm_qemu.vm-02: Still creating... [10s elapsed]
proxmox_vm_qemu.vm-02: Still creating... [20s elapsed]
proxmox_vm_qemu.vm-02: Still creating... [30s elapsed]
proxmox_vm_qemu.vm-02: Still creating... [40s elapsed]
proxmox_vm_qemu.vm-02: Still creating... [50s elapsed]
proxmox_vm_qemu.vm-02: Creation complete after 53s [id=pve-01/qemu/101]

Apply complete! Resources: 3 added, 0 changed, 0 destroyed.
Can we see it on the Salt server?
$ sudo salt-key -L
Accepted Keys:
pve-01.yetiops.lab
salt-master.yetiops.lab
vm-01.yetiops.lab
Denied Keys:
Unaccepted Keys:
vm-02.yetiops.lab
Rejected Keys:
We can!
Accept the key
We can now accept the key in Salt. As with the Debian instance, this will immediately start a highstate. The highstate deploys Consul and the Prometheus Node Exporter, meaning we should see it in Prometheus once it completes: -
$ sudo salt-key -a 'vm-02*'
The following keys are going to be accepted:
Unaccepted Keys:
vm-02.yetiops.lab
Proceed? [n/Y] y
Key for minion vm-02.yetiops.lab accepted.
We can check what states will be applied to this minion as well: -
$ sudo salt 'vm-02*' state.show_states
vm-02.yetiops.lab:
    - consul
    - exporters.node_exporter.systemd
Verify the highstate
Once the initial highstate has ran, we should now be able to see vm-02 (the Fedora instance) in Consul: -
$ consul members
Node               Address            Status  Type    Build  Protocol  DC       Segment
salt-master        10.15.31.249:8301  alive   server  1.8.1  2         yetiops  <all>
pve-01             10.15.31.7:8301    alive   client  1.8.1  2         yetiops  <default>
vm-01.yetiops.lab  10.15.31.154:8301  alive   client  1.8.1  2         yetiops  <default>
vm-02.yetiops.lab  10.15.31.97:8301   alive   client  1.8.1  2         yetiops  <default>
We should also be able to check that the Node Exporter is running: -
$ curl 10.15.31.97:9100/metrics | grep -i uname
# HELP node_uname_info Labeled system information as provided by the uname system call.
# TYPE node_uname_info gauge
node_uname_info{domainname="(none)",machine="x86_64",nodename="vm-02.yetiops.lab",release="5.6.6-300.fc32.x86_64",sysname="Linux",version="#1 SMP Tue Apr 21 13:44:19 UTC 2020"} 1
All looking good!
We can also re-run the highstate, to ensure no configuration changes are required: -
$ sudo salt 'vm-02*' state.highstate
vm-02.yetiops.lab:
----------
          ID: consul_binary
    Function: archive.extracted
        Name: /usr/local/bin
      Result: True
     Comment: Path /usr/local/bin/consul exists
     Started: 13:23:03.623496
    Duration: 2.937 ms
     Changes:
----------
          ID: consul_user
    Function: user.present
        Name: consul
      Result: True
     Comment: User consul is present and up to date
     Started: 13:23:03.627282
    Duration: 44.905 ms
     Changes:
----------
          ID: consul_group
    Function: group.present
        Name: consul
      Result: True
     Comment: Group consul is present and up to date
     Started: 13:23:03.673917
    Duration: 11.163 ms
     Changes:
----------
          ID: /etc/systemd/system/consul.service
    Function: file.managed
      Result: True
     Comment: File /etc/systemd/system/consul.service is in the correct state
     Started: 13:23:03.688362
    Duration: 48.745 ms
     Changes:
----------
          ID: /opt/consul
    Function: file.directory
      Result: True
     Comment: The directory /opt/consul is in the correct state
     Started: 13:23:03.737332
    Duration: 2.013 ms
     Changes:
----------
          ID: /etc/consul.d
    Function: file.directory
      Result: True
     Comment: The directory /etc/consul.d is in the correct state
     Started: 13:23:03.739451
    Duration: 0.817 ms
     Changes:
----------
          ID: /etc/consul.d/consul.hcl
    Function: file.managed
      Result: True
     Comment: File /etc/consul.d/consul.hcl is in the correct state
     Started: 13:23:03.740365
    Duration: 32.16 ms
     Changes:
----------
          ID: consul_service
    Function: service.running
        Name: consul
      Result: True
     Comment: The service consul is already running
     Started: 13:23:03.796163
    Duration: 107.187 ms
     Changes:
----------
          ID: /etc/consul.d/node_exporter.hcl
    Function: file.managed
      Result: True
     Comment: File /etc/consul.d/node_exporter.hcl is in the correct state
     Started: 13:23:03.903681
    Duration: 24.074 ms
     Changes:
----------
          ID: consul_reload_node_exporter
    Function: cmd.run
        Name: consul reload
      Result: True
     Comment: Command "consul reload" run
     Started: 13:23:03.935968
    Duration: 124.716 ms
     Changes:
              ----------
              pid:
                  17428
              retcode:
                  0
              stderr:
              stdout:
                  Configuration reload triggered
----------
          ID: node_exporter_user
    Function: user.present
        Name: node_exporter
      Result: True
     Comment: User node_exporter is present and up to date
     Started: 13:23:04.060975
    Duration: 4.172 ms
     Changes:
----------
          ID: node_exporter_group
    Function: group.present
        Name: node_exporter
      Result: True
     Comment: Group node_exporter is present and up to date
     Started: 13:23:04.065357
    Duration: 0.784 ms
     Changes:
----------
          ID: /opt/prometheus/exporters/dist/textfile
    Function: file.directory
      Result: True
     Comment: The directory /opt/prometheus/exporters/dist/textfile is in the correct state
     Started: 13:23:04.066249
    Duration: 1.028 ms
     Changes:
----------
          ID: /etc/systemd/system/node_exporter.service
    Function: file.managed
      Result: True
     Comment: File /etc/systemd/system/node_exporter.service is in the correct state
     Started: 13:23:04.067377
    Duration: 14.781 ms
     Changes:
----------
          ID: node_exporter_selinux_fcontext
    Function: selinux.fcontext_policy_present
        Name: /usr/local/bin/node_exporter
      Result: True
     Comment: SELinux policy for "/usr/local/bin/node_exporter" already present with specified filetype "all files" and sel_type "bin_t".
     Started: 13:23:04.084381
    Duration: 488.474 ms
     Changes:
----------
          ID: node_exporter_selinux_fcontext_applied
    Function: selinux.fcontext_policy_applied
        Name: /usr/local/bin/node_exporter
      Result: True
     Comment: SElinux policies are already applied for filespec "/usr/local/bin/node_exporter"
     Started: 13:23:04.573102
    Duration: 8.826 ms
     Changes:
----------
          ID: node_exporter_service_reload
    Function: cmd.run
        Name: systemctl daemon-reload
      Result: True
     Comment: Command "systemctl daemon-reload" run
     Started: 13:23:04.582755
    Duration: 267.884 ms
     Changes:
              ----------
              pid:
                  17441
              retcode:
                  0
              stderr:
              stdout:
----------
          ID: node_exporter_service
    Function: service.running
        Name: node_exporter
      Result: True
     Comment: The service node_exporter is already running
     Started: 13:23:04.850912
    Duration: 38.384 ms
     Changes:

Summary for vm-02.yetiops.lab
-------------
Succeeded: 18 (changed=2)
Failed:     0
-------------
Total states run:     18
Total run time:    1.223 s
As before, no configuration changes, just a couple of states which could be improved to not run unless other files have changed first.
Prometheus Targets
We should now be able to see the Fedora instance in Prometheus: -
There it is!
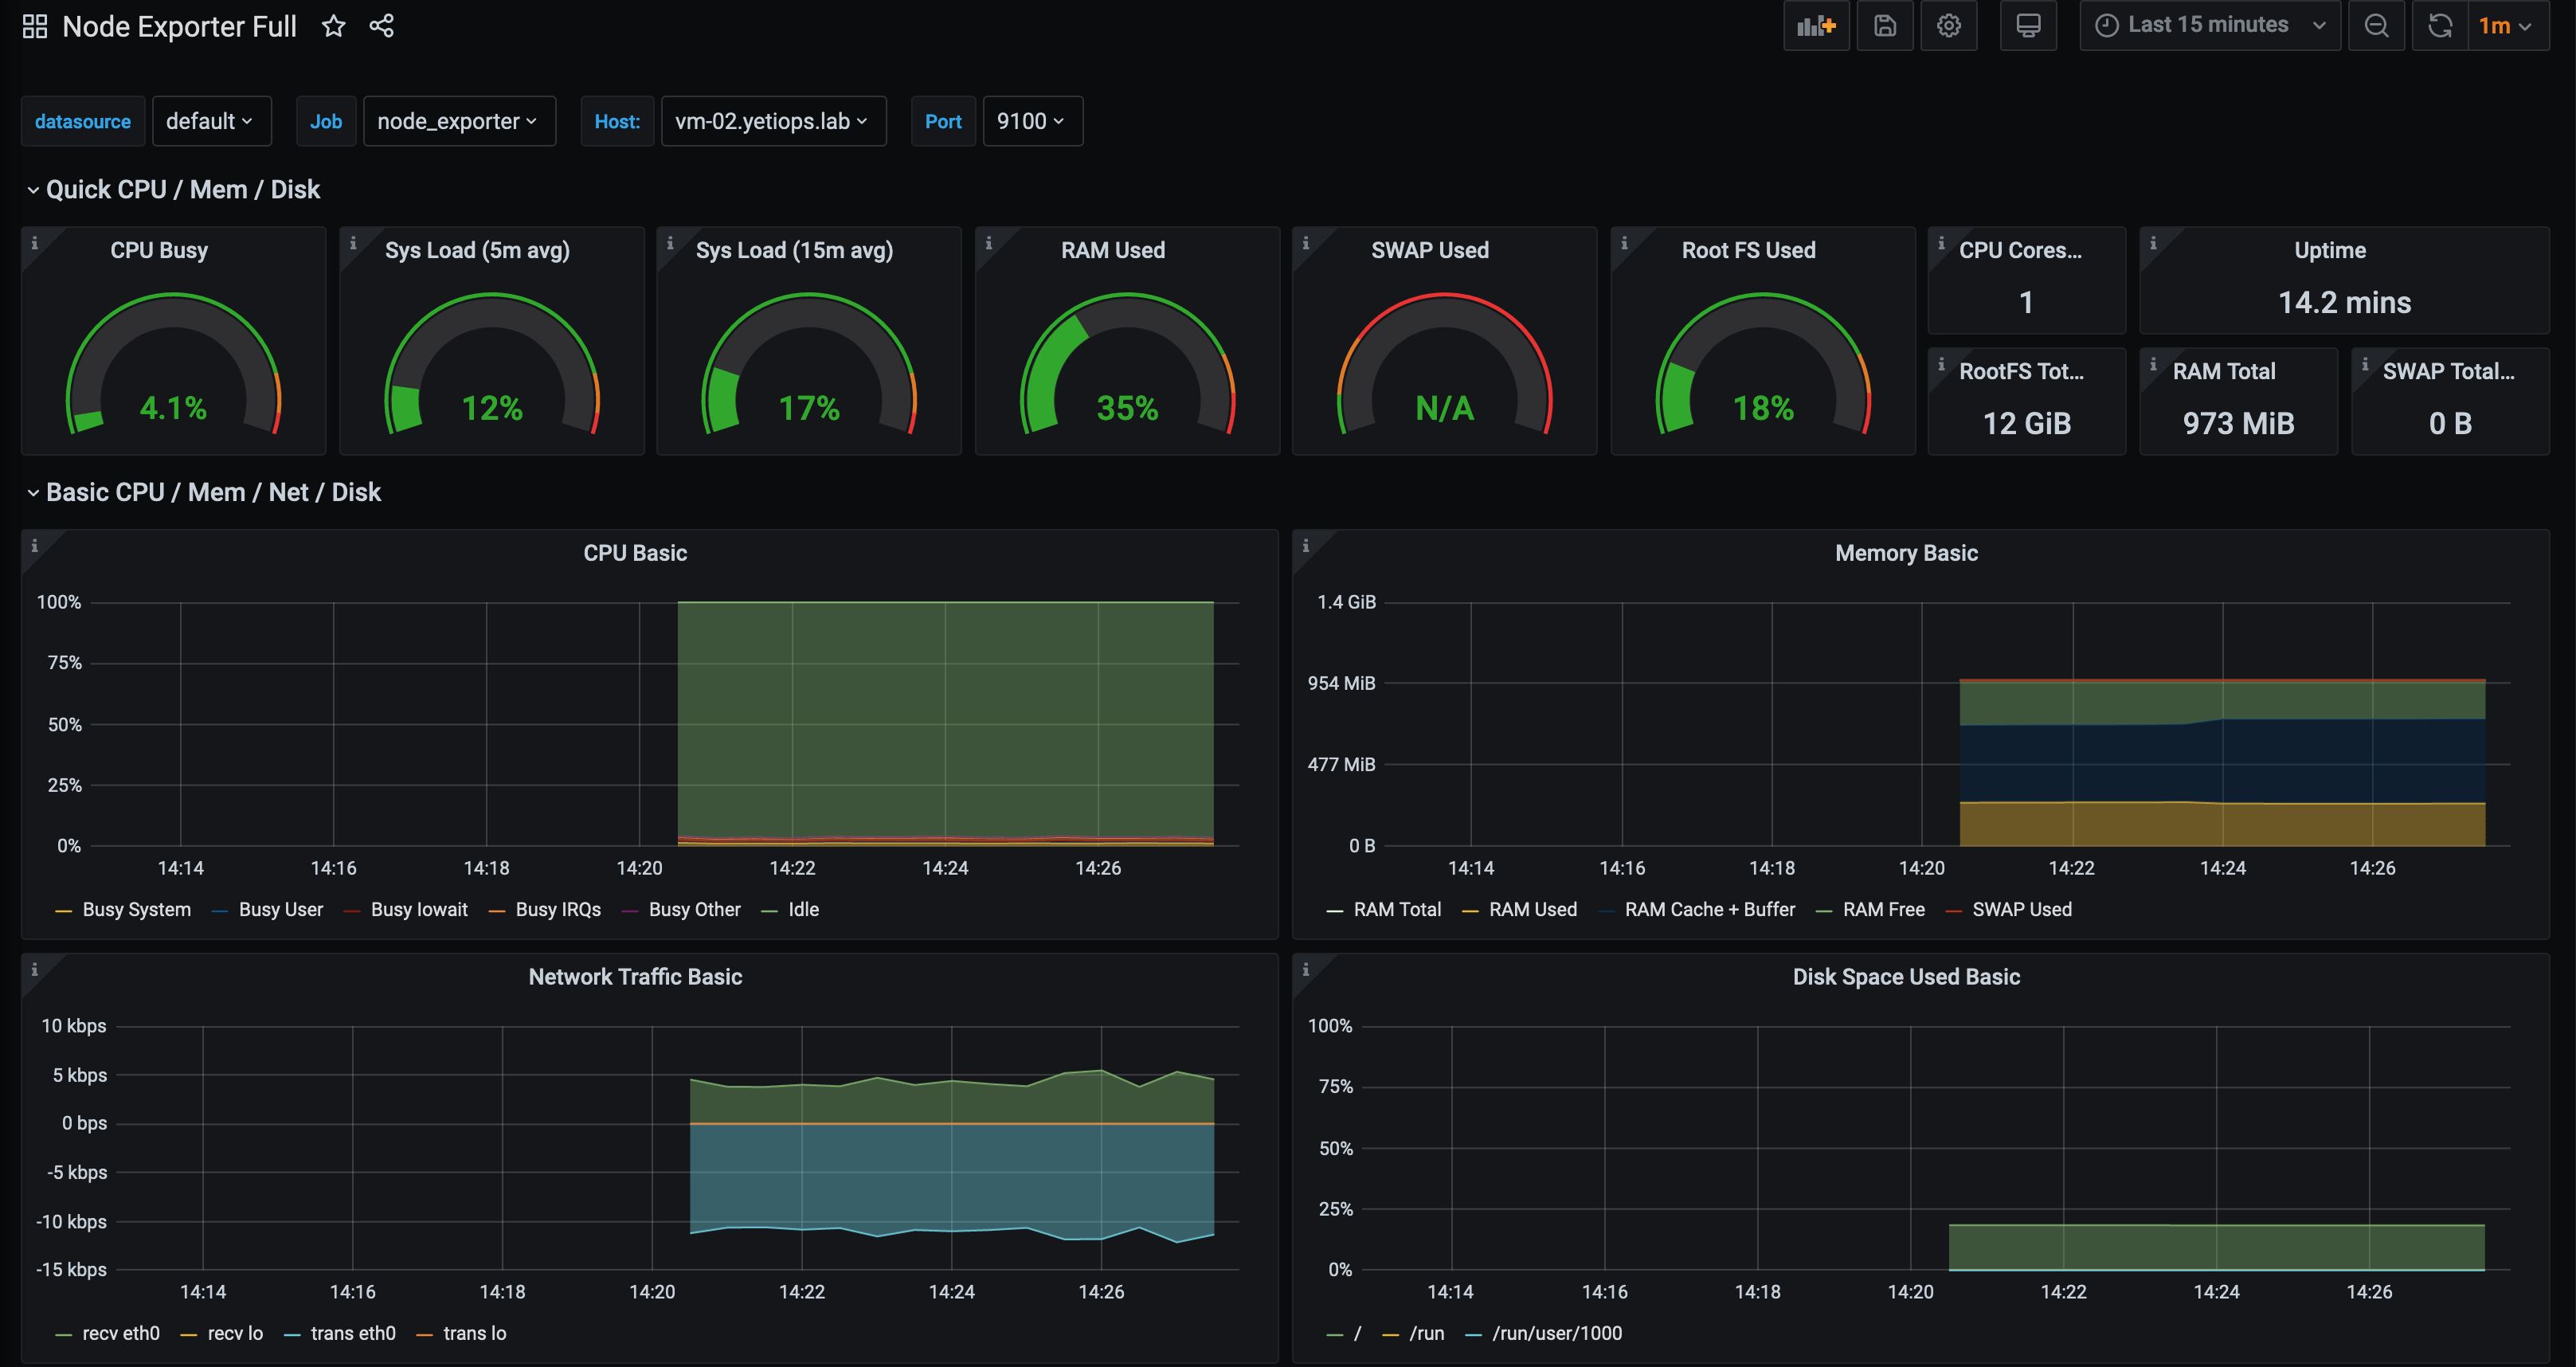
Grafana
We should now also be able to see this instance in our Node Exporter dashboard in Grafana: -
Any other distributions?
Any distribution which supports Cloud-Init and all of the cloud-config options should work with the method shown here. For a full list of distributions and systems supporting Cloud-Init, you can check: -
While it may not be true for every system, it is reasonably safe to assume that if a distribution or system runs on a public cloud provider (e.g. AWS or Azure) or on OpenStack, then it will probably work with Proxmox using Cloud-Init too.
Summary
While many workloads are now moving to public clouds, there are still many use cases for on-premise hypervisors like Proxmox. Whether this is in a homelab, running and managing your own hardware in a data centre (but without the need for OpenStack’s feature-set) or simply as an alternative to VMWare and its licensing model.
Using Terraform, Cloud-Init and SaltStack together can reduce the time and effort to manage instances on Proxmox, as well as providing some of the benefits you would find from using a cloud provider (e.g. Infrastructure-as-Code, ephemeral instances, monitoring automation).
devops monitoring prometheus consul saltstack terraform proxmox
technical prometheus monitoring config management
6794 Words
2020-08-10 19:10 +0000