18 minutes
Prometheus - Using Service Discovery with OpenStack
In a previous post I mentioned that Prometheus has a number of ways to discover services. This ranges from statically defined configuration to consuming APIs from different cloud providers. So far, we have covered: -
In this post we will cover discovering services running on OpenStack.
What is OpenStack?
OpenStack is a way of running your own Infrastructure-as-a-service platform. It enables you to deploy compute, storage, networking and other resources similar to the major cloud providers. It began as a joint venture between Rackspace and NASA to provide an Open Source cloud solution.
Initially, OpenStack was embraced by a number of different sectors of the IT industry. Some companies saw it as a way to become an alternative to the likes of AWS or Azure (e.g. HPE Helion, OVH, Huawei). For others, it enabled them to use their existing hardware while being able to spin up resources in a cloud-like way.
In recent years, OpenStack has become increasingly popular with telecommunications providers. Many of these providers own or have access to telecoms exchanges, and have large data centre footprints spanning cities, countries and even continents. OpenStack allows them to create multi-region clouds of their own, without the need to leverage a public cloud provider.
The lab
OpenStack usually requires a fleet of high-powered servers managed as a cluster (or multiple clusters) of compute, storage and other services. If you want to test out OpenStack on a single machine, there are multiple options available: -
- DevStack - Installs OpenStack on a virtual machine (or physical machine) running Ubuntu or Fedora and turns it into a mini OpenStack cloud
- MicroStack - A Canonical project that deploys a OpenStack inside of a Snap package
- Kolla-Ansible - An Ansible project that deploys all the OpenStack services as containers
I decided to use MicroStack on an Ubuntu 18.04 LTS virtual machine.
MicroStack
To install and run MicroStack, run the following commands: -
# Install MicroStack with Classic confinement (i.e. not fully sandboxed)
$ sudo snap install microstack --classic --beta

# Initialize MicroStack
$ sudo microstack.init --auto
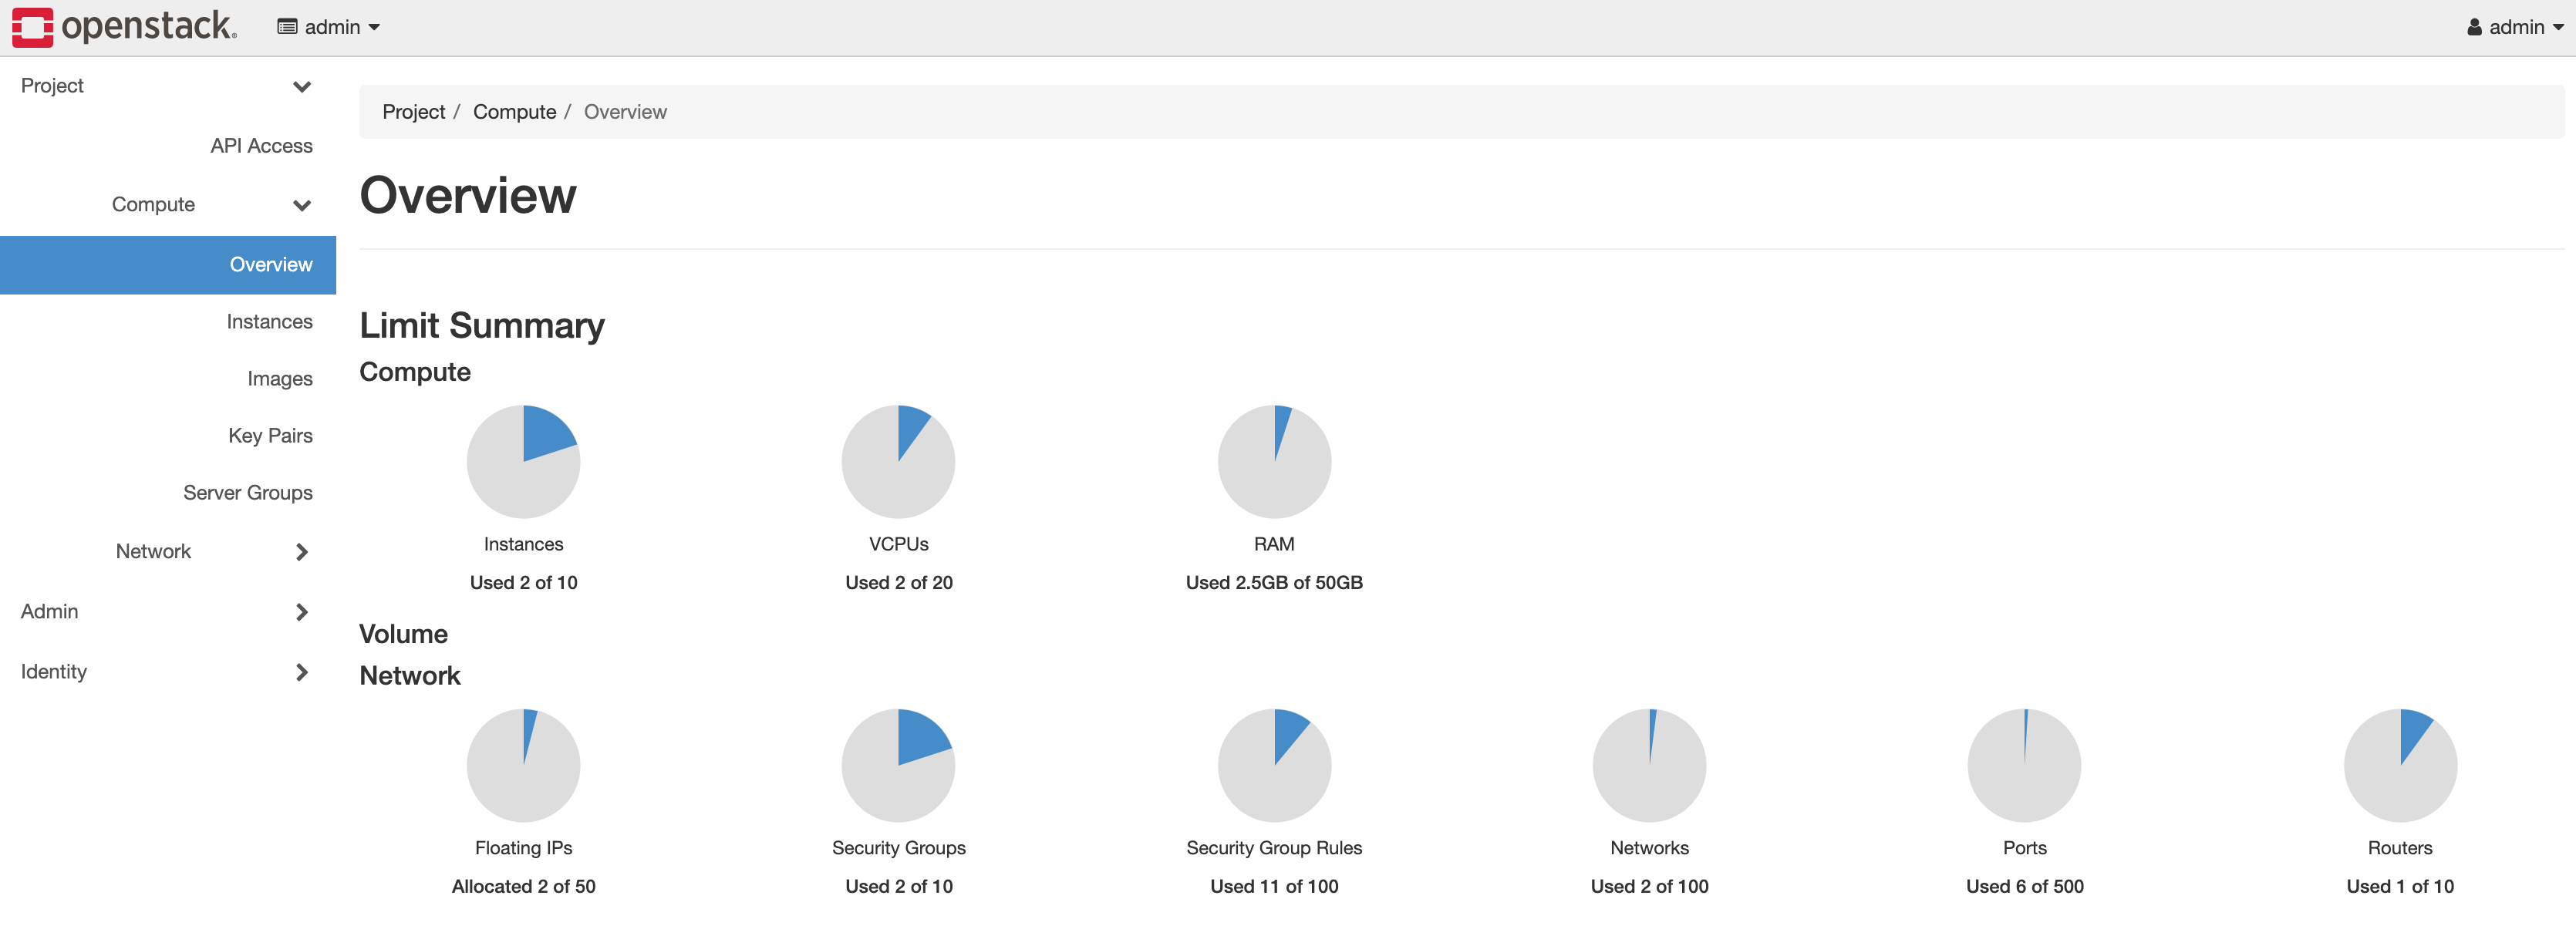
After a few minutes (ranging from 5 to 20 minutes, depending on your machine) MicroStack will have finished initializing. The web interface will be available at http://10.20.20.1: -

The credentials for this page are: -
- Username:
admin - Password:
keystone
You can create a virtual machine (instance) from here, or from the command line.
# Launch the instance
$ microstack.launch cirros --name test

Server test launched! (status is BUILD)

Access it with `ssh -i $HOME/.ssh/id_microstack` <username>@10.20.20.143

# SSH to it, with the MicroStack generated SSH key
$ ssh -i ~/.ssh/id_microstack [email protected]

# Check that this machine is running the buildroot OS (which is what CirrOS uses)
$ cat /etc/os-release
NAME=Buildroot
VERSION=2015.05-g31af4e3-dirty
ID=buildroot
VERSION_ID=2015.05
PRETTY_NAME="Buildroot 2015.05"
Notice that all the commands are prefixed with microstack.. This is because OpenStack runs inside a Snap package.
Adding additional images
By default, MicroStack only includes the CirrOS image. While it is useful for testing that OpenStack can provision resources, it does not provide the ability to install packages.
Many Linux distributions create OpenStack-ready images, a list of which can be found here.
For this post, I used a Debian Buster image: -
# Download the image
$ wget https://cdimage.debian.org/cdimage/openstack/current/debian-10.4.3-20200610-openstack-amd64.qcow2

# Add the image to OpenStack
$ microstack.openstack image create \
            --container-format bare \
            --disk-format qcow2 \
            --file debian-10.4.3-20200610-openstack-amd64.qcow2 \
            debian-buster

# Verify that the image is defined
$ microstack.openstack image list
+--------------------------------------+---------------+--------+
| ID                                   | Name          | Status |
+--------------------------------------+---------------+--------+
| eb4ec0e3-4ca4-4f4e-8b2a-58a5c4a21bbc | cirros        | active |
| 8559ed3c-a9ba-43a0-8508-a637be6dedce | debian-buster | active |
+--------------------------------------+---------------+--------+
This image (and many others) allow the use of cloud-init and cloud-config, allowing you to specify first-time boot configuration and package installation.
Terraform
Terraform has an official OpenStack Provider that allows you to manage the resources on OpenStack. It can create everything from compute instances, object storage, containers and more.
For information on how to install Terraform and an example project structure, see here.
Create application credentials
You can use OpenStack user credentials (even the admin account) with Terraform if you choose. However, using application credentials allows you to restrict what access Terraform has, and can be revoked and/or rotated if the credentials are exposed in some way.
To generate an application credential, you can either use the CLI or the web interface.
CLI
$ microstack.openstack application credential create --role admin terraform_prov
+--------------+----------------------------------------------------------------------------------------+
| Field        | Value                                                                                  |
+--------------+----------------------------------------------------------------------------------------+
| description  | None                                                                                   |
| expires_at   | None                                                                                   |
| id           | 13d10c3fab064589b375a8ef5373c7c4                                                       |
| name         | terraform_prov                                                                         |
| project_id   | d29ad3cbb72c41be867c95561fb6224d                                                       |
| roles        | admin                                                                                  |
| secret       | ###SECRET###                                                                           |
| system       | None                                                                                   |
| unrestricted | False                                                                                  |
| user_id      | 2ef25a15d1ae4d9b9f50e740da61ba6f                                                       |
+--------------+----------------------------------------------------------------------------------------+
Web UI
Go to Identity > Application Credentials and then click Create Application Credential
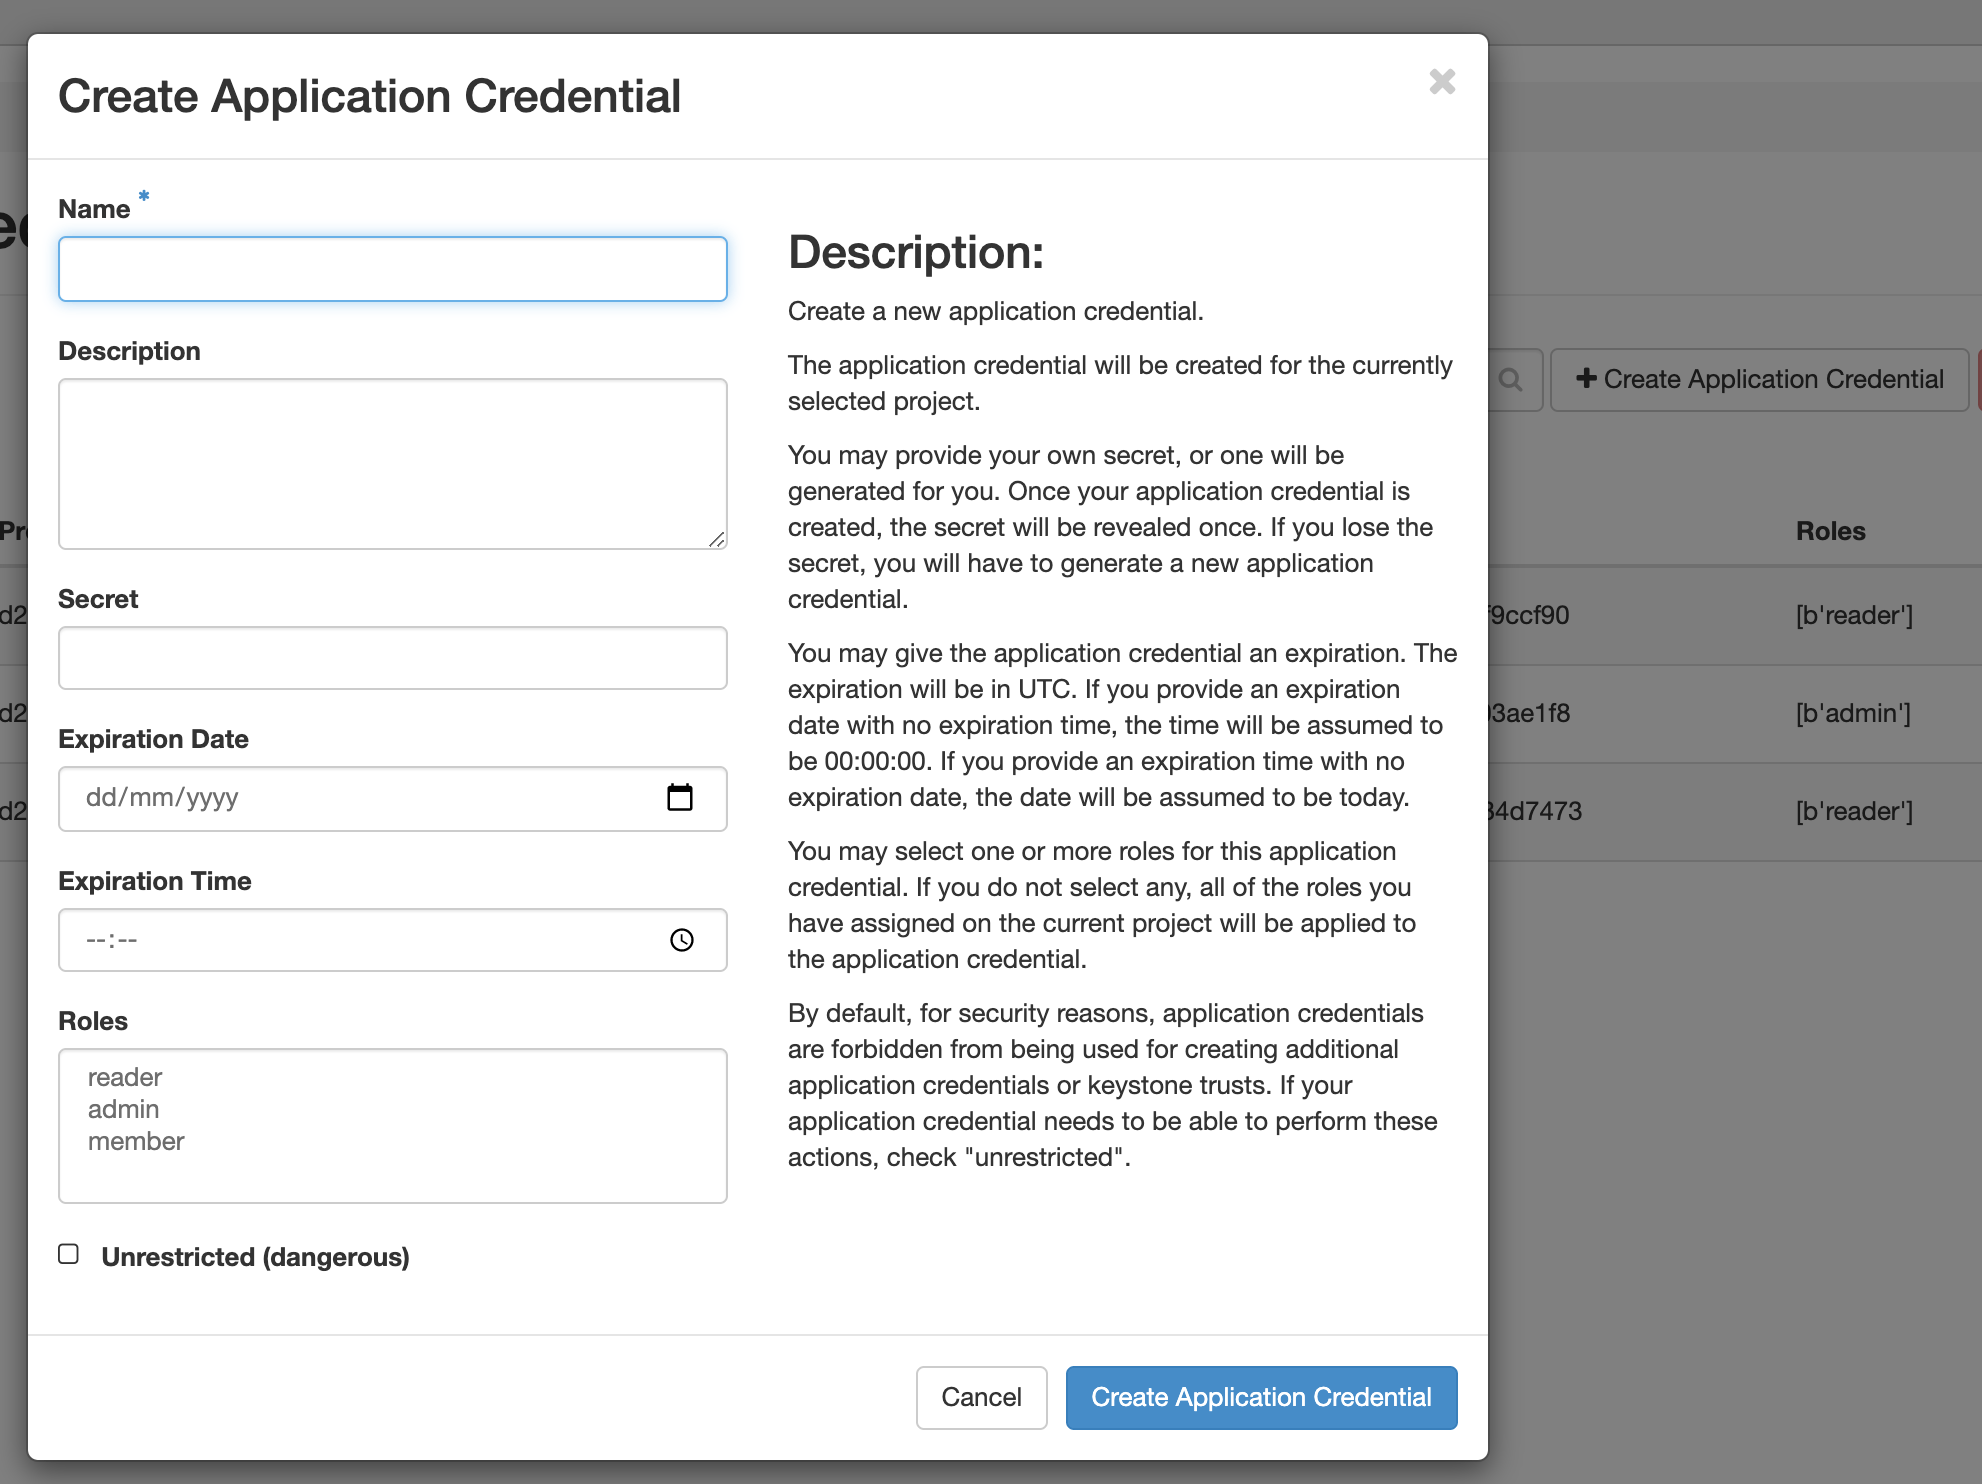
You can assign the application credential a member, reader or admin role. As Terraform will be creating resources, the admin role is applicable.
A couple of points to note here are: -
- The
project_idis the OpenStack project in which you create your resources (think of this like a tenant or your account in a public cloud) - The
user_idis the ID of this application credential
Either note down these credentials, or download them in a clouds.yaml file or an OpenRC file. The latter can be sourced in your .bashrc, .zshrc or the rc file for the shell of your choice.
Provider Configuration
In my Terraform directory, I have create a directory called openstack. In this directory, the provider configuration looks like the below: -
provider "openstack" {
  user_name                     = "admin"
  auth_url                      = "http://10.20.20.1:5000/v3"
  region                        = "microstack"
  user_id                       = "2ef25a15d1ae4d9b9f50e740da61ba6f"
  application_credential_id     = "13d10c3fab064589b375a8ef5373c7c4"
  application_credential_secret = "### SECRET ###"
  tenant_id                     = "d29ad3cbb72c41be867c95561fb6224d"
}
The user_name is admin because the Application Credentials were created within the admin account. If they were created for another OpenStack user, you would change this to the username for that account.
The auth_url uses the v3 Keystone API endpoint (which will be http://10.20.20.1:5000/v3 for any default Microstack install).
The region is microstack. This can be verified with the below: -
$ microstack.openstack region list
+------------+---------------+-------------+
| Region     | Parent Region | Description |
+------------+---------------+-------------+
| microstack | None          |             |
+------------+---------------+-------------+
The user_id, application_credential_id and application_credential_secret are from the credential we created in the previous stage.
The tenant_id is the same as the project_id.
If you have sourced the credentials using the OpenRC file in the previous stage, you can remove all of the fields in the provider. Terraform will use environment variables instead. You would then have something like: -
provider "openstack" {
}
After this, run terraform init to download the OpenStack provider, ready to start creating resource in OpenStack: -
$ terraform init
Initializing the backend...

Initializing provider plugins...
- Checking for available provider plugins...
- Downloading plugin for provider "openstack" (terraform-providers/openstack) 1.29.0...

The following providers do not have any version constraints in configuration,
so the latest version was installed.

To prevent automatic upgrades to new major versions that may contain breaking
changes, it is recommended to add version = "..." constraints to the
corresponding provider blocks in configuration, with the constraint strings
suggested below.

* provider.openstack: version = "~> 1.29"

Terraform has been successfully initialized!

You may now begin working with Terraform. Try running "terraform plan" to see
any changes that are required for your infrastructure. All Terraform commands
should now work.

If you ever set or change modules or backend configuration for Terraform,
rerun this command to reinitialize your working directory. If you forget, other
commands will detect it and remind you to do so if necessary.
Define the infrastructure - Instances
You can now create the configuration files for your first compute instance. The below is from the file instance.tf in the terraform/openstack directory: -
data "openstack_images_image_v2" "debian-buster" {
  name        = "debian-buster"
  most_recent = true
}

resource "openstack_compute_flavor_v2" "m1-micro" {
  name  = "m1.micro"
  ram   = "512"
  vcpus = "1"
  disk  = "5"
}


resource "openstack_compute_keypair_v2" "symphonyx" {
    name       = "symphonyx"
    public_key = "### SSH PUBLIC KEY ###"
}

resource "openstack_compute_instance_v2" "debian-buster" {
  name            = "debian-buster"
  image_id        = data.openstack_images_image_v2.debian-buster.id
  flavor_id       = openstack_compute_flavor_v2.m1-micro.id
  key_pair        = openstack_compute_keypair_v2.symphonyx.name
  security_groups = [
    openstack_networking_secgroup_v2.buster.name
  ]
  user_data       = data.template_file.debian.template

  metadata = {
    prometheus = "true"
    node_exporter = "true"
  }

  network {
    name = "test"
  }
}

resource "openstack_networking_floatingip_v2" "debian-buster-fip" {
    pool = "external"
}

resource "openstack_compute_floatingip_associate_v2" "debian-buster-fip" {
    floating_ip = openstack_networking_floatingip_v2.debian-buster-fip.address
    instance_id = openstack_compute_instance_v2.debian-buster.id
}

resource "openstack_networking_secgroup_v2" "buster" {
    name        = "buster"
    description = "Buster Security Group"
}

resource "openstack_networking_secgroup_rule_v2" "node_exporter" {
  direction         = "ingress"
  ethertype         = "IPv4"
  protocol          = "tcp"
  port_range_min    = 9100
  port_range_max    = 9100
  remote_ip_prefix  = "0.0.0.0/0"
  security_group_id = openstack_networking_secgroup_v2.buster.id
}

resource "openstack_networking_secgroup_rule_v2" "ssh" {
  direction         = "ingress"
  ethertype         = "IPv4"
  protocol          = "tcp"
  port_range_min    = 22
  port_range_max    = 22
  remote_ip_prefix  = "0.0.0.0/0"
  security_group_id = openstack_networking_secgroup_v2.buster.id
}

resource "openstack_networking_secgroup_rule_v2" "icmp_v4" {
  direction         = "ingress"
  ethertype         = "IPv4"
  protocol          = "icmp"
  remote_ip_prefix  = "0.0.0.0/0"
  security_group_id = openstack_networking_secgroup_v2.buster.id
}
To summarize what we are doing here, we: -
- Use a data source to match the Debian Buster OpenStack image we defined earlier
- Define an OpenStack flavour
- Flavours are the “size” of an instance (CPU, RAM and Disk)
- You may not need to do this, depending on your instance size requirements
- Add our SSH key so that we can manage the instance
- Create an OpenStack instance called
debian-buster, using the flavour, image and keypair previously defined. We also: -- Associate a security group (i.e. a firewall)
- OpenStack supports
user_data, so we supply acloud-configtemplate to the instance - Add metadata (i.e. tags) for
prometheusandnode_exporter - Associate the network “test” (which is predefined in MicroStack)
- Create a floating IP and associate it with this instance
- The instance can be destroyed and recreated, but retain the same floating IP (similar to Elastic IPs in AWS)
- Create the security group, and add rules for inbound SSH, ICMP (i.e. ping) and also allow the
node_exporterport (TCP9100)
The user_data is defined using the same approach as here, but with the name changed to debian: -
data "template_file" "debian" {
  template = "${file("${path.module}/files/debian.tpl")}"
}

data "template_cloudinit_config" "debian" {
  gzip          = false
  base64_encode = false

  part {
    filename     = "init.cfg"
    content_type = "text/cloud-config"
    content      = data.template_file.debian.rendered
  }
}
The contents of the template are: -
#cloud-config
packages:
 - prometheus-node-exporter
Build the infrastructure - Instance
We can now apply our configuration, and see if it builds an OpenStack instance: -
$ terraform apply
data.openstack_images_image_v2.debian-buster: Refreshing state...
data.template_file.debian: Refreshing state...
data.template_cloudinit_config.debian: Refreshing state...

An execution plan has been generated and is shown below.
Resource actions are indicated with the following symbols:
  + create

Terraform will perform the following actions:

  # openstack_compute_flavor_v2.m1-micro will be created
  + resource "openstack_compute_flavor_v2" "m1-micro" {
      + disk         = 5
      + extra_specs  = (known after apply)
      + id           = (known after apply)
      + name         = "m1.micro"
      + ram          = 512
      + region       = (known after apply)
      + rx_tx_factor = 1
      + vcpus        = 1
    }

  # openstack_compute_floatingip_associate_v2.debian-buster-fip will be created
  + resource "openstack_compute_floatingip_associate_v2" "debian-buster-fip" {
      + floating_ip = (known after apply)
      + id          = (known after apply)
      + instance_id = (known after apply)
      + region      = (known after apply)
    }

  # openstack_compute_instance_v2.debian-buster will be created
  + resource "openstack_compute_instance_v2" "debian-buster" {
      + access_ip_v4        = (known after apply)
      + access_ip_v6        = (known after apply)
      + all_metadata        = (known after apply)
      + all_tags            = (known after apply)
      + availability_zone   = (known after apply)
      + flavor_id           = (known after apply)
      + flavor_name         = (known after apply)
      + force_delete        = false
      + id                  = (known after apply)
      + image_id            = "8559ed3c-a9ba-43a0-8508-a637be6dedce"
      + image_name          = (known after apply)
      + key_pair            = "symphonyx"
      + metadata            = {
          + "node_exporter" = "true"
          + "prometheus"    = "true"
        }
      + name                = "debian-buster"
      + power_state         = "active"
      + region              = (known after apply)
      + security_groups     = [
          + "buster",
        ]
      + stop_before_destroy = false
      + user_data           = "2169d8a3e100623d34bf1a7b2f6bd924a8997bfb"

      + network {
          + access_network = false
          + fixed_ip_v4    = (known after apply)
          + fixed_ip_v6    = (known after apply)
          + floating_ip    = (known after apply)
          + mac            = (known after apply)
          + name           = "test"
          + port           = (known after apply)
          + uuid           = (known after apply)
        }
    }

  # openstack_compute_keypair_v2.symphonyx will be created
  + resource "openstack_compute_keypair_v2" "symphonyx" {
      + fingerprint = (known after apply)
      + id          = (known after apply)
      + name        = "symphonyx"
      + private_key = (known after apply)
      + public_key  = "### SSH PUBLIC KEY ###"
      + region      = (known after apply)
    }

  # openstack_networking_floatingip_v2.debian-buster-fip will be created
  + resource "openstack_networking_floatingip_v2" "debian-buster-fip" {
      + address    = (known after apply)
      + all_tags   = (known after apply)
      + dns_domain = (known after apply)
      + dns_name   = (known after apply)
      + fixed_ip   = (known after apply)
      + id         = (known after apply)
      + pool       = "external"
      + port_id    = (known after apply)
      + region     = (known after apply)
      + tenant_id  = (known after apply)
    }

  # openstack_networking_secgroup_rule_v2.icmp_v4 will be created
  + resource "openstack_networking_secgroup_rule_v2" "icmp_v4" {
      + direction         = "ingress"
      + ethertype         = "IPv4"
      + id                = (known after apply)
      + port_range_max    = (known after apply)
      + port_range_min    = (known after apply)
      + protocol          = "icmp"
      + region            = (known after apply)
      + remote_group_id   = (known after apply)
      + remote_ip_prefix  = "0.0.0.0/0"
      + security_group_id = (known after apply)
      + tenant_id         = (known after apply)
    }

  # openstack_networking_secgroup_rule_v2.node_exporter will be created
  + resource "openstack_networking_secgroup_rule_v2" "node_exporter" {
      + direction         = "ingress"
      + ethertype         = "IPv4"
      + id                = (known after apply)
      + port_range_max    = 9100
      + port_range_min    = 9100
      + protocol          = "tcp"
      + region            = (known after apply)
      + remote_group_id   = (known after apply)
      + remote_ip_prefix  = "0.0.0.0/0"
      + security_group_id = (known after apply)
      + tenant_id         = (known after apply)
    }

  # openstack_networking_secgroup_rule_v2.ssh will be created
  + resource "openstack_networking_secgroup_rule_v2" "ssh" {
      + direction         = "ingress"
      + ethertype         = "IPv4"
      + id                = (known after apply)
      + port_range_max    = 22
      + port_range_min    = 22
      + protocol          = "tcp"
      + region            = (known after apply)
      + remote_group_id   = (known after apply)
      + remote_ip_prefix  = "0.0.0.0/0"
      + security_group_id = (known after apply)
      + tenant_id         = (known after apply)
    }

  # openstack_networking_secgroup_v2.buster will be created
  + resource "openstack_networking_secgroup_v2" "buster" {
      + all_tags    = (known after apply)
      + description = "Buster Security Group"
      + id          = (known after apply)
      + name        = "buster"
      + region      = (known after apply)
      + tenant_id   = (known after apply)
    }

Plan: 9 to add, 0 to change, 0 to destroy.

Do you want to perform these actions?
  Terraform will perform the actions described above.
  Only 'yes' will be accepted to approve.

  Enter a value: yes

openstack_compute_flavor_v2.m1-micro: Creating...
openstack_compute_keypair_v2.symphonyx: Creating...
openstack_networking_secgroup_v2.buster: Creating...
openstack_networking_floatingip_v2.debian-buster-fip: Creating...
openstack_compute_keypair_v2.symphonyx: Creation complete after 1s [id=symphonyx]
openstack_networking_secgroup_v2.buster: Creation complete after 1s [id=b498273c-53f7-4489-9bf7-83da3de24802]
openstack_networking_secgroup_rule_v2.node_exporter: Creating...
openstack_networking_secgroup_rule_v2.icmp_v4: Creating...
openstack_networking_secgroup_rule_v2.ssh: Creating...
openstack_networking_secgroup_rule_v2.icmp_v4: Creation complete after 0s [id=13705ec0-fb8b-4d91-a7e1-912b1bd8b2e3]
openstack_networking_secgroup_rule_v2.node_exporter: Creation complete after 0s [id=f46cafb7-001c-4543-9476-e32e56c3f0d2]
openstack_networking_secgroup_rule_v2.ssh: Creation complete after 0s [id=4ac2c918-90ba-4cd5-82d7-ecccc96ee634]
openstack_compute_flavor_v2.m1-micro: Creation complete after 1s [id=bd9cefe4-05b7-44b2-bc26-8c74f7ea708d]
openstack_compute_instance_v2.debian-buster: Creating...
openstack_networking_floatingip_v2.debian-buster-fip: Creation complete after 7s [id=6943a249-25a7-46eb-b729-c67330c8eca6]
openstack_compute_instance_v2.debian-buster: Still creating... [10s elapsed]
openstack_compute_instance_v2.debian-buster: Creation complete after 12s [id=aaa3aa7d-6d21-4aba-a872-1722604f4954]
openstack_compute_floatingip_associate_v2.debian-buster-fip: Creating...
openstack_compute_floatingip_associate_v2.debian-buster-fip: Creation complete after 2s [id=10.20.20.156/aaa3aa7d-6d21-4aba-a872-1722604f4954/]

Apply complete! Resources: 9 added, 0 changed, 0 destroyed.
We can double check that Terraform is managing these resources now with terraform state list: -
$ terraform state list
data.openstack_images_image_v2.debian-buster
data.template_cloudinit_config.debian
data.template_file.debian
openstack_compute_flavor_v2.m1-micro
openstack_compute_floatingip_associate_v2.debian-buster-fip
openstack_compute_instance_v2.debian-buster
openstack_compute_keypair_v2.symphonyx
openstack_networking_floatingip_v2.debian-buster-fip
openstack_networking_secgroup_rule_v2.icmp_v4
openstack_networking_secgroup_rule_v2.node_exporter
openstack_networking_secgroup_rule_v2.ssh
openstack_networking_secgroup_v2.buster
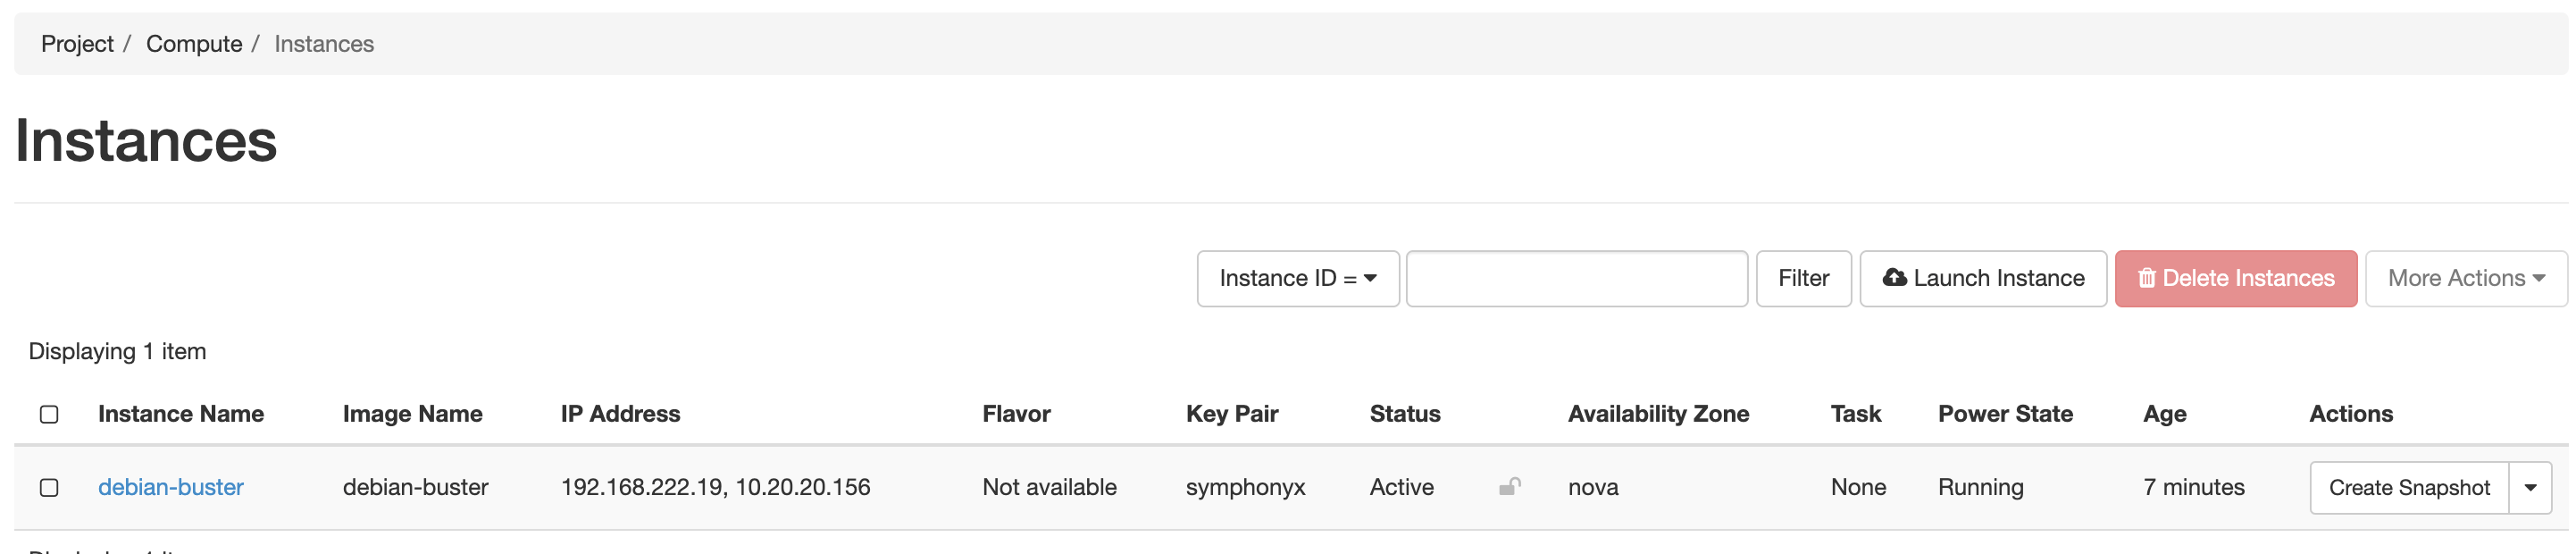
We can check to see if the instance is in the OpenStack Console: -
Now lets try SSH: -
$ ssh [email protected]
Linux debian-buster 4.19.0-9-cloud-amd64 #1 SMP Debian 4.19.118-2+deb10u1 (2020-06-07) x86_64

The programs included with the Debian GNU/Linux system are free software;
the exact distribution terms for each program are described in the
individual files in /usr/share/doc/*/copyright.

Debian GNU/Linux comes with ABSOLUTELY NO WARRANTY, to the extent
permitted by applicable law.

$ ps aux | grep -i node
prometh+  2206  0.5  3.7 558272 18876 ?        Ssl  18:26   0:02 /usr/bin/prometheus-node-exporter
debian    2581  0.0  0.1   6144   884 pts/0    S+   18:35   0:00 grep -i node
Prometheus
Now that we have our Instance created in OpenStack, we can configure Prometheus to discover it.
Create an application credential for Prometheus
Prometheus requires an application credential to discover instances in OpenStack (see here). When creating the credential, assign it the reader role. The Prometheus user does not need to make any changes within OpenStack, only discover from it.
$ microstack.openstack application credential create --role reader prometheus_sd
OpenStack Instance Service Discovery
To allow Prometheus to discover instances in OpenStack, use configuration like the below: -
  - job_name: 'openstack'
    openstack_sd_configs:
      - role: 'instance'
        region: 'microstack'
        identity_endpoint: 'http://10.20.20.1:5000/v3/'
        domain_name: 'default'
        userid: '2ef25a15d1ae4d9b9f50e740da61ba6f'
        application_credential_id: '3f48628678514e909ad3c01d8f9ccf90'
        application_credential_secret: '### APPLICATION CREDENTIAL SECRET ###'
    relabel_configs:
      - source_labels: [__meta_openstack_public_ip]
        target_label: __address__
        replacement: '$1:9100'
      - source_labels: [__meta_openstack_tag_prometheus]
        regex: true.*
        action: keep
      - source_labels: [__meta_openstack_tag_node_exporter]
        regex: true.*
        action: keep
      - action: labelmap
        regex: __meta_openstack_(.+)
Some points to note here are: -
- You can choose between the
hypervisororinstancerolehypervisordiscovers OpenStack hosts - useful if you have multiple hosts using the same Keystone identity endpointinstancediscovers the instances running on the Openstack hosts- The
domain_namemay differ -defaultis the fallback in case you have no others configured
- The
public_ipused in therelabel_configssection is equivalent to the Floating IP created by Terraform
The other values are explained in the Terraform Provider section.
The tag relabelling configuration is similar to how we match tags in the AWS, Azure and Google Cloud Platform post.
We also use something called a label_map. Any metadata discovered that matches the regular expression __meta_openstack_(.+) will be added as a label to all metrics received from discovered hosts. If we look at the metadata discovered for the instance, this will make a lot more sense: -
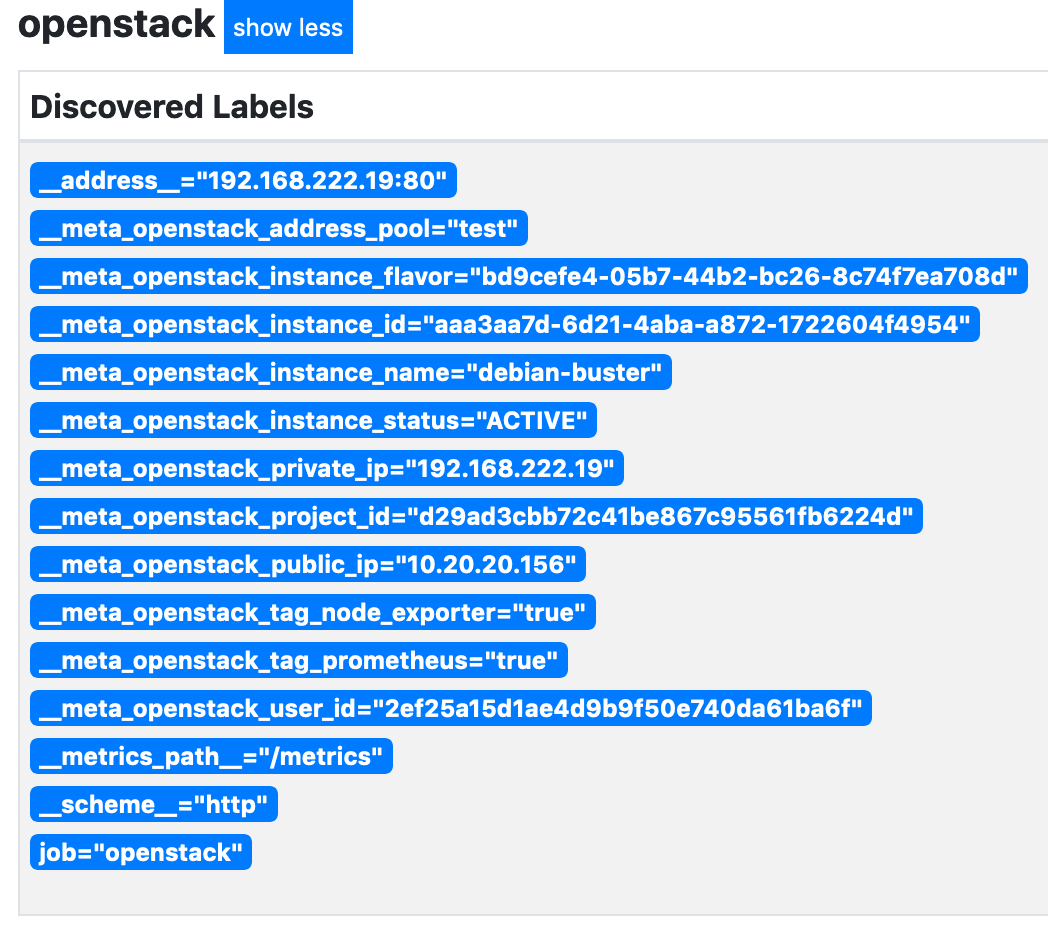
Every discovered label in the above that has the prefix __meta_openstack_ will now be added to the instance and all metrics: -
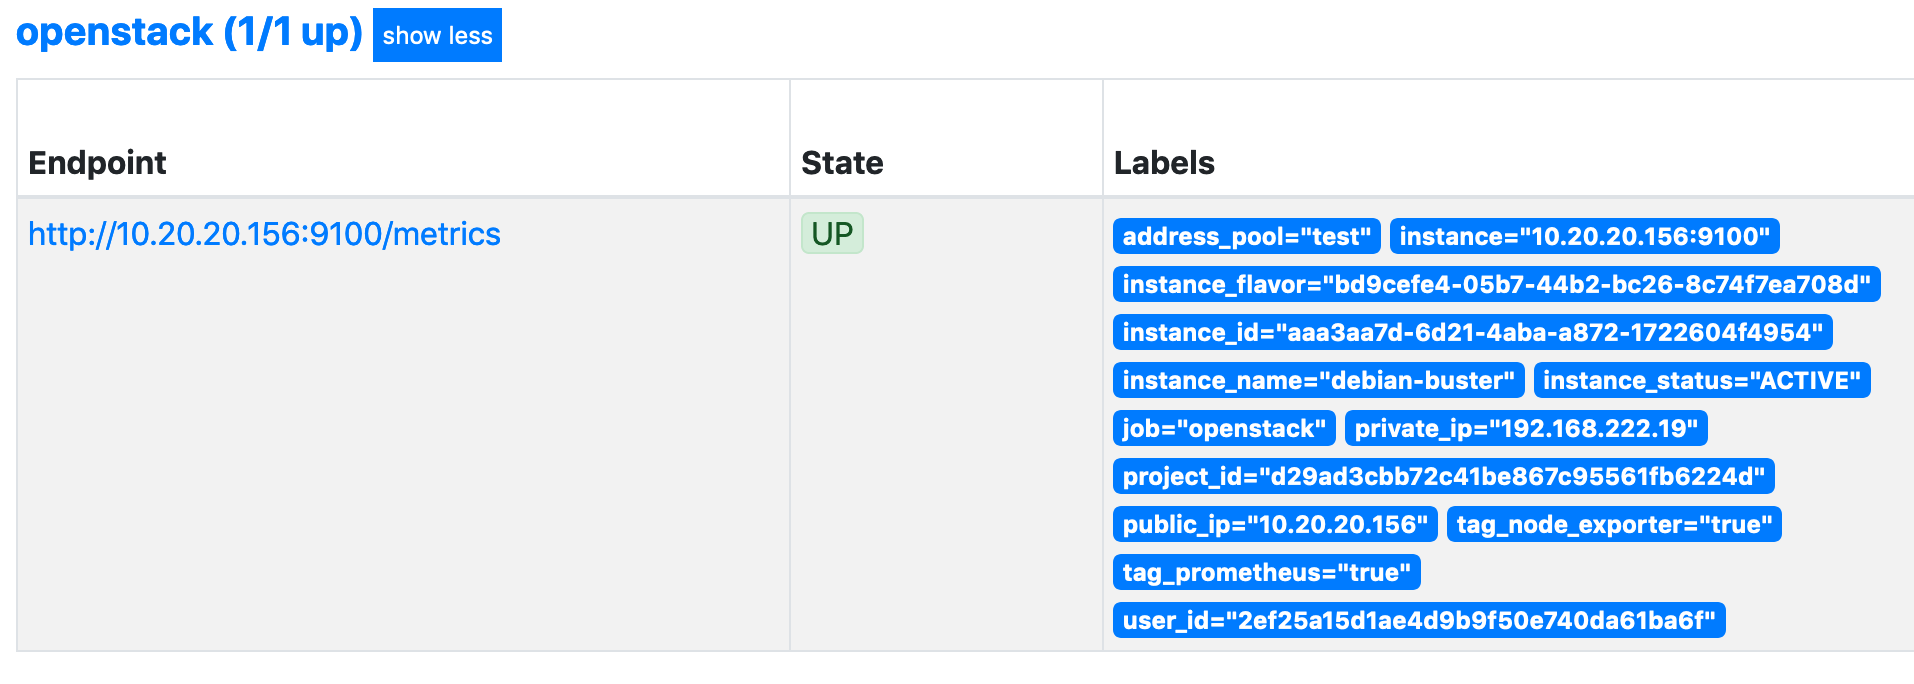
As we can see, we have labels of instance_name, private_ip, instance_status and more. Without the labelmap, we would only see the instance and the job.
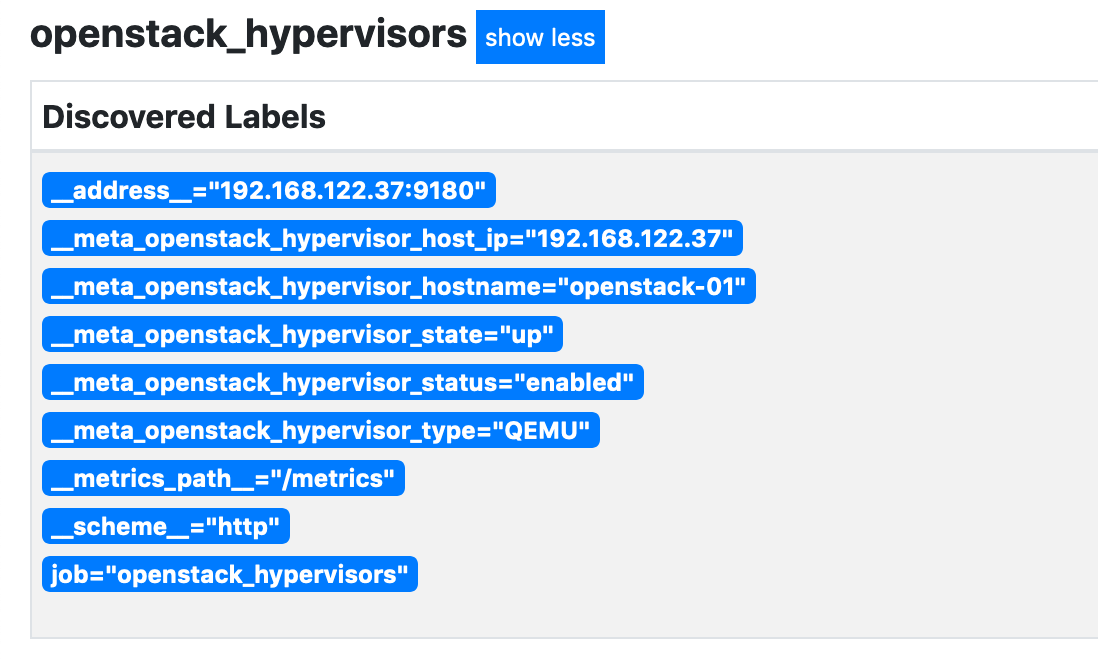
OpenStack Hypervisor Service Discovery
If we want to monitor the hypervisor as well, we can use the following configuration: -
  - job_name: 'openstack_hypervisors'
    openstack_sd_configs:
      - role: 'hypervisor'
        region: 'microstack'
        identity_endpoint: 'http://10.20.20.1:5000/v3/'
        domain_name: 'default'
        userid: '2ef25a15d1ae4d9b9f50e740da61ba6f'
        application_credential_id: '3f48628678514e909ad3c01d8f9ccf90'
        application_credential_secret: '### APPLICATION CREDENTIAL SECRET ###'
        port: '9100'
    relabel_configs:
      - action: labelmap
        regex: __meta_openstack_(.+)
One point to note is that the hypervisor role requires higher privileges than the instance role. You will need to create another application credential, this time with admin privileges.
At this point, you could use only the Prometheus Node Exporter to monitor the hypervisor. If you need to gather OpenStack-specific metrics, then use one of the following projects: -
- openstack-exporter
- prometheus-openstack-exporter from Canonical
The prometheus-openstack-exporter project requires multiple Python dependencies to install it natively on the hypervisor. There is also the option of deploying it as a Docker container
The openstack-exporter project is provided as a single Go binary.
OpenStack Exporter
Download the binary from the openstack-exporter page, extract the contents, and place the openstack-exporter binary in /usr/local/bin.
The openstack-exporter requires the use of a clouds.yaml file. When you create an application credential, you are given the option to download the YAML file: -

Create a prometheus user, and also create a prometheus directory in the /etc folder of your OpenStack host: -
# Create the user
$ adduser prometheus

# Create the Prometheus directory
$ mkdir -p /etc/prometheus

# Make sure the directory is own by the prometheus user
$ chown prometheus:prometheus /etc/prometheus
Place the clouds.yaml file in the /etc/prometheus directory. Once this is done, we can test the exporter: -
$ sudo openstack-exporter --os-client-config /etc/prometheus/clouds.yaml openstack
INFO[0000] Starting openstack exporter version (version=1.1.0, branch=HEAD, revision=f60affb67206e1ab66456b527f3ffc3f8e2a74c6) for cloud: openstack  source="main.go:49"
INFO[0000] Build context (go=go1.13.12, user=root@15b7eb12a7c5, date=20200702-16:24:38)  source="main.go:50"
ERRO[0000] enabling exporter for service volume failed: No suitable endpoint could be found in the service catalog.  source="main.go:63"
ERRO[0000] enabling exporter for service object-store failed: No suitable endpoint could be found in the service catalog.  source="main.go:63"
ERRO[0001] enabling exporter for service dns failed: No suitable endpoint could be found in the service catalog.  source="main.go:63"
ERRO[0001] enabling exporter for service identity failed: No suitable endpoint could be found in the service catalog.  source="main.go:63"
ERRO[0001] enabling exporter for service load-balancer failed: No suitable endpoint could be found in the service catalog.  source="main.go:63"
ERRO[0002] enabling exporter for service container-infra failed: No suitable endpoint could be found in the service catalog.  source="main.go:63"
INFO[0002] Adding metric: floating_ips to exporter: neutron  source="exporter.go:165"
INFO[0002] Adding metric: floating_ips_associated_not_active to exporter: neutron  source="exporter.go:165"
INFO[0002] Adding metric: networks to exporter: neutron  source="exporter.go:165"
INFO[0002] Adding metric: security_groups to exporter: neutron  source="exporter.go:165"
INFO[0002] Adding metric: subnets to exporter: neutron   source="exporter.go:165"
INFO[0002] Adding metric: port to exporter: neutron      source="exporter.go:165"
INFO[0002] Adding metric: ports to exporter: neutron     source="exporter.go:165"
[...]
If you then want this to run when the hypervisor starts, define a SystemD unit file like the below: -
/etc/systemd/system/openstack-exporter.service
[Unit]
Description=OpenStack Exporter
After=network.target

[Service]
User=prometheus
Group=prometheus
Type=simple
ExecStart=/usr/local/bin/openstack-exporter --os-client-config /etc/prometheus/clouds.yaml openstack

[Install]
WantedBy=multi-user.target
Enable and start the service: -
# Enable the service
$ systemctl daemon-reload
$ systemctl enable openstack-exporter

# Start the service
$ systemctl start openstack-exporter
Update the Prometheus job configuration to use port 9180 (the openstack-exporter port) rather than 9100: -
  - job_name: 'openstack_hypervisors'
    openstack_sd_configs:
      - role: 'hypervisor'
        region: 'microstack'
        identity_endpoint: 'http://10.20.20.1:5000/v3/'
        domain_name: 'default'
        userid: '2ef25a15d1ae4d9b9f50e740da61ba6f'
        application_credential_id: '3f48628678514e909ad3c01d8f9ccf90'
        application_credential_secret: '### APPLICATION CREDENTIAL SECRET ###'
        port: '9180'
    relabel_configs:
      - action: labelmap
        regex: __meta_openstack_(.+)
We should now be able to see metadata for the discovered hypervisor (in this case the MicroStack instance) and also see that the openstack-exporter is up: -

Looking good!
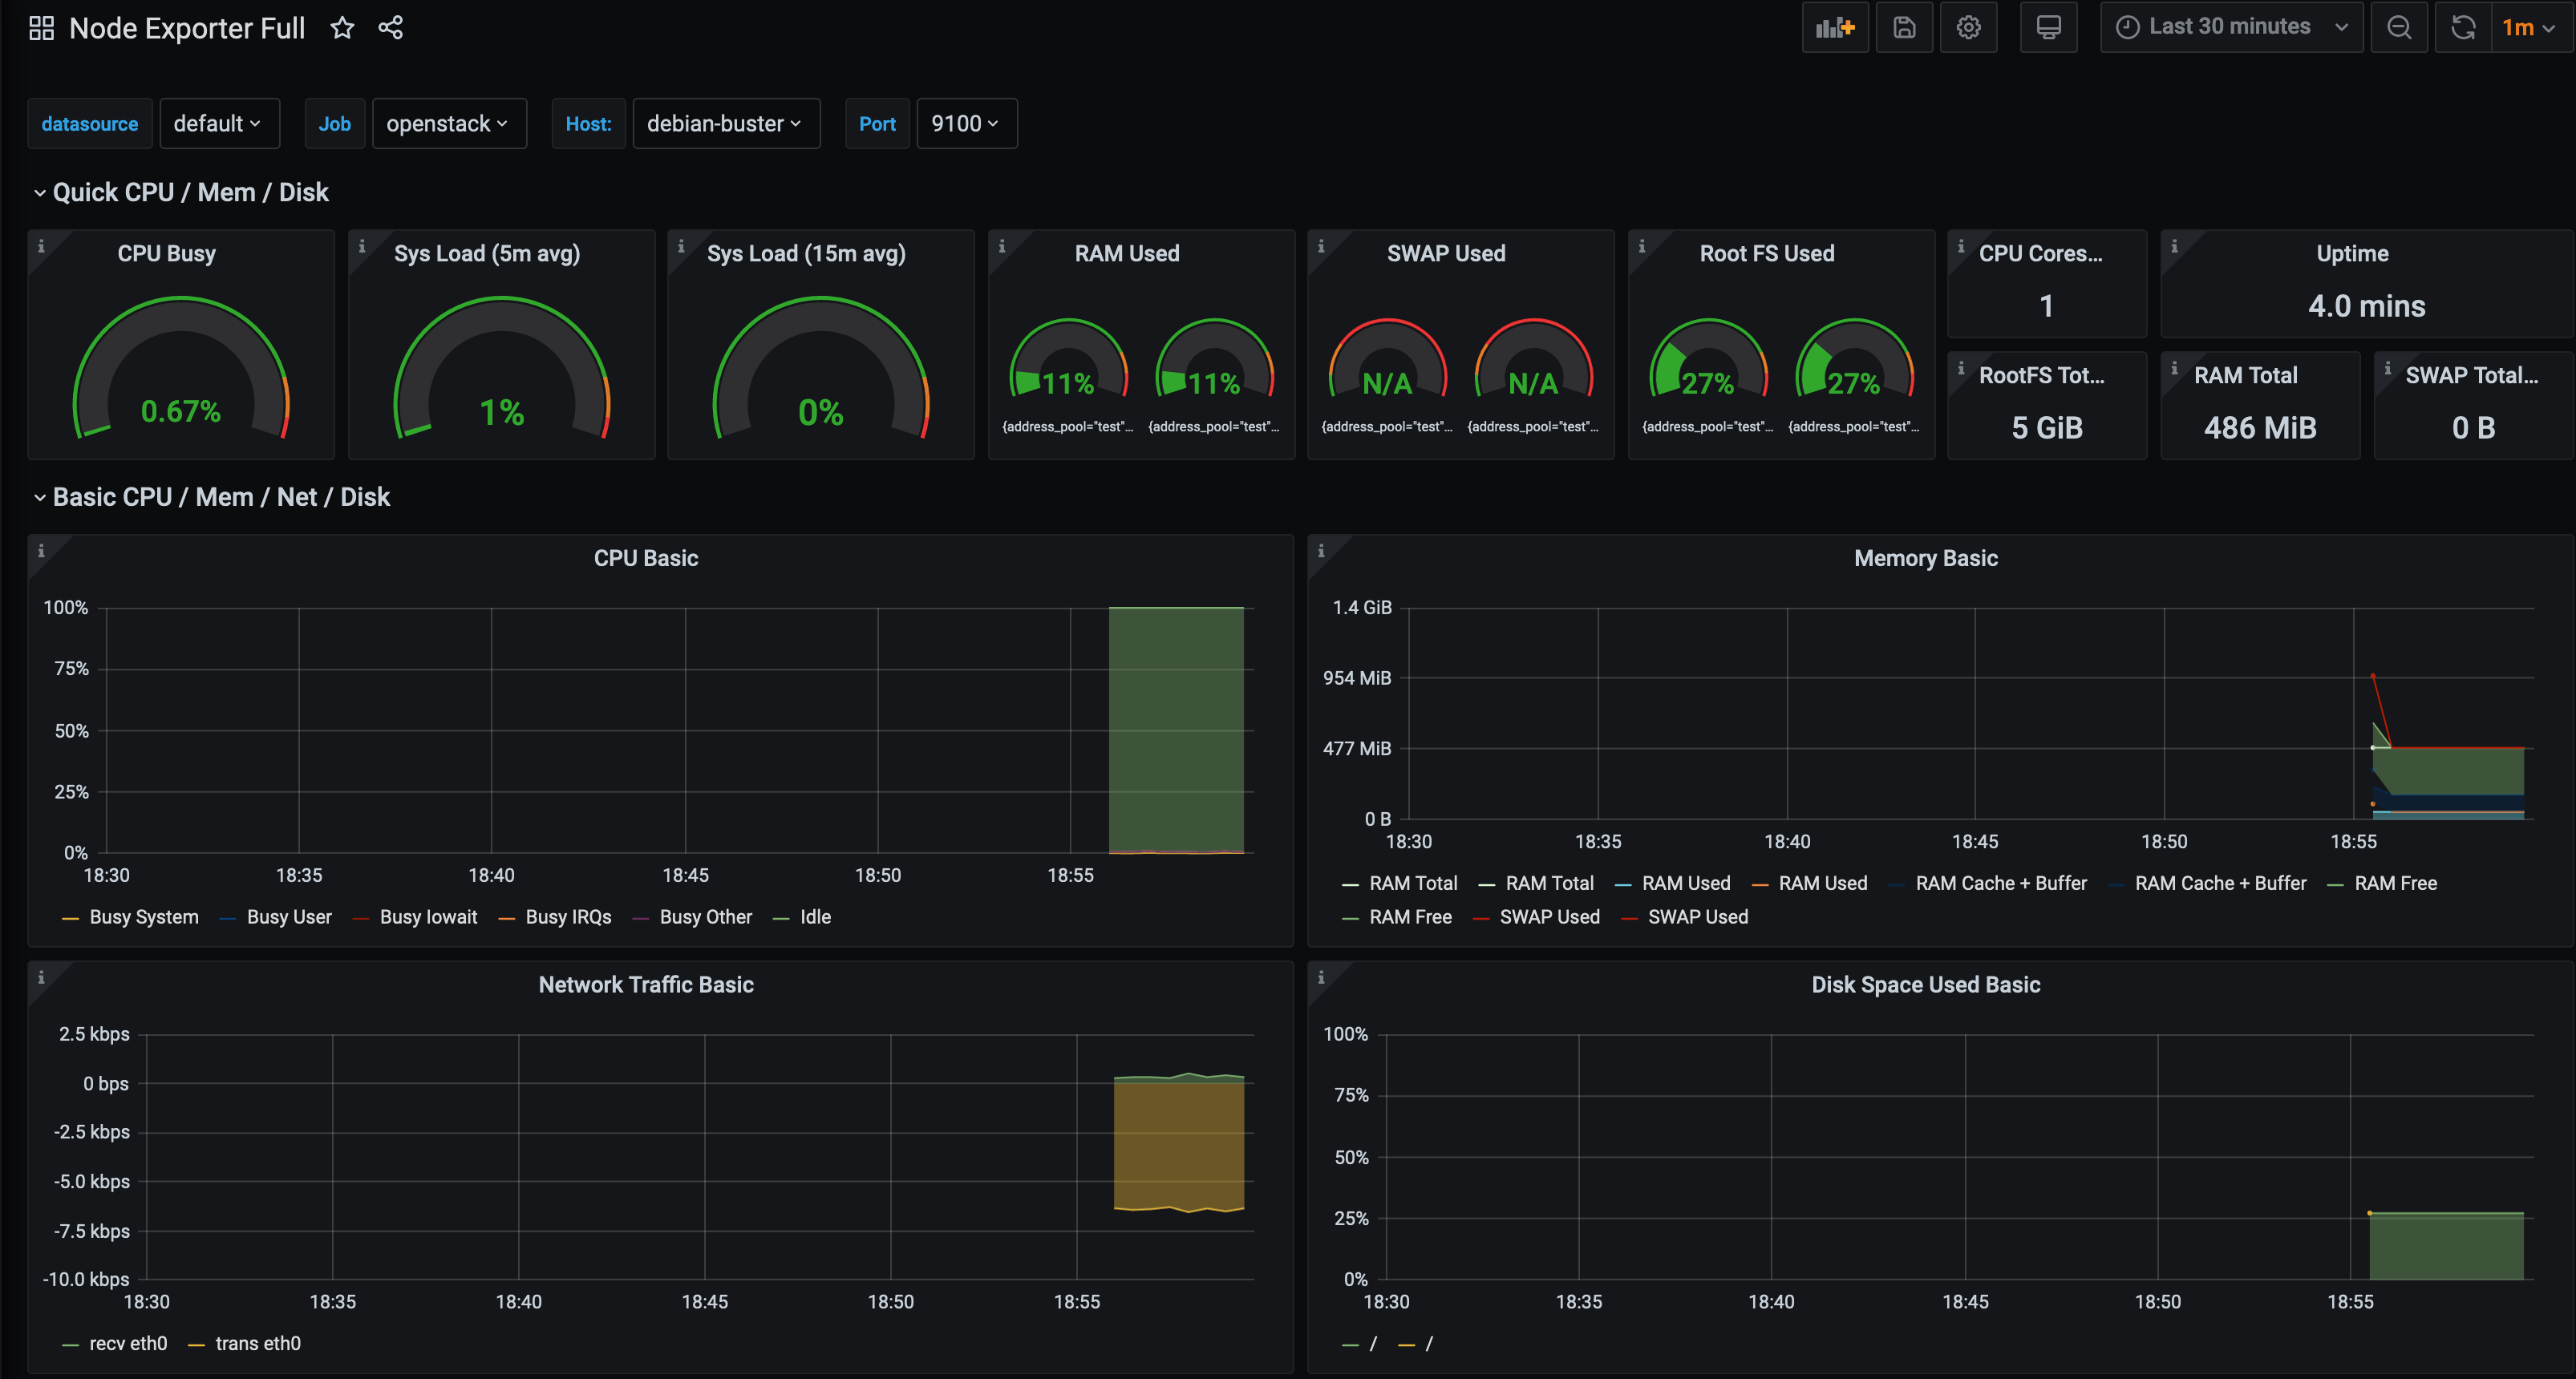
Grafana
Now that we have discovered the instances, we can use any Node Exporter dashboard in Grafana to view their metrics. The Node Exporter Full is always a good start when using the Node Exporter: -
There is also a pre-existing dashboard for the openstack-exporter: -
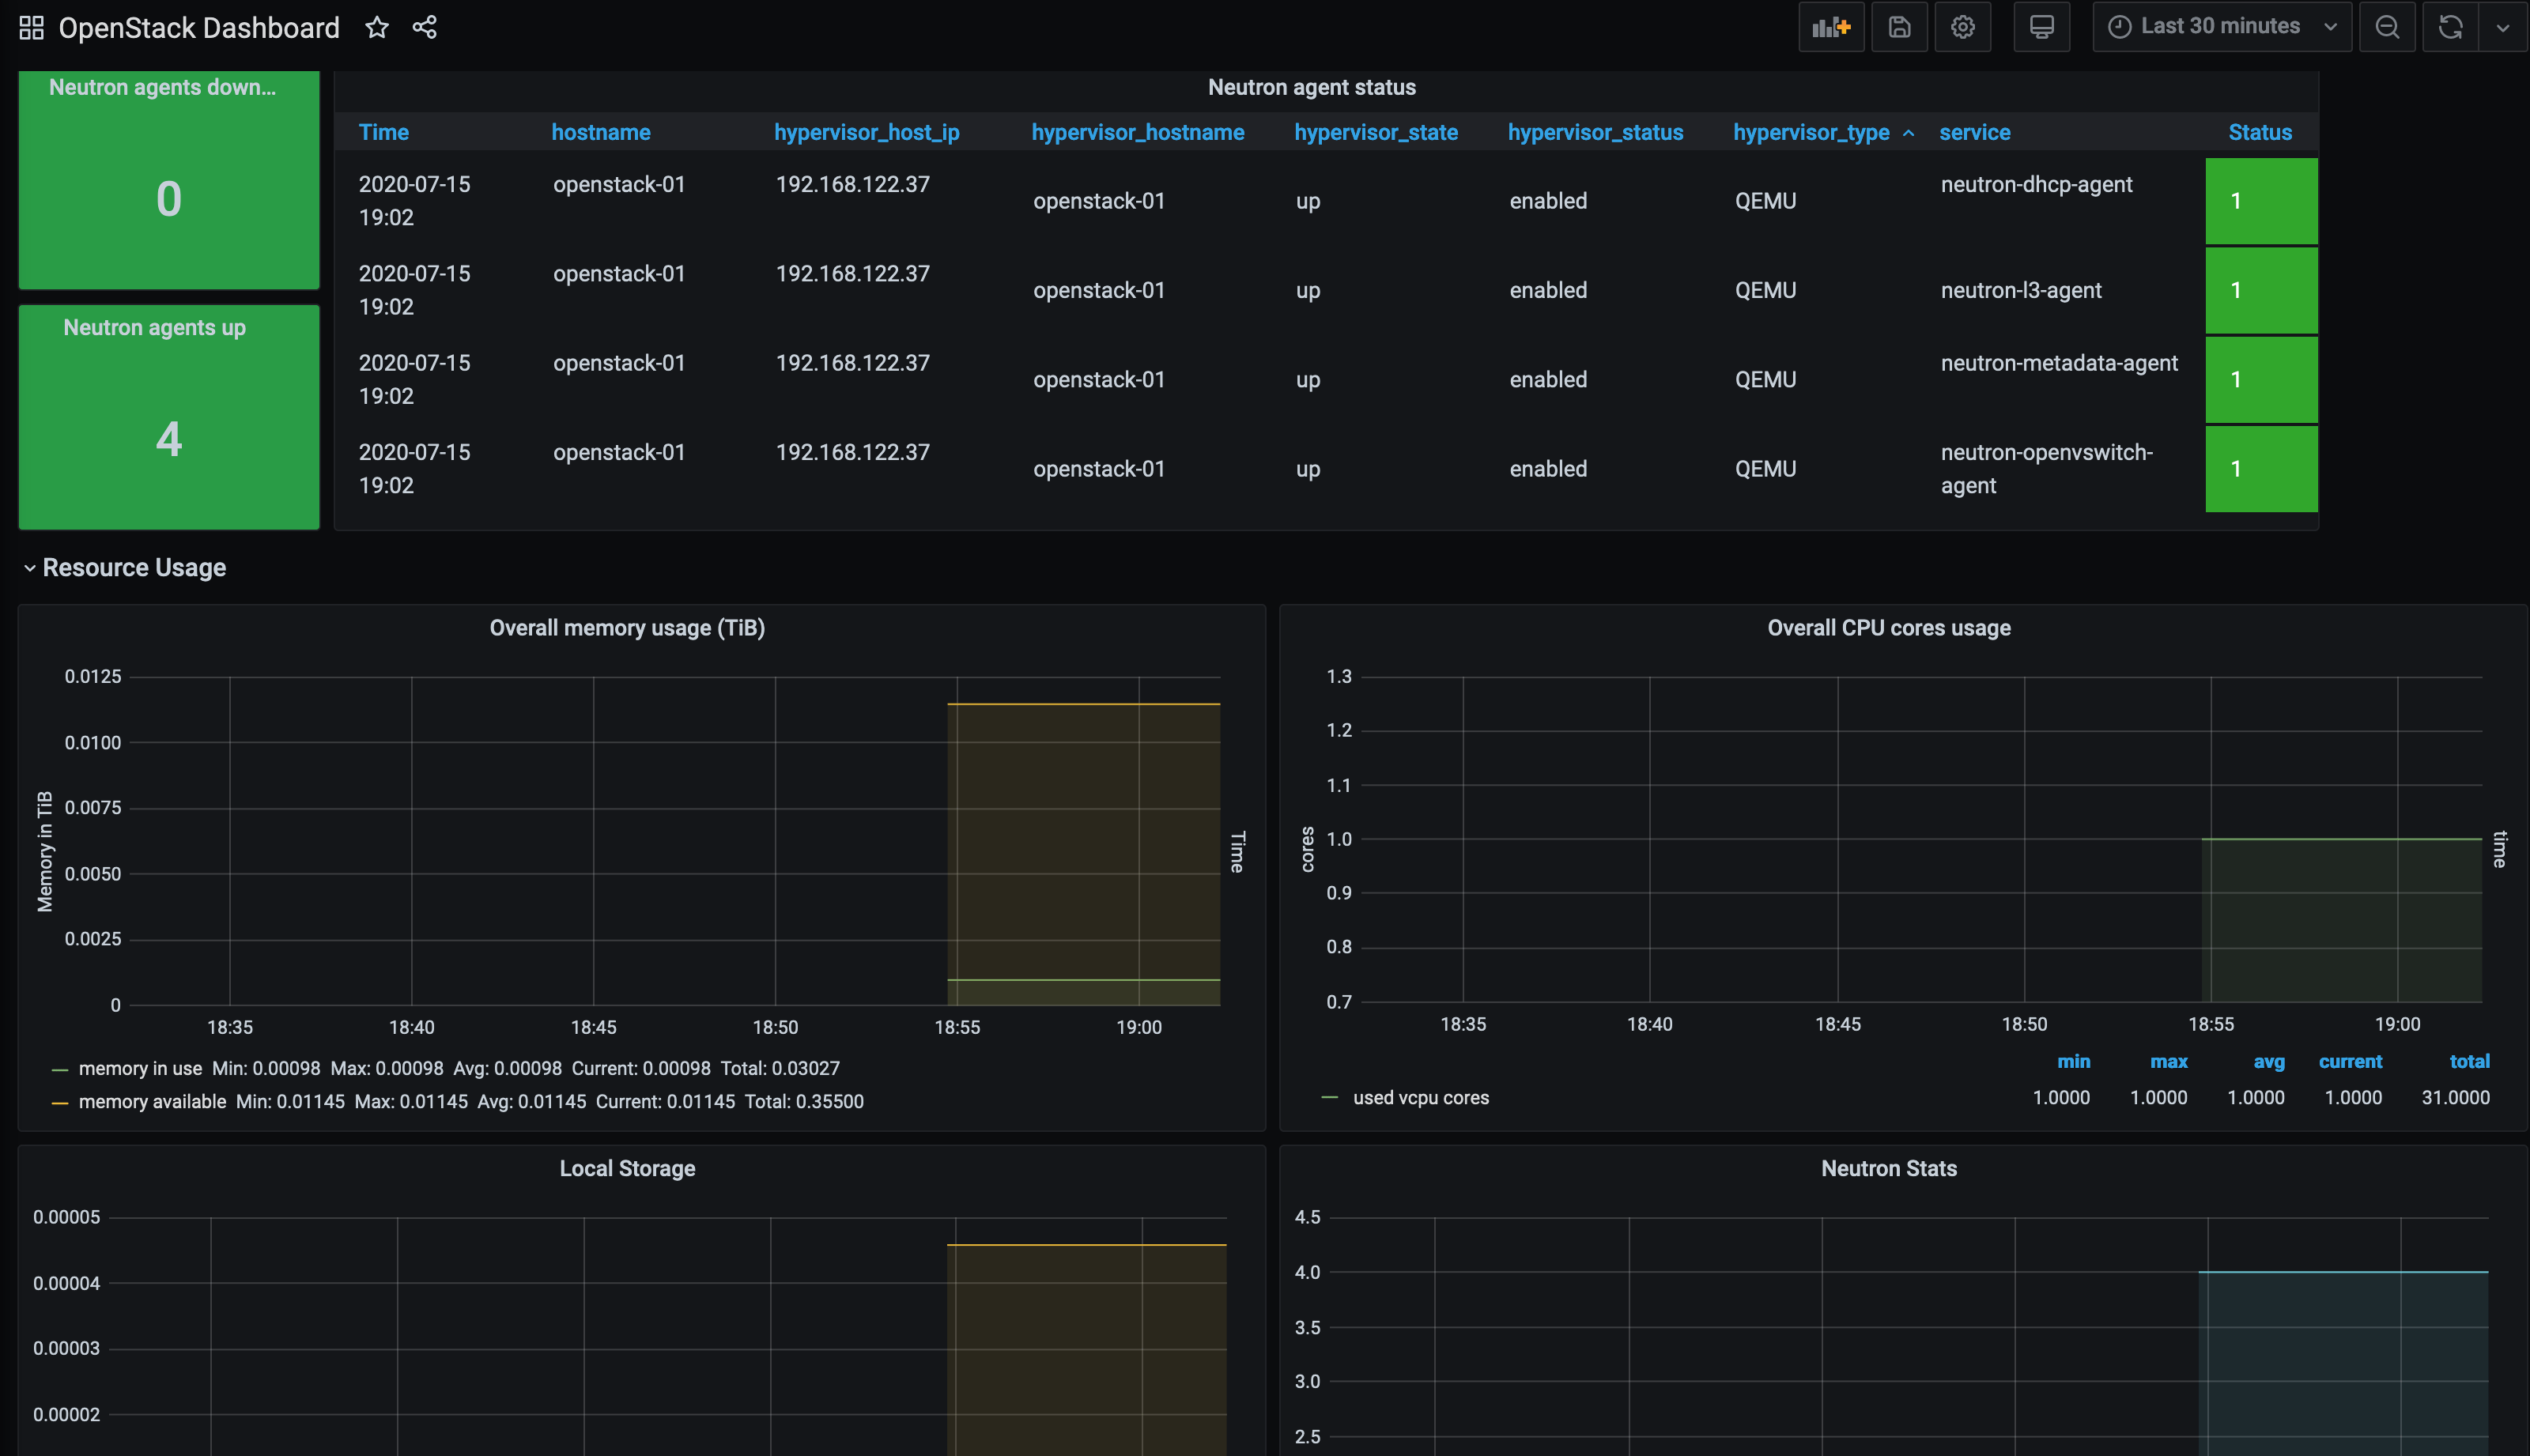
If you decide to use the Canonical OpenStack Exporter, then you could use this dashboard as a reference too.
Summary
For those who choose to own their cloud infrastructure, the OpenStack Service Discovery mechanism does provide a very flexible way of monitoring the hypervisors and instances.
Also, if you migrate from a public cloud provider to OpenStack, it is comforting to know you can manage and monitor your own cloud the same way (i.e. Terraform for deployment, Prometheus for monitoring).
devops monitoring prometheus openstack terraform
technical prometheus monitoring cloud
3682 Words
2020-07-15 18:17 +0000