17 minutes
Prometheus - Auto-deploying Consul and Exporters using Saltstack Part 2: Windows
This is the second part in my ongoing series on using SaltStack to deploy Consul and Prometheus Exporters, enabling Prometheus to discover machines and services to monitor. You can view the other posts in the series below: -
All of the states (as well as those for future posts, if you want a quick preview) are available in my Salt Lab repository.
This post covers Windows Server 2019. The same Salt states have been tested across Windows 2008, 2012 and 2016, so you should not run into any issues for even 12 year old operating systems!
Windows and SaltStack
Managing Windows with SaltStack is quite similar to managing Linux or other systems. The state files are similar, the SaltStack configuration files are the same, and the applications themselves are similar too.
The main differences are permissions, paths, and the lack of an included command line text editor. If you are using servers with the GUI (Desktop Experience) enabled, or using RDP to manage a Windows Core (i.e. Windows without the GUI) install, then you can use Notepad or other editors with a GUI. If however you are managing the machines entirely via the command line, this may prove to be a problem.
Why not just use RDP? In my scenario, it was because my lab network is isolated inside the machine it is running on (KVM hypervisor), with the machine running headless too. If you run in environments requiring jump/bastion hosts to manage infrastructure, then you may run into issues too. Also, managing via the command line uses far less bandwidth (which may or may not be an issue, depending on your network infrastructure).
Configuring a static IP on Windows
If you work primarily with Linux/Unix, you may not be familiar with managing network interfaces on Windows via the command line. You can use the netsh utility, or you can use PowerShell.
You can gain access to Powershell remotely through a virtual machine console, or through WinRM. It is now possible to use SSH too, which I’ll cover later in this post. This is presuming you are managing via a virtual machine console (as the machine may not have an IP yet).
First, you need to get the list of Network Adapters: -
PS C:\Users\Administrator> Get-NetIPInterface

ifIndex InterfaceAlias                  AddressFamily NlMtu(Bytes) InterfaceMetric Dhcp     ConnectionState PolicyStore
------- --------------                  ------------- ------------ --------------- ----     --------------- -----------
5       Ethernet 2                      IPv6                  1500              25 Enabled  Connected       ActiveStore
2       Ethernet                        IPv6                  1500              25 Enabled  Connected       ActiveStore
1       Loopback Pseudo-Interface 1     IPv6            4294967295              75 Disabled Connected       ActiveStore
5       Ethernet 2                      IPv4                  1500              25 Disabled Connected       ActiveStore
2       Ethernet                        IPv4                  1500              25 Enabled  Connected       ActiveStore
1       Loopback Pseudo-Interface 1     IPv4            4294967295              75 Disabled Connected       ActiveStore
You need the ifIndex value for the interface you want to configure. In my case, this is Ethernet 2, so the ifIndex value is 5.
After this, apply the following: -
PS C:\Users\Administrator> New-NetIPAddress -InterfaceIndex 5 -IPAddress 10.15.31.25 -PrefixLength 24
Change the IPAddress values and PrefixLength values for your chosen IP Address and Subnet.
Enabling OpenSSH on Windows
I decided to enable OpenSSH on Windows, enabling me to manage all the machines in the lab the same way. You can enable this yourself by doing the following: -
# Install the OpenSSH Server feature
PS C:\Users\Administrator> Add-WindowsCapability -Online -Name OpenSSH.Server~~~~0.0.1.0

# Enable the services
PS C:\Users\Administrator> Set-Service -Name sshd -StartupType Automatic
PS C:\Users\Administrator> Set-Service -Name ssh-agent -StartupType Automatic
After this, you should be able to SSH into the machine. You can also use SCP to transfer files as well.
$ ssh [email protected]
[email protected]'s password:

Microsoft Windows [Version 10.0.17763.737]
(c) 2018 Microsoft Corporation. All rights reserved.

administrator@WIN2019-01 C:\Users\Administrator>
Installing the Salt Minion
If you have the desktop experience (i.e. the GUI) enabled, you can download the Salt Minion from here, double click the executable and fill in the details of your Salt Master. This will install the Salt Minion, and attempt to register it to your Salt Master.
If you are doing this entirely through the command line though, then follow the below steps: -
Download the installer
To download the installer, use the PowerShell Invoke-WebRequest command: -
PS C:\Users\Administrator> Invoke-WebRequest -uri https://repo.saltstack.com/windows/Salt-Minion-3000.3-Py3-AMD64-Setup.exe -outfile salt-minion.exe
If you need to specify a proxy server, add the -proxy http://$PROXY_IP:$PORT_PORT option.
Some older versions of Windows do not automatically use TLS when using Invoke-WebRequest, instead attempting with SSLv3. If you find that the download fails due to this, you can preface the command with [Net.ServicePointManager]::SecurityProtocol = "tls12, tls11, tls";, which enables TLS for the current Powershell session.
Installing the minion
To install the minion run: -
PS C:\Users\Administrator> Salt-Minion-3000.3-Py3-AMD64-Setup.exe /S /master=$SALT_MASTER /minion-name=$NODENAME
This should install Salt silently (i.e. without spawning an installation wizard). You can check if this worked by running: -
PS C:\Users\Administrator> Get-Service 'salt-minion'

Status   Name               DisplayName
------   ----               -----------
Running  salt-minion        salt-minion
Configuring the minion
While the installer configures the minion, I prefer to change the configuration to including the id and nodename (as I use them in certain states). Windows has no command line text editor out of the box, so we need to find a different way to edit the Minion configuration.
Create the configuration file on a Linux machine, like the below: -
master: salt-master.yetiops.lab
id: win2019-01.yetiops.lab
nodename: win2019-01
You can then use SCP to transfer it to the machine: -
$ scp win2019-01-minion.cfg [email protected]:
Once this is done, place it in the correct directory with the filename minion: -
PS C:\Users\Administrator> mv win2019-01-minion.cfg c:\salt\conf\minion
After this, restart the service (Restart-Service 'salt-minion'). You should now see the machine attempt to register to the Salt Master: -
$ sudo salt-key -L
Accepted Keys:
alpine-01.yetiops.lab
arch-01.yetiops.lab
centos-01.yetiops.lab
salt-master.yetiops.lab
suse-01.yetiops.lab
ubuntu-01.yetiops.lab
void-01.yetiops.lab
Denied Keys:
Unaccepted Keys:
win2019-01.yetiops.lab
Rejected Keys:
Accept the key with salt-key -a 'win2019-01*'. Once this is done, you should now be able to manage the machine using Salt: -
$ sudo salt 'win*' test.ping
win2019-01.yetiops.lab:
    True

$ sudo salt 'win*' grains.item os
win2019-01.yetiops.lab:
    ----------
    os:
        Windows
Salt States
We use two sets of states to deploy to Windows. The first deploys Consul, the other deploys the Windows Exporter. The Windows Exporter (previously known as the WMI exporter) is the Windows equivalent of the Prometheus Node Exporter. It exposes CPU, memory, storage, service states and much more.
Applying Salt States
Once you have configured the states detailed below, use one of the following options to deploy the changes to the Windows machine: -
salt '*' state.highstatefrom the Salt server (to configure every machine and every state)salt 'win*' state.highstatefrom the Salt server (to configure all machines with a name beginning withwin*, applying all states)salt 'win*.' state.apply consulfrom the Salt server (to configure all machines with a name beginning withwin*, applying only theconsulstate)salt-call state.highstatefrom a machine running the Salt agent (to configure just one machine with all states)salt-call state.apply consulfrom a machine running the Salt agent (to configure just one machine with only theconsulstate)
You can also use the salt -C option to apply based upon grains, pillars or other types of matches. For example, to apply to all machines running a Windows kernel, you could run salt -C 'G@kernel:Windows' state.highstate.
Consul - Deployment
States
The following Salt state is used to deploy Consul onto a Windows host: -
/srv/salt/states/consul/windows.sls
consul_user:
  user.present:
    - name: Consul
    - groups:
      - Users
    - fullname: Hashicorp Consul
    - enforce_password: False

consul_base_dir:
  file.directory:
  - name: 'C:\consul'
  - win_owner: Consul
  - win_perms: {'Users': {'perms': 'full_control', 'applies_to': 'this_folder_only'}}
  - makedirs: True

{% if not salt['file.file_exists']('c:\consul\consul.exe') %}

retrieve_consul:
  cmd.run:
    - name: '[Net.ServicePointManager]::SecurityProtocol = "tls12, tls11, tls"; Invoke-WebRequest -uri https://releases.hashicorp.com/consul/1.7.2/consul_1.7.2_windows_amd64.zip -OutFile c:\consul\consul.zip'
    - shell: powershell

extract_consul:
  archive.extracted:
    - name: c:\consul
    - enforce_toplevel: false
    - source: c:\consul\consul.zip

remove_consul_zip:
  file.absent:
    - name: c:\consul\consul.zip
{% endif %}

consul_conf_dir:
  file.directory:
  - name: 'C:\consul\conf'
  - win_owner: Consul
  - win_perms: {'Users': {'perms': 'full_control', 'applies_to': 'this_folder_only'}}
  - makedirs: True

consul_data_dir:
  file.directory:
  - name: 'C:\consul\data'
  - win_owner: Consul
  - win_perms: {'Users': {'perms': 'full_control', 'applies_to': 'this_folder_only'}}
  - makedirs: True

c:\consul\conf\consul.hcl:
  file.managed:
    - source: salt://consul/client/files/consul.hcl.j2
    - win_owner: consul
    - template: jinja

{% if salt['service.available']('consul') %}
modify_consul_service:
  module.run:
    - name: service.modify
    - m_name: consul
    - bin_path: 'c:\consul\consul.exe'
    - display_name: 'HashiCorp Consul Client Agent'
    - exe_args: 'agent -config-dir=c:\consul\conf'
    - start_type: auto
{% else %}
create_consul_service:
  module.run:
    - name: service.create
    - m_name: consul
    - bin_path: 'c:\consul\consul.exe'
    - display_name: 'HashiCorp Consul Client Agent'
    - exe_args: 'agent -config-dir=c:\consul\conf'
    - start_type: auto
{% endif %}

running_consul_service:
  service.running:
    - name: consul

{% if pillar['consul'] is defined %}
{% if pillar['consul']['prometheus_services'] is defined %}
{% for service in pillar['consul']['prometheus_services'] %}
c:\consul\conf\{{ service }}.hcl:
  file.managed:
    - source: salt://consul/services/files/{{ service }}.hcl
    - win_owner: consul
    - template: jinja

consul_reload_{{ service }}:
  cmd.run:
    - name: c:\consul\consul.exe reload
    - shell: powershell
    - watch:
      - file: c:\consul\conf\{{ service }}.hcl
{% endfor %}
{% endif %}
{% endif %}
As mentioned, the state isn’t too dissimilar to the Linux Consul state. The biggest differences are the paths (e.g. c:\ vs / as your base/root directory), and permissions in Windows are different than in Linux or Unix.
consul_user:
  user.present:
    - name: Consul
    - groups:
      - Users
    - fullname: Hashicorp Consul
    - enforce_password: False
Rather than creating a Consul-specific group, we leverage the Users group. We do not need more permissions than this, so this is sufficient. We also avoid setting a password, as this is not required for this user.
consul_base_dir:
  file.directory:
  - name: 'C:\consul'
  - win_owner: Consul
  - win_perms: {'Users': {'perms': 'full_control', 'applies_to': 'this_folder_only'}}
  - makedirs: True
This creates a folder called C:\consul, owned by the Consul user, controllable by the Users group. We use makedirs: True so that directories will be created if they do not already exist.
{% if not salt['file.file_exists']('c:\consul\consul.exe') %}

retrieve_consul:
  cmd.run:
    - name: '[Net.ServicePointManager]::SecurityProtocol = "tls12, tls11, tls"; Invoke-WebRequest -uri https://releases.hashicorp.com/consul/1.7.2/consul_1.7.2_windows_amd64.zip -OutFile c:\consul\consul.zip'
    - shell: powershell

extract_consul:
  archive.extracted:
    - name: c:\consul
    - enforce_toplevel: false
    - source: c:\consul\consul.zip

remove_consul_zip:
  file.absent:
    - name: c:\consul\consul.zip
{% endif %}
Here we download the Consul zip archive containing the binary consul.exe, extract it to the c:\consul directory and remove the consul.zip file once it is extracted. This only runs if the c:\consul\consul.exe file does not already exist. This stops the task running on subsequent state applies.
consul_conf_dir:
  file.directory:
  - name: 'C:\consul\conf'
  - win_owner: Consul
  - win_perms: {'Users': {'perms': 'full_control', 'applies_to': 'this_folder_only'}}
  - makedirs: True

consul_data_dir:
  file.directory:
  - name: 'C:\consul\data'
  - win_owner: Consul
  - win_perms: {'Users': {'perms': 'full_control', 'applies_to': 'this_folder_only'}}
  - makedirs: True

c:\consul\conf\consul.hcl:
  file.managed:
    - source: salt://consul/client/files/consul.hcl.j2
    - win_owner: consul
    - template: jinja
Here we create the c:\consul\conf directory (for Consul configuration files) and c:\consul\data (where Consul stores its data and running state). We also create the c:\consul\conf\consul.hcl file. This template used is the same regardless of operating system.
{
{%- for ip in grains['ipv4'] %}
{%- if '10.15.31' in ip %}
  "advertise_addr": "{{ ip }}",
  "bind_addr": "{{ ip }}",
{%- endif %}
{%- endfor %}
  "data_dir": "{{ pillar['consul']['data_dir'] }}",
  "datacenter": "{{ pillar['consul']['dc'] }}",
  "encrypt": "{{ pillar['consul']['enc_key'] }}",
  "node_name": "{{ grains['nodename'] }}",
  "retry_join": [
{%- for server in pillar['consul']['servers'] %}
    "{{ server }}",
{%- endfor %}
  ],
  "server": false,
}
The only difference this file has when generated, compared to the other hosts in the lab, is the data_dir. We will see this in the pillars later.
{% if salt['service.available']('consul') %}
modify_consul_service:
  module.run:
    - name: service.modify
    - m_name: consul
    - bin_path: 'c:\consul\consul.exe'
    - display_name: 'HashiCorp Consul Client Agent'
    - exe_args: 'agent -config-dir=c:\consul\conf'
    - start_type: auto
{% else %}
create_consul_service:
  module.run:
    - name: service.create
    - m_name: consul
    - bin_path: 'c:\consul\consul.exe'
    - display_name: 'HashiCorp Consul Client Agent'
    - exe_args: 'agent -config-dir=c:\consul\conf'
    - start_type: auto
{% endif %}
In this section, we use module.run, which is where Salt uses modules rather than state directives. States use the “desired state” approach, where if what we aim to achieve (e.g. configuration files generated by Salt match what is already on the machine) then no changes are made.
Modules are intended for running ad-hoc jobs (running a command or making changes to a file once). Every time they run, they try to make the same changes, regardless of whether the intended state matches what is already on the machine.
Currently there is no Salt state directive for defining Windows services natively, only modules. Because of this, we implement some conditional logic (if/else). If the service already exists (i.e. service.available), modify the existing service. If it does not, create the service.
The name value states the module we will use. The m_name is used in place of supplying the name argument to the module itself. This is the same as running salt 'win2019-01*' service.modify name=consul.
The out come is that there will always be a module run on every state apply, regardless of whether any changes need to happen (either creation or modification of the service). This isn’t ideal, but it is better to do this than adding more complexity (e.g. pulling back each field from an existing service and checking it).
running_consul_service:
  service.running:
    - name: consul

{% if pillar['consul'] is defined %}
{% if pillar['consul']['prometheus_services'] is defined %}
{% for service in pillar['consul']['prometheus_services'] %}
c:\consul\conf\{{ service }}.hcl:
  file.managed:
    - source: salt://consul/services/files/{{ service }}.hcl
    - win_owner: consul
    - template: jinja

consul_reload_{{ service }}:
  cmd.run:
    - name: c:\consul\consul.exe reload
    - shell: powershell
    - watch:
      - file: c:\consul\conf\{{ service }}.hcl
{% endfor %}
{% endif %}
{% endif %}
The above states are very similar to what we use for Linux. We ensure the service runs, and then we add the HCL configuration files for services we would like to register with Consul.
The state is applied as such: -
base:
  'G@init:systemd and G@kernel:Linux':
    - match: compound
    - consul
    - exporters.node_exporter.systemd

  'os:Alpine':
    - match: grain
    - consul.alpine
    - exporters.node_exporter.alpine

  'os:Void':
    - match: grain
    - consul.void
    - exporters.node_exporter.void

  'kernel:Windows':
    - match: grain
    - consul.windows
In the above, we match any OS which has a Salt grain of kernel: Windows, demonstrated below: -
$ salt 'win2019-01*' grains.item kernel
win2019-01.yetiops.lab:
    ----------
    kernel:
        Windows

$ salt -C 'G@kernel:Windows' test.ping
win2019-01.yetiops.lab:
    True
In our lab, this only matches one machine. If we add more Windows machines, then we would see them here too.
Pillars
The pillars (i.e. the host/group specific variables) are defined as such: -
consul-client-win.sls
consul:
  data_dir: c:/consul/data
  prometheus_services:
  - windows_exporter
consul-dc.sls
consul:
  dc: yetiops
  enc_key: ###CONSUL_KEY###
  servers:
  - salt-master.yetiops.lab
These pillars reside in /srv/salt/pillars/consul. The consul-dc.sls file is the same as we use for all of the Consul clients.
The differences here compared to the other hosts are that we have a different data_dir, and that we want to register the windows_exporter service with Consul rather than node_exporter.
A point to note is that Consul expects the directories to use forward-slashes, even on Windows. If you supply them as a standard Windows path (e.g. c:\consul\data), Consul will not start.
The Consul service file that will get deployed based upon the above is: -
/srv/salt/states/consul/services/windows_exporter.hcl
{"service":
  {"name": "windows_exporter",
   "tags": ["windows_exporter", "prometheus"],
   "port": 9182
  }
}
This is tagged with prometheus (so Prometheus knows to match against this service) and windows_exporter (for easy grouping when looking through the Consul UI or API).
These pillars are applied as such: -
base:
  '*':
    - consul.consul-dc

  'G@kernel:Linux':
    - match: compound
    - consul.consul

  'kernel:Windows':
    - match: grain
    - consul.consul-client-win

  'salt-master*':
    - consul.consul-server
As before, the consul.consul-dc pillar is applied to everything. We also apply the consul.consul-client-win pillar only to Windows. We are not running any Windows hosts as the Consul server, so this is enough.
Consul - Verification
We can verify that Consul is working with the below: -
On the Windows host
administrator@WIN2019-01 c:\consul>.\consul.exe members
Node                   Address           Status  Type    Build  Protocol  DC       Segment
salt-master            10.15.31.5:8301   alive   server  1.7.3  2         yetiops  <all>
alpine-01              10.15.31.27:8301  alive   client  1.7.3  2         yetiops  <default>
arch-01                10.15.31.26:8301  alive   client  1.7.3  2         yetiops  <default>
centos-01.yetiops.lab  10.15.31.24:8301  alive   client  1.7.3  2         yetiops  <default>
suse-01                10.15.31.22:8301  alive   client  1.7.3  2         yetiops  <default>
ubuntu-01              10.15.31.33:8301  alive   client  1.7.3  2         yetiops  <default>
void-01                10.15.31.31:8301  alive   client  1.7.2  2         yetiops  <default>
win2019-01             10.15.31.25:8301  alive   client  1.7.2  2         yetiops  <default>

administrator@WIN2019-01 c:\consul>.\consul.exe catalog nodes -service=windows_exporter
Node        ID        Address      DC
win2019-01  7a185c82  10.15.31.25  yetiops
On a Linux host
$ consul members
Node                   Address           Status  Type    Build  Protocol  DC       Segment
salt-master            10.15.31.5:8301   alive   server  1.7.3  2         yetiops  <all>
alpine-01              10.15.31.27:8301  alive   client  1.7.3  2         yetiops  <default>
arch-01                10.15.31.26:8301  alive   client  1.7.3  2         yetiops  <default>
centos-01.yetiops.lab  10.15.31.24:8301  alive   client  1.7.3  2         yetiops  <default>
suse-01                10.15.31.22:8301  alive   client  1.7.3  2         yetiops  <default>
ubuntu-01              10.15.31.33:8301  alive   client  1.7.3  2         yetiops  <default>
void-01                10.15.31.31:8301  alive   client  1.7.2  2         yetiops  <default>
win2019-01             10.15.31.25:8301  alive   client  1.7.2  2         yetiops  <default>

$ consul catalog nodes -service windows_exporter
Node        ID        Address      DC
win2019-01  7a185c82  10.15.31.25  yetiops
Windows Exporter - Deployment
As in the Linux post, we have informed Consul that the windows_exporter service should be running. This state is what deploys the exporter itself.
States
The following Salt states are used to deploy the Prometheus Windows Exporter onto a Windows host: -
win_exporter.sls
exporter_user:
  user.present:
    - name: exporter
    - groups:
      - Users
    - fullname: Prometheus Exporter User
    - enforce_password: False

exporter_base_dir:
  file.directory:
  - name: 'C:\exporter'
  - win_owner: exporter
  - win_perms: {'Users': {'perms': 'full_control', 'applies_to': 'this_folder_only'}}
  - makedirs: True

exporter_textfile_dir:
  file.directory:
  - name: 'C:\exporter\textfile'
  - win_owner: exporter
  - win_perms: {'Users': {'perms': 'full_control', 'applies_to': 'this_folder_only'}}
  - makedirs: True
The above state is a prerequisite state for all exporters we may install on Windows. This creates the exporter user and folder, rather than setting this up for every exporter we install. As with the Consul state, we do not enforce a password, and we place the exporter user in the Users group.
Without this state, we would have a lot of boilerplate/repeated tasks to create the same folders for every additional exporter.
windows_exporter.sls
windows_exporter_dir:
  file.directory:
  - name: 'C:\exporter\windows_exporter'
  - win_owner: exporter
  - win_perms: {'Users': {'perms': 'full_control', 'applies_to': 'this_folder_only'}}
  - makedirs: True

{% if not salt['file.file_exists']('c:\exporter\windows_exporter\windows_exporter.msi') %}

retrieve_windows_exporter:
  cmd.run:
    - name: '[Net.ServicePointManager]::SecurityProtocol = "tls12, tls11, tls"; Invoke-WebRequest -uri https://github.com/prometheus-community/windows_exporter/releases/download/v0.13.0/windows_exporter-0.13.0-amd64.msi -OutFile c:\exporter\windows_exporter\windows_exporter.msi'
    - shell: powershell
{% endif %}

{% if not salt['service.available']('windows_exporter') %}
windows_exporter_install:
  cmd.run:
    - name: msiexec /i C:\exporter\windows_exporter\windows_exporter.msi /quiet ENABLED_COLLECTORS="cpu,cs,logical_disk,memory,net,os,process,service,system,textfile" TEXTFILE_DIR="C:\exporter\textfile"
    - shell: powershell
{% endif %}
Because the Windows Exporter comes with its own installation file (i.e. an MSI), it automatically creates the Windows services and installs the exporter into the correct location. This means the state has far fewer parts than some of the states for the Node Exporter (especially the Linux SystemD state).
As with Consul, we need to specify that the server will require TLS for retrieving the installer. We only download the MSI if it does not already exist on the machine.
Finally, we check if the windows_exporter service is available, and if not, we install from the MSI. We specify the collectors we want enabled (as some are not enabled by default). We also enable the Textfile directory in case we want to run scripts that generate their own metrics.
These states are applied with the following: -
base:
  'G@init:systemd and G@kernel:Linux':
    - match: compound
    - consul
    - exporters.node_exporter.systemd

  'os:Alpine':
    - match: grain
    - consul.alpine
    - exporters.node_exporter.alpine

  'os:Void':
    - match: grain
    - consul.void
    - exporters.node_exporter.void

  'kernel:Windows':
    - match: grain
    - consul.windows
    - exporters.windows_exporter.win_exporter
    - exporters.windows_exporter.windows_exporter
As you can see, we apply the win_exporter and windows_exporter states to any host running the Windows kernel.
Pillars
There are no pillars in this lab specific to the Windows Exporter.
Windows Exporter - Verification
After this, we should see that the service is running: -
PS C:\Users\Administrator> Get-Service 'windows_exporter'

Status   Name               DisplayName
------   ----               -----------
Running  windows_exporter   windows_exporter
We should also see that it is listening on TCP port 9182: -
PS C:\Users\Administrator> netstat -ano | Select-String 9182

  TCP    0.0.0.0:9182           0.0.0.0:0              LISTENING       2140
  TCP    10.15.31.25:9182       10.15.31.254:42876     ESTABLISHED     2140
  TCP    [::]:9182              [::]:0                 LISTENING       2140
Finally, we can run a cURL request from another machine to make sure it is responding: -
$ curl 10.15.31.25:9182/metrics | grep -i 2019

windows_cs_hostname{domain="WORKGROUP",fqdn="win2019-01",hostname="win2019-01"} 1
windows_os_info{product="Microsoft Windows Server 2019 Standard Evaluation",version="10.0.17763"} 1
Prometheus Targets
As Prometheus is already set up (see here), and matches on the prometheus tag, we should see this within the Prometheus targets straight away: -
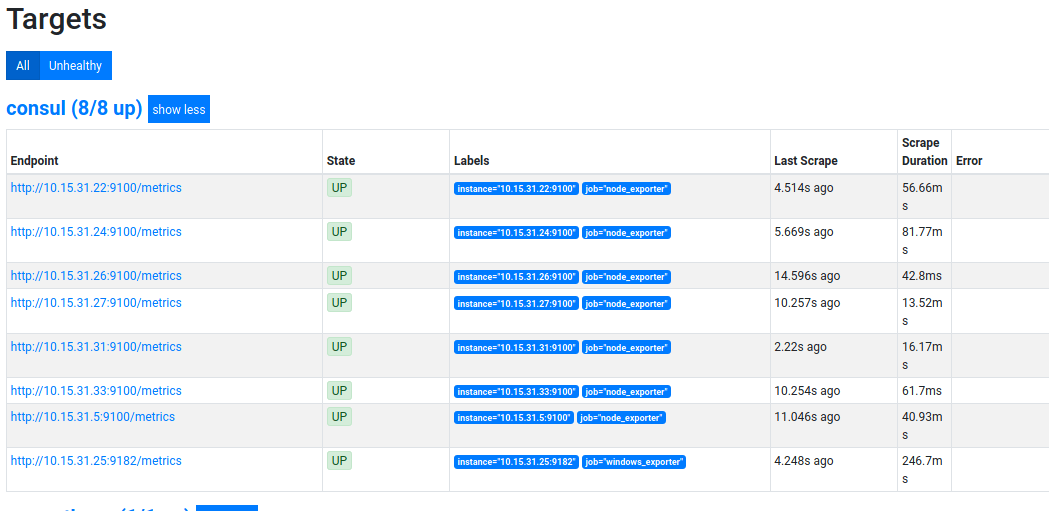
The last one in the list is the Windows machine, successfully being scraped.
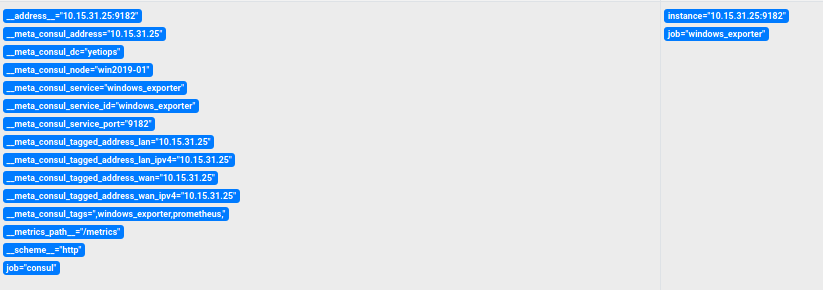
Above is the Metadata we receive from Consul about this host
Grafana Dashboards
The Windows node dashboard is a good place to start. However as the exporter is now the Windows Exporter (which includes changing all metrics to be prefixed by windows_ rather than wmi_), this version of the dashboard will not work any longer.
A version has already been created that changes the prefix, here.

Another to look at is the Windows Node with Process Info dashboard. This one was made previous to the WMI to Windows exporter change, so you will need to update it to work with the different metric prefix (a find/replace in the JSON file would potentially cover most of it)
Summary
For those who are in a mixed environment of different systems, the approach to monitoring and managing both can often be quite disparate. However thanks to SaltStack and Consul, we can treat both Linux and Windows equally.
Not only are we saving time by deploying our monitoring automatically, but also by using the same systems to manage them too. With a little bit of effort in creating the States in the first place, you can make your infrastructure feel less like separate silos of operating systems and more like one environment.
In the next post in this series, we will cover how you deploy SaltStack on an OpenBSD host, which will then deploy Consul and the Prometheus Node Exporter.
devops monitoring prometheus consul saltstack windows
technical prometheus monitoring config management
3578 Words
2020-06-19 10:46 +0000