9 minutes
Prometheus - Using Service Discovery with Hetzner HCloud
In a number of posts on this site I have covered Prometheus and some of the service discovery methods, including: -
In the next release of Prometheus (v2.21 at the time of writing) Prometheus will also be able to discover services for Eureka and Hetzner.
At the time of writing, the v2.21 release of Prometheus is available as a Release Candidate (available here), meaning we do not need to compile Prometheus from source to make use of it. However if you intend to run this in production, it is advisable to wait for final release.
Hetzner
Who are Hetzner?
Hetzner are a German hosting company and data centre operator. They run data centres in three locations (Nuremberg, Falkenstein and Helsinki in Finland), and can provide everything from webmail to dedicated servers.
Hetzner’s Robot is the name they give to their dedicated server offering. The Hetzner Cloud provides virtual servers, load balancers, private networking and more.
The Prometheus Service Discovery enables discover servers from both Robot and Cloud.
Creating an account
To sign up with Hetzner’s Cloud, go to the Hetzner Account Sign-Up page. This will create an account which is usable across all of Hetzner’s products.
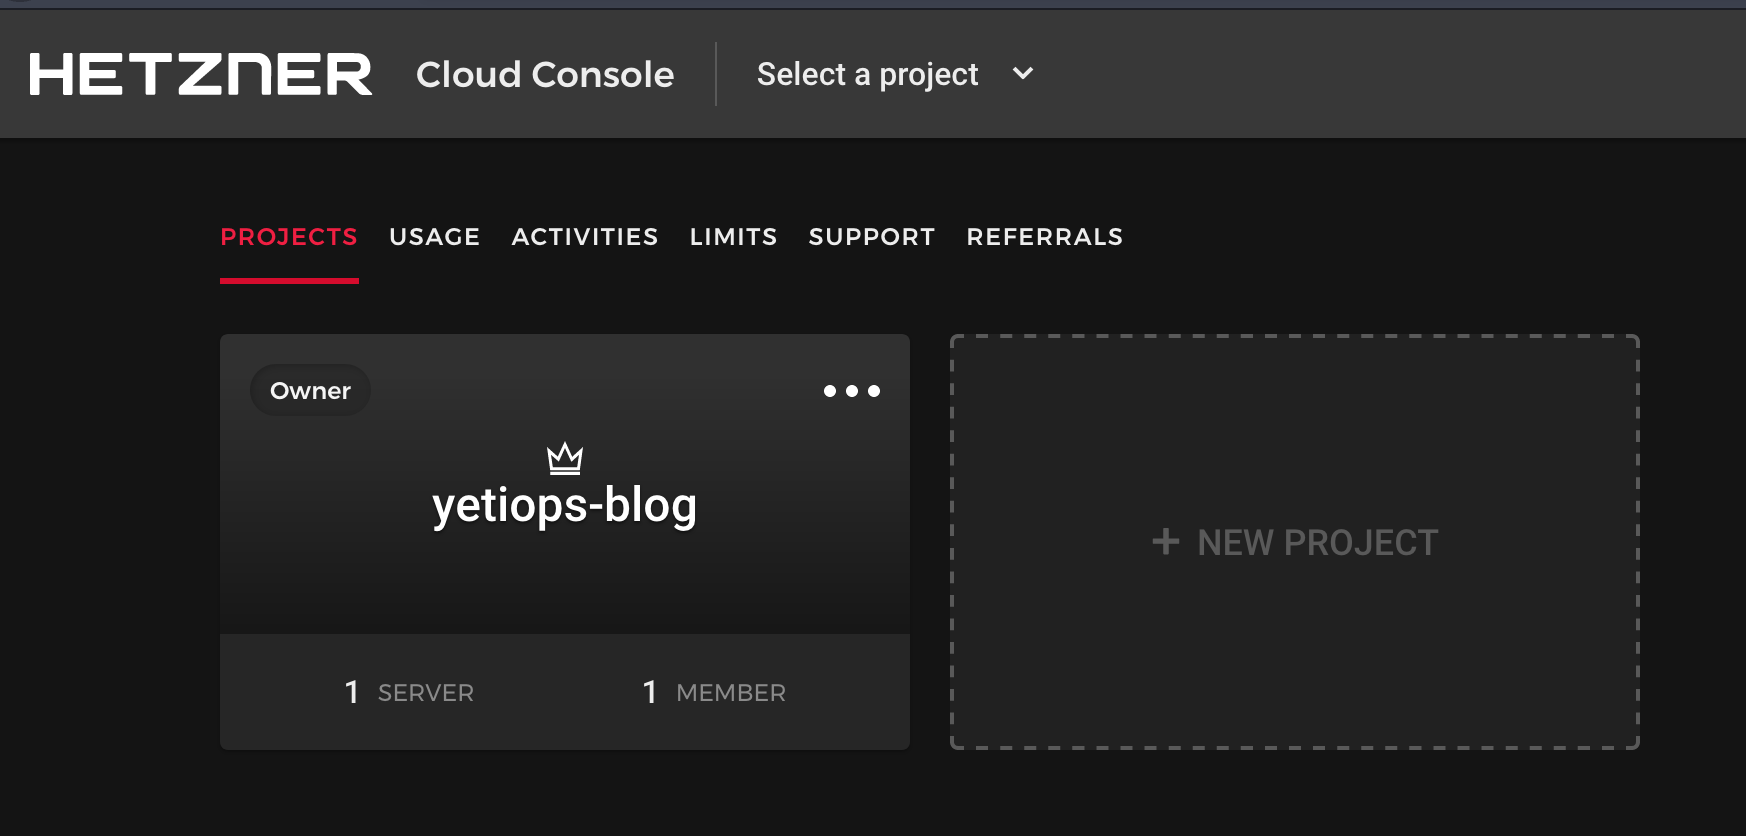
Once you have created an account, you will be asked to create a project like so: -

Currently you cannot create resources in a specific project using Terraform, nor can you limit targets by project in Prometheus, so what name you choose is arbitrary.
Terraform
There is an official Terraform Provider for Hetzner’s Cloud offering which will allow us to create virtual servers ready to be discovered by Prometheus.
For information on how to install Terraform and an example project structure, see here.
Create an API Token
Terraform uses Hetzner Cloud API keys to authenticate and provision resources. You can generate a key in the Security section of the Hetzner Cloud Console: -

You can configure the API Token directly in the Terraform provider configuration: -
provider "hcloud" {
  token = "$API_TOKEN"
}
Alternatively, you can set an environment variable of HCLOUD_TOKEN="$API_TOKEN" (e.g. export HCLOUD_TOKEN="$API_TOKEN") that the Terraform provider will use instead.
If you are using Terraform version 0.13, you can also add the hcloud provider to your list of required providers like so: -
terraform {
  required_providers {
    hcloud = {
      source = "hetznercloud/hcloud"
    }
    template = {
      source = "hashicorp/template"
    }
  }
  required_version = ">= 0.13"
}
This configuration goes in a versions.tf file in the basic-vms folder.
Configure Terraform - Virtual Servers
Now that we have created an API token and configured the provider, we can create our Hetzner Cloud virtual servers.
Run terraform init to download and install the provider: -
$ terraform init

Initializing the backend...

Initializing provider plugins...
- Finding latest version of hashicorp/template...
- Finding latest version of hetznercloud/hcloud...
- Installing hetznercloud/hcloud v1.20.1...
- Installed hetznercloud/hcloud v1.20.1 (signed by a HashiCorp partner, key ID 5219EACB3A77198B)
- Installing hashicorp/template v2.1.2...
- Installed hashicorp/template v2.1.2 (signed by HashiCorp)

Partner and community providers are signed by their developers.
If you'd like to know more about provider signing, you can read about it here:
https://www.terraform.io/docs/plugins/signing.html

The following providers do not have any version constraints in configuration,
so the latest version was installed.

To prevent automatic upgrades to new major versions that may contain breaking
changes, we recommend adding version constraints in a required_providers block
in your configuration, with the constraint strings suggested below.

* hashicorp/template: version = "~> 2.1.2"
* hetznercloud/hcloud: version = "~> 1.20.1"

Terraform has been successfully initialized!

You may now begin working with Terraform. Try running "terraform plan" to see
any changes that are required for your infrastructure. All Terraform commands
should now work.

If you ever set or change modules or backend configuration for Terraform,
rerun this command to reinitialize your working directory. If you forget, other
commands will detect it and remind you to do so if necessary.
Define the infrastructure - Virtual Servers
You can now create the configuration files for your first virtual server. The below is from the file hcloud.tf in the terraform/basic-vms directory: -
resource "hcloud_server" "yetiops-blog" {
  name               = "yetiops-blog"
  image              = "ubuntu-20.04"
  server_type        = "cx11"
  user_data          = data.template_file.ubuntu.rendered
  ssh_keys           = [
    hcloud_ssh_key.yetiops-ssh-key.name
  ]
  labels = {
    "prometheus" = "true",
    "node_exporter" = "true"
  }
}

resource "hcloud_ssh_key" "yetiops-ssh-key" {
  name       = "yetiops-ssh-key"
  public_key = file("~/.ssh/id_ed25519.pub")
}

output "yetiops_blog_ipv4" {
  value = hcloud_server.yetiops-blog.ipv4_address
}

output "yetiops_blog_ipv6" {
  value = hcloud_server.yetiops-blog.ipv6_address
}
Compared to some of the other posts, we are creating a small amount of infrastructure. This is because: -
- Hetzner Cloud does not provide firewall/security group resources (like an AWS Security Group or a Digital Ocean Firewall)
- While you can specify a datacentre, Hetzner will choose one at random if you do not (rather than it being a prerequisite of creating an instance)
Hetzner Cloud instances support labels for instances (consisting of key-value pairs). These can then be used to filter/match instances with Prometheus later.
We have also added some Terraform outputs as well. Outputs can be used in Terraform modules to expose attributes to state files that call the modules, or they can be used to show information when Terraform finishes an apply operation.
One part that does differ from our previous posts is that we extend the user-data being provided. This create a basic host-based firewall (leveraging UFW) on the server: -
#cloud-config
packages:
 - prometheus-node-exporter

ufw_enable:
  - &ufw_enable |
    ufw allow from ${my_ip}
    ufw enable

runcmd:
   - [ sh, -c, *ufw_enable ]
We now also need to supply our IP as part of this: -
data "template_file" "ubuntu" {
  template = "${file("${path.module}/files/ubuntu.tpl")}"
  vars = {
    my_ip = "###MY PUBLIC IP ADDRESS###"
  }
}
You could also use IPTables, nftables, firewalld or any other host-based firewall of your choice.
Build the infrastructure - Virtual Servers
We can now apply our configuration, and see if it builds a Hetzner Cloud virtual server: -
$ terraform apply
data.template_file.ubuntu: Refreshing state...
data.template_cloudinit_config.ubuntu: Refreshing state...

An execution plan has been generated and is shown below.
Resource actions are indicated with the following symbols:
  + create

Terraform will perform the following actions:

  # hcloud_server.yetiops-blog will be created
  + resource "hcloud_server" "yetiops-blog" {
      + backup_window = (known after apply)
      + backups       = false
      + datacenter    = (known after apply)
      + id            = (known after apply)
      + image         = "ubuntu-20.04"
      + ipv4_address  = (known after apply)
      + ipv6_address  = (known after apply)
      + ipv6_network  = (known after apply)
      + keep_disk     = false
      + labels        = {
          + "node_exporter" = "true"
          + "prometheus"    = "true"
        }
      + location      = (known after apply)
      + name          = "yetiops-blog"
      + server_type   = "cx11"
      + ssh_keys      = [
          + "mbp-ssh-key",
        ]
      + status        = (known after apply)
      + user_data     = "w+GFzbnffrRD1nkvx62lUBl75Zw="
    }

  # hcloud_ssh_key.yetiops-ssh-key will be created
  + resource "hcloud_ssh_key" "yetiops-ssh-key" {
      + fingerprint = (known after apply)
      + id          = (known after apply)
      + name        = "yetiops-ssh-key"
      + public_key  = <<~EOT
            ssh-ed25519 AAAAC3NzaC1lZDI1NTE5AAAAIB5EDvM9LaPqNH5tTV2WOHHC+rc5iK7AWRJyMpvNLcvD stuh84@symphonyx
        EOT
    }

Plan: 2 to add, 0 to change, 0 to destroy.

Changes to Outputs:
  + yetiops_blog_ipv4 = (known after apply)
  + yetiops_blog_ipv6 = (known after apply)

Do you want to perform these actions?
  Terraform will perform the actions described above.
  Only 'yes' will be accepted to approve.

  Enter a value: yes

hcloud_ssh_key.yetiops-ssh-key: Creating...
hcloud_ssh_key.yetiops-ssh-key: Creation complete after 0s [id=2022327]
hcloud_server.yetiops-blog: Creating...
hcloud_server.yetiops-blog: Creation complete after 7s [id=7490230]

Apply complete! Resources: 2 added, 0 changed, 0 destroyed.

Outputs:

yetiops_blog_ipv4 = ###IPv4 Public IP###
yetiops_blog_ipv6 = ###IPv6 Public IP###
As we can see, we also have Outputs that display the IPv4 and IPv6 address of this server.
We can double check that Terraform is managing these resources now with terraform state list: -
$ terraform state list
data.template_cloudinit_config.ubuntu
data.template_file.ubuntu
hcloud_server.yetiops-blog
hcloud_ssh_key.yetiops-ssh-key
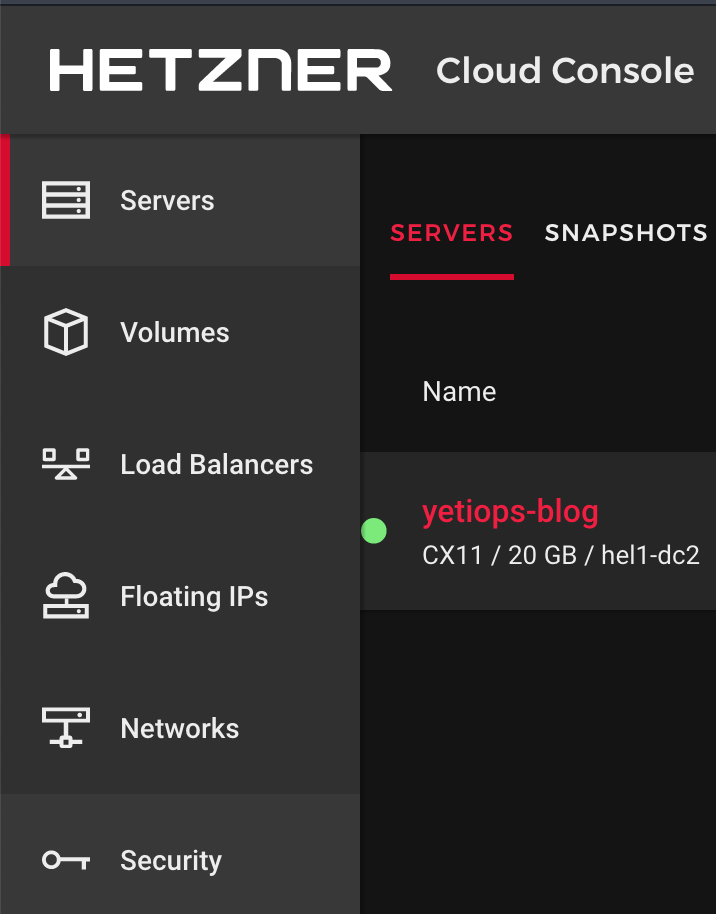
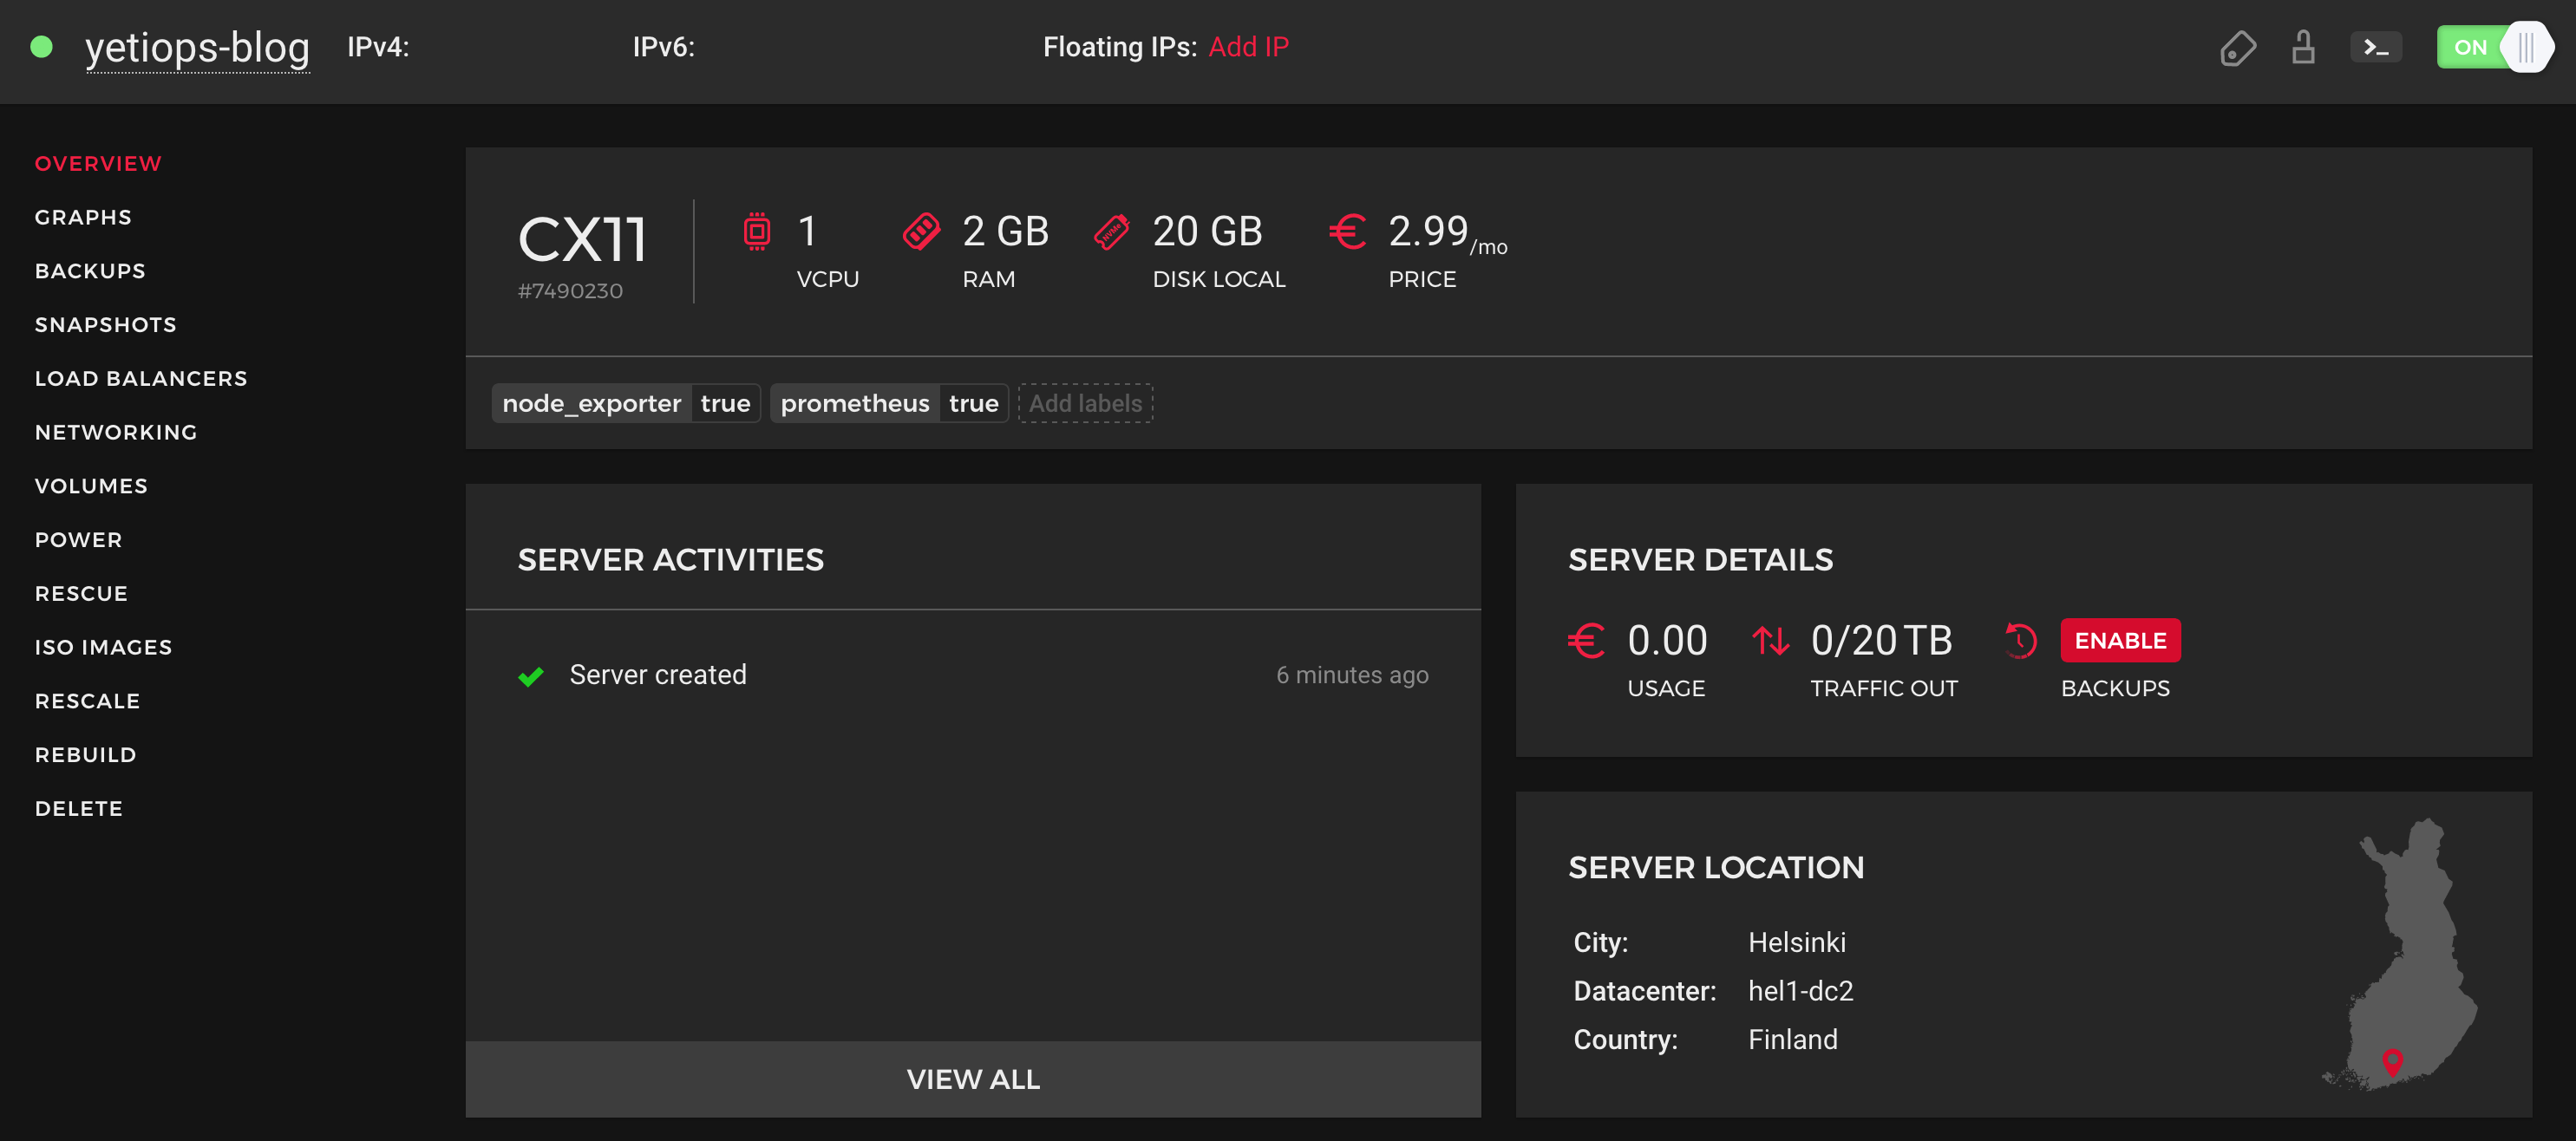
We can check to see if the instance is in the Hetzner Cloud Console: -
Now lets try SSH: -
$ ssh root@$INSTANCE_PUBLIC_IP
Welcome to Ubuntu 20.04.1 LTS (GNU/Linux 5.4.0-42-generic x86_64)

 * Documentation:  https://help.ubuntu.com
 * Management:     https://landscape.canonical.com
 * Support:        https://ubuntu.com/advantage

root@yetiops-blog:~# ps aux | grep -i node
prometh+    1276  0.3  0.9 485924 18912 ?        Ssl  22:53   0:02 /usr/bin/prometheus-node-exporter
root        1968  0.0  0.0   6300   732 pts/0    S+   23:05   0:00 grep --color=auto -i node
Prometheus
Now that we have our virtual server in Hetzner Cloud, we can configure our Prometheus instance. I am using an Ubuntu 20.04 virtual machine in my lab for this.
Hetzner Cloud Service Discovery
To allow Prometheus to discover virtual servers in Hetzner Cloud, use configuration like the below: -
global:
  scrape_interval:     15s
  evaluation_interval: 15s

scrape_configs:
  - job_name: 'prometheus'
    static_configs:
    - targets:
      - 'localhost:9090'
  - job_name: 'hetzner-nodes'
    hetzner_sd_configs:
      - bearer_token: "###HETZNER_API_TOKEN###"
        role: "hcloud"
    relabel_configs:
      - source_labels: [__meta_hetzner_hcloud_label_prometheus]
        regex: true.*
        action: keep
      - source_labels: [__meta_hetzner_hcloud_label_node_exporter]
        regex: true.*
        action: keep
      - source_labels: [__meta_hetzner_public_ipv4]
        target_label: __address__
        replacement: '$1:9100'
      - action: labelmap
        regex: __meta_hetzner_hcloud_(.+)
      - action: labelmap
        regex: __meta_hetzner_server_(.+)
You can create an API token for Prometheus using the same method as for Terraform
There a few points to note in this configuration: -
- We are using the
hcloudrole- You can use
robotif you have dedicated servers with Hetzner
- You can use
- The labels (tags) are key-value pairs like in AWS, GCP or Azure, rather than the tags in Digital Ocean which are comma-separated values
- We use two labelmaps to bring in most of the metadata in as additional labels
- This is because some labels are exposed only under
__meta_hetzner_hcloudand others under__meta_hetzner_server
- This is because some labels are exposed only under
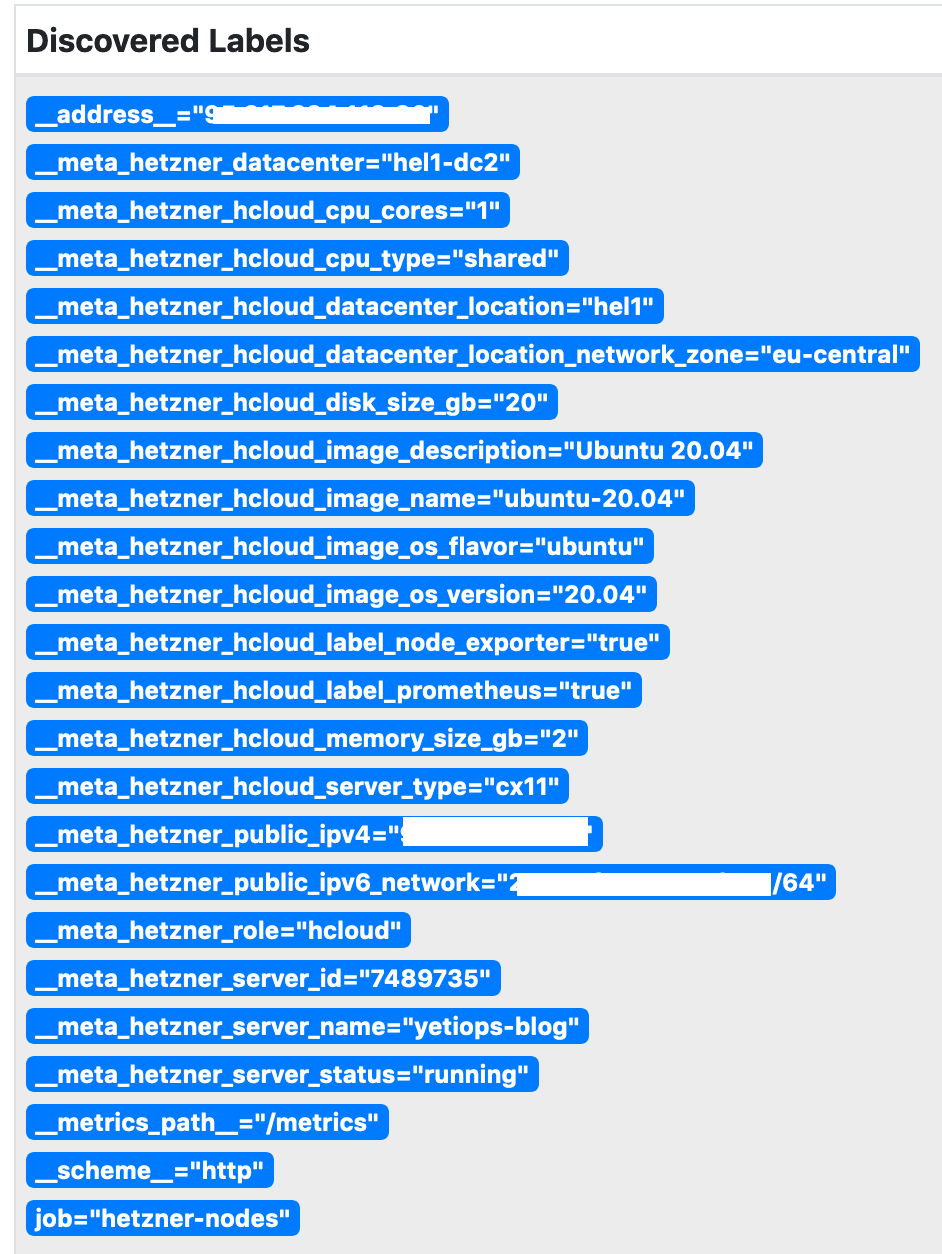
We can now look at the labels that the Hetzner Service Discovery generates: -
Can we reach the node_exporter on the Instance?
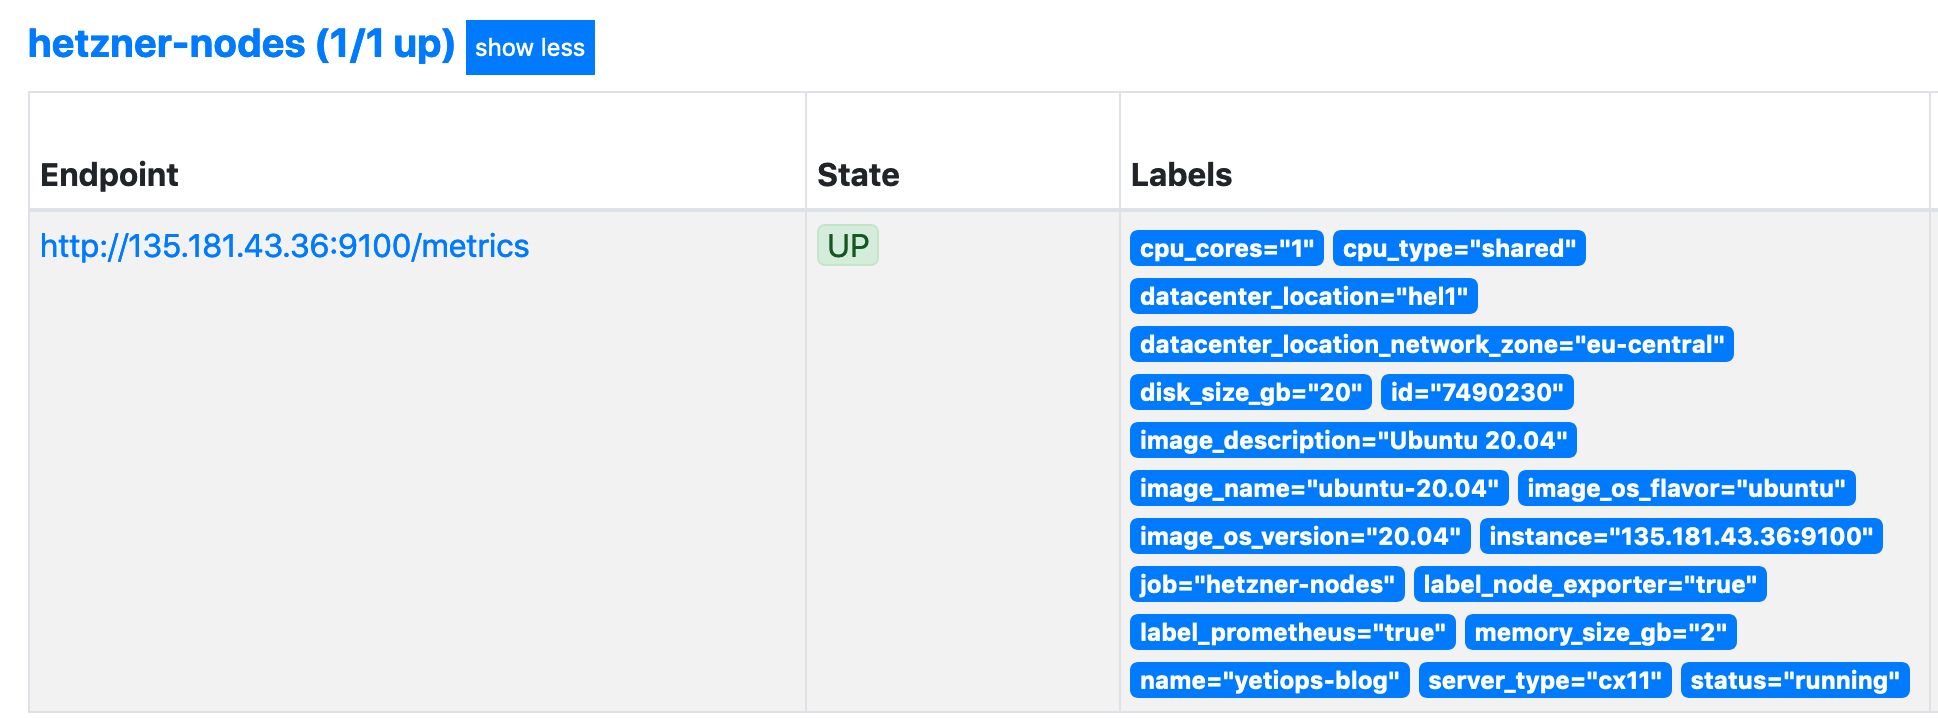
Looks like we can!
Grafana
With the above, we can use any Node Exporter dashboard in Grafana to view all of the discovered instances. The Node Exporter Full is always a good start when using the Node Exporter: -
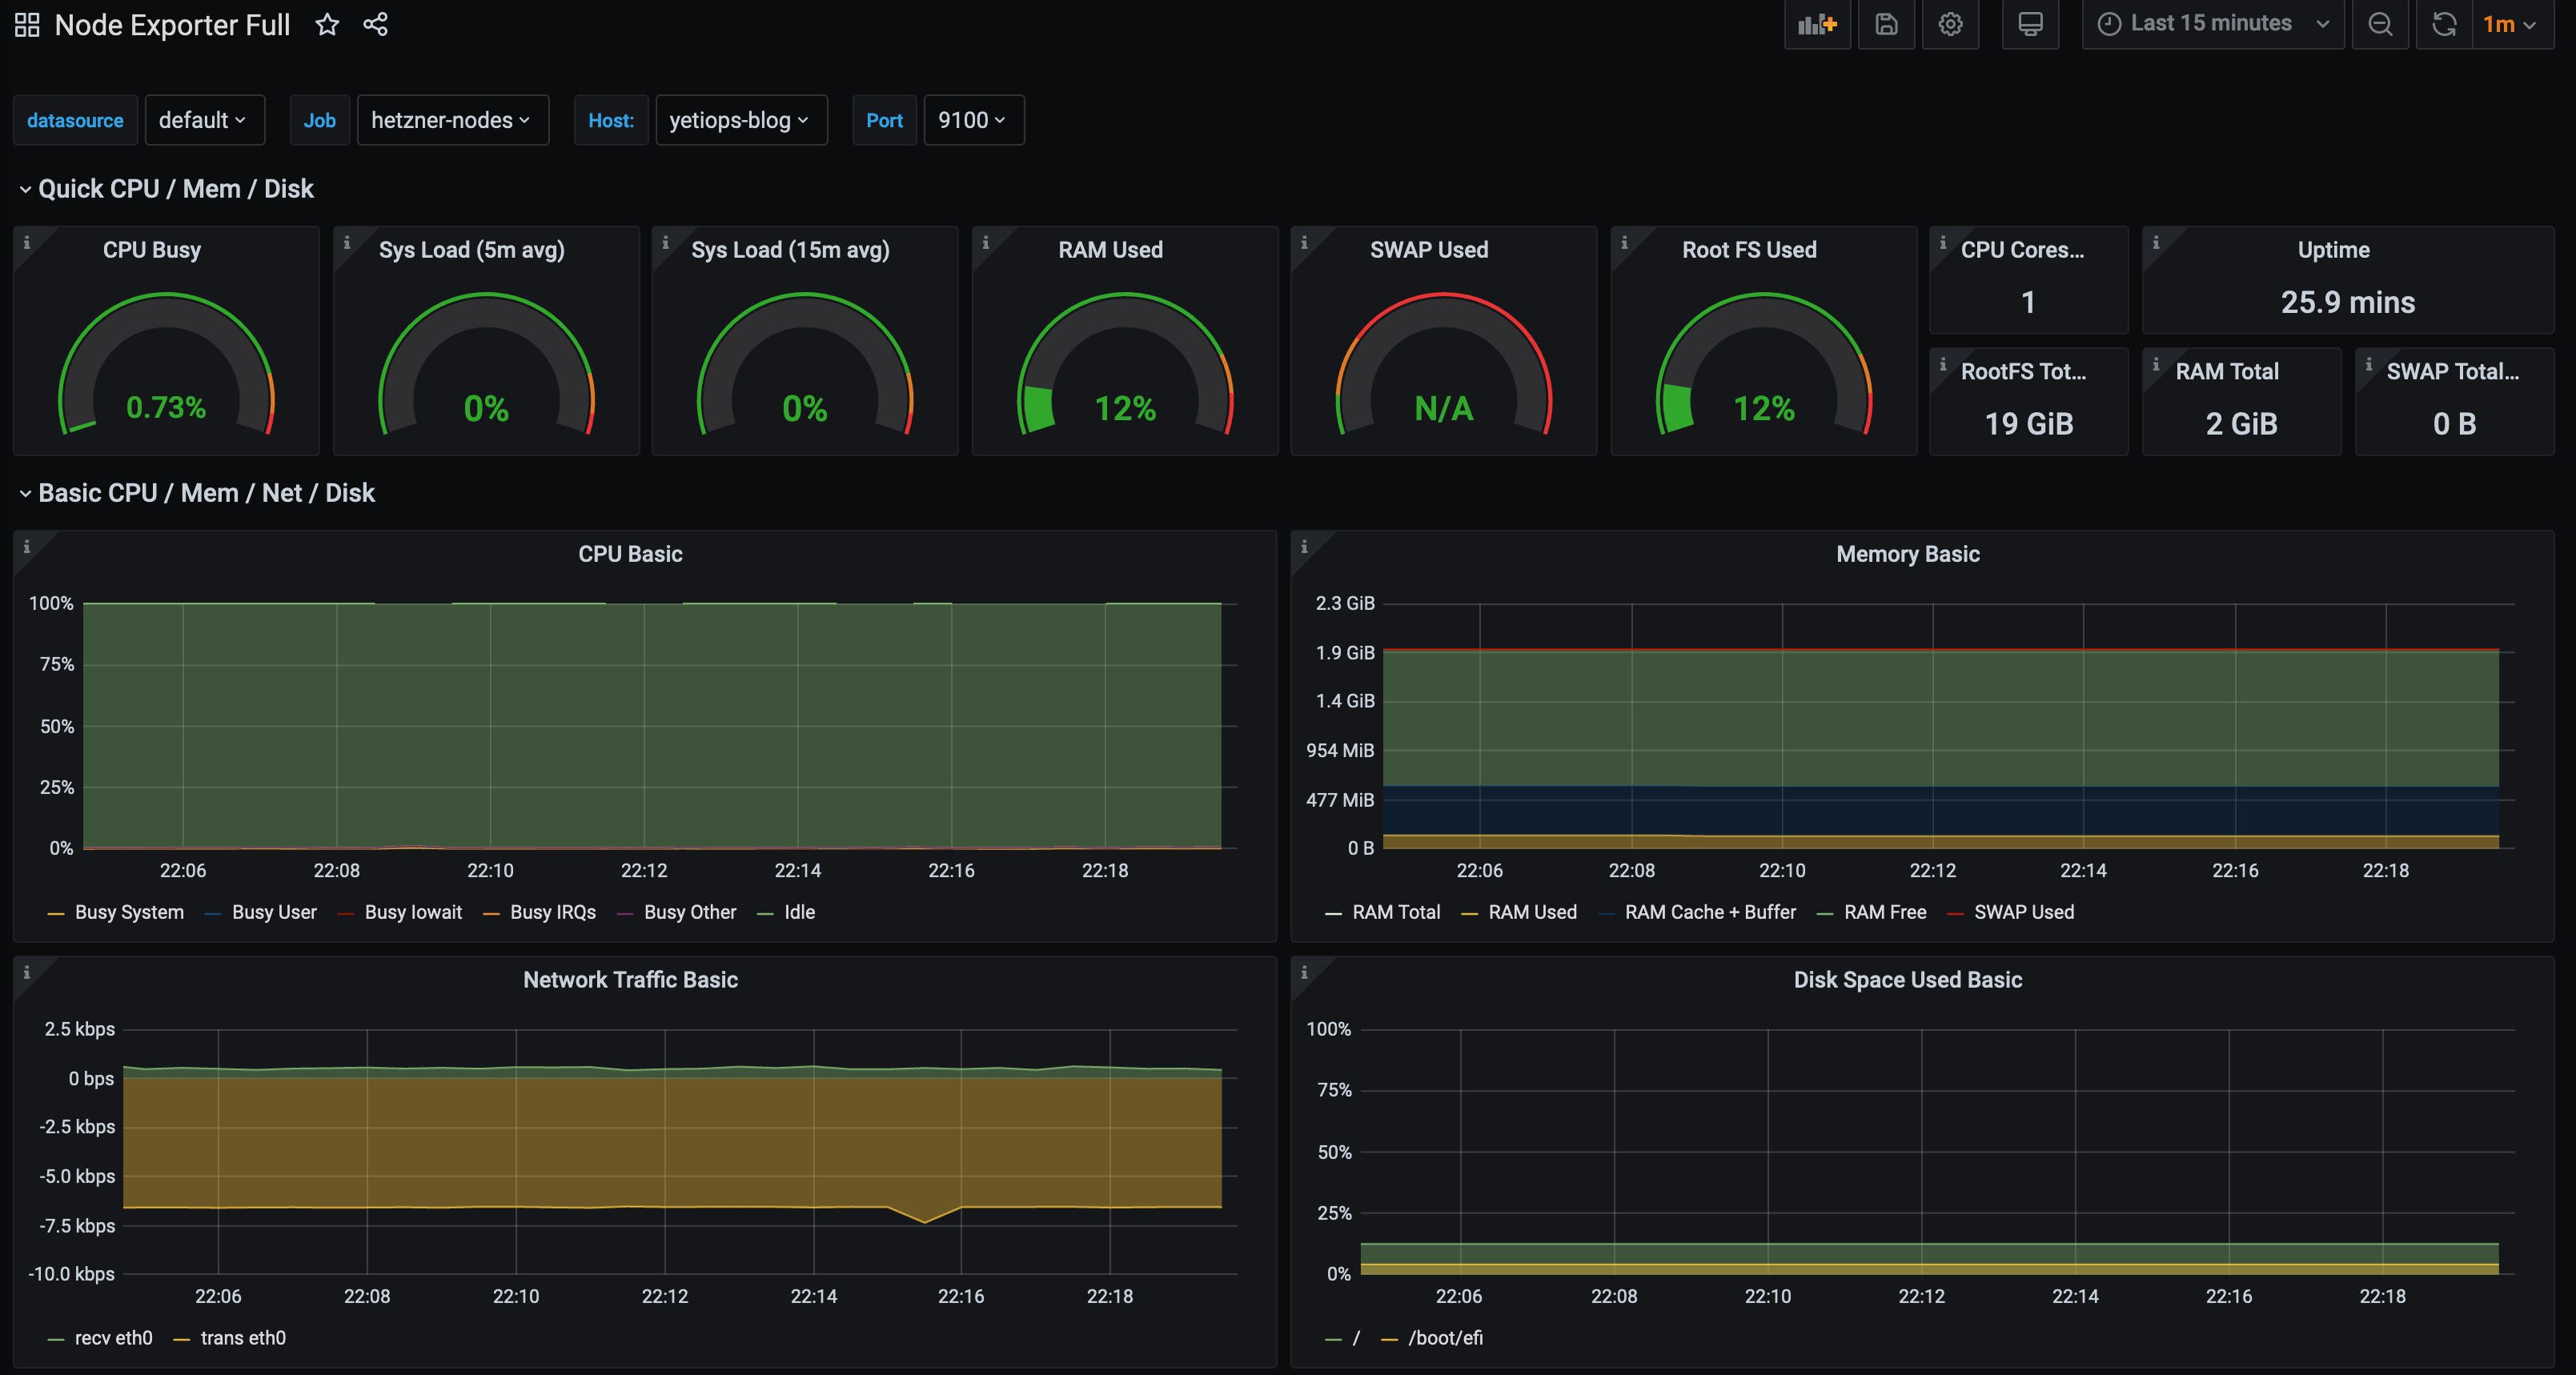
If we add more virtual servers, they will also appear in this dashboard too.
Summary
With each release of Prometheus, more and more discovery methods are being added. This means that even if you aren’t running on some of the larger providers (e.g. AWS, Azure or GCP), you can start to look at using Prometheus to automatically discover your instances and services without needing to run either something like Consul or using file_sd_configs and configuration management.
I am excited to see what new methods will appear in future versions!
devops monitoring prometheus hetzner hcloud terraform
technical prometheus monitoring cloud
1708 Words
2020-09-04 21:28 +0000