14 minutes
Home and Personal Infrastructure Overhaul: Part 4 - Getting Started with Drone CI
This post is the next in the series on how I overhauled my personal infrastructure to make it easier to manage, make changes and integrate new applications.
In the previous posts I covered the improvements to my Ansible Playbooks (i.e. a complete overhaul of them) and the improvements to my Saltstack environment. Both of these were pre-requisites to being able to implement a Continuous Integration environment on my infrastructure.
This post is going to cover the choices of CI environments I could use, and why I chose Drone.
The choices
In terms of continuous integration, there are a number of different solutions to fit every kind of infrastructure, budget and need. For example, if all of your code is on GitHub, an obvious choice would be GitHub Actions. The same can be said of the Gitlab CI offering as well.
If you are more geared towards Windows deployment, you may choose something like TeamCity. If you are in AWS you may choose CodePipelines and CodeDeploy. If you are in Azure, you may choose Azure DevOps. The options are endless.
With this being the case, I needed to set out what I wanted in a CI tool: -
- Self-hosted
- I have a homelab, so something I can run on it is preferable
- Resource usage isn’t huge
- My homelab is a 2012 Mac Mini and a 6th generation NUC, so resources are enough but not unlimited
- It integrates with my chosen Git repository provider
- The pipelines are written in a simple language/format
Before I found Drone, the two main contenders were Gitlab CI and Jenkins.
Jenkins?
I only briefly considered Jenkins. Jenkins has it’s place, but it isn’t what I was after.
I’m not a huge fan of the Groovy language for writing pipelines. Also the resource usage can be quite significant, especially if one of the plugins is poorly written.
I have supported Jenkins at multiple businesses, and always run into issues with the plugin system. Upgrading one can break others, or upgrading one core plugin means every other plugin needs updating too.
Due to this, it was easy for me to rule out Jenkins.
Gitlab CI?
Gitlab CI seemed like the obvious choice at this point. It also helps that I have integrated Gitlab CI before at one of my previous employers, so I already had a lot of experience with it.
However, after running just self-hosted Gitlab on a virtual machine on my infrastructure for a while, I found the resource usage to be a little too much. Even at idle, the machine used a lot of memory and CPU (at least compared to the other machines on my infrastructure).
I subsequently removed Gitlab from my personal infrastructure. With this being the case, I needed to move all my repositories from my self-hosted Gitlab instance into another Git system. Thankfully,
I already have a Gitea instance running on my infrastructure, so after migrating all the repositories to it, I began the search for a CI system that works with Gitea
What works with Gitea?
Gitea is a self-hosted Git service, providing a web interface, API and standard Git forge utilities (i.e. issues, pull requests, webhooks to external systems etc). However Gitea does not (at the time of writing) have an integrated CI system (unlike GitHub or Gitlab).
After a little research, I found the Awesome-Gitea repository. This contains a list of useful utilities that can integrate with Gitea, or augment the functionality. In this list were a few CI systems that integrate natively with Gitea.
The one that caught my eye was Drone. It is built in Go (so had a good chance of low resource usage), the pipelines are written in YAML, it is self-hosted, and integrates natively with Gitea.
I decided to give Drone a try.
Setting up the Drone Server
Drone has two versions, the Community edition and the Enterprise edition. I chose the Community edition as I didn’t need any of the extra features that the Enterprise edition provides (like clustering, ephemeral agents/runners, autoscaling).
To install the server, Drone provide documentation for integration with GitHub, Gitlab, Gogs (what Gitea is forked from), Gitea, Bitbucket and Gitee.
The installation uses Docker, so you need to have a system that supports containers (Podman will probably work, although I haven’t tried it). You also to generate some secrets and an OAuth Application settings up in Gitea.
Creating the OAuth Application in Gitea
To create an OAuth application in Gitea, click on your user icon in the top right hand corner, and click settings: -
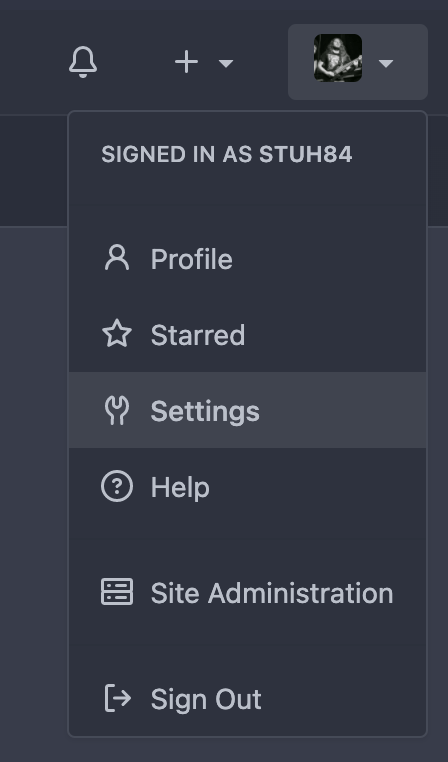
From here, choose Applications: -

You should now see the option to Manage OAuth2 Applications. In the fields provided, add a name (e.g. drone-ci), and the URL Drone will run on followed by /login. In my home infrastructure, this is https://drone.noisepalace.co.uk, but in my demo lab, this is http://192.168.203.10/login: -
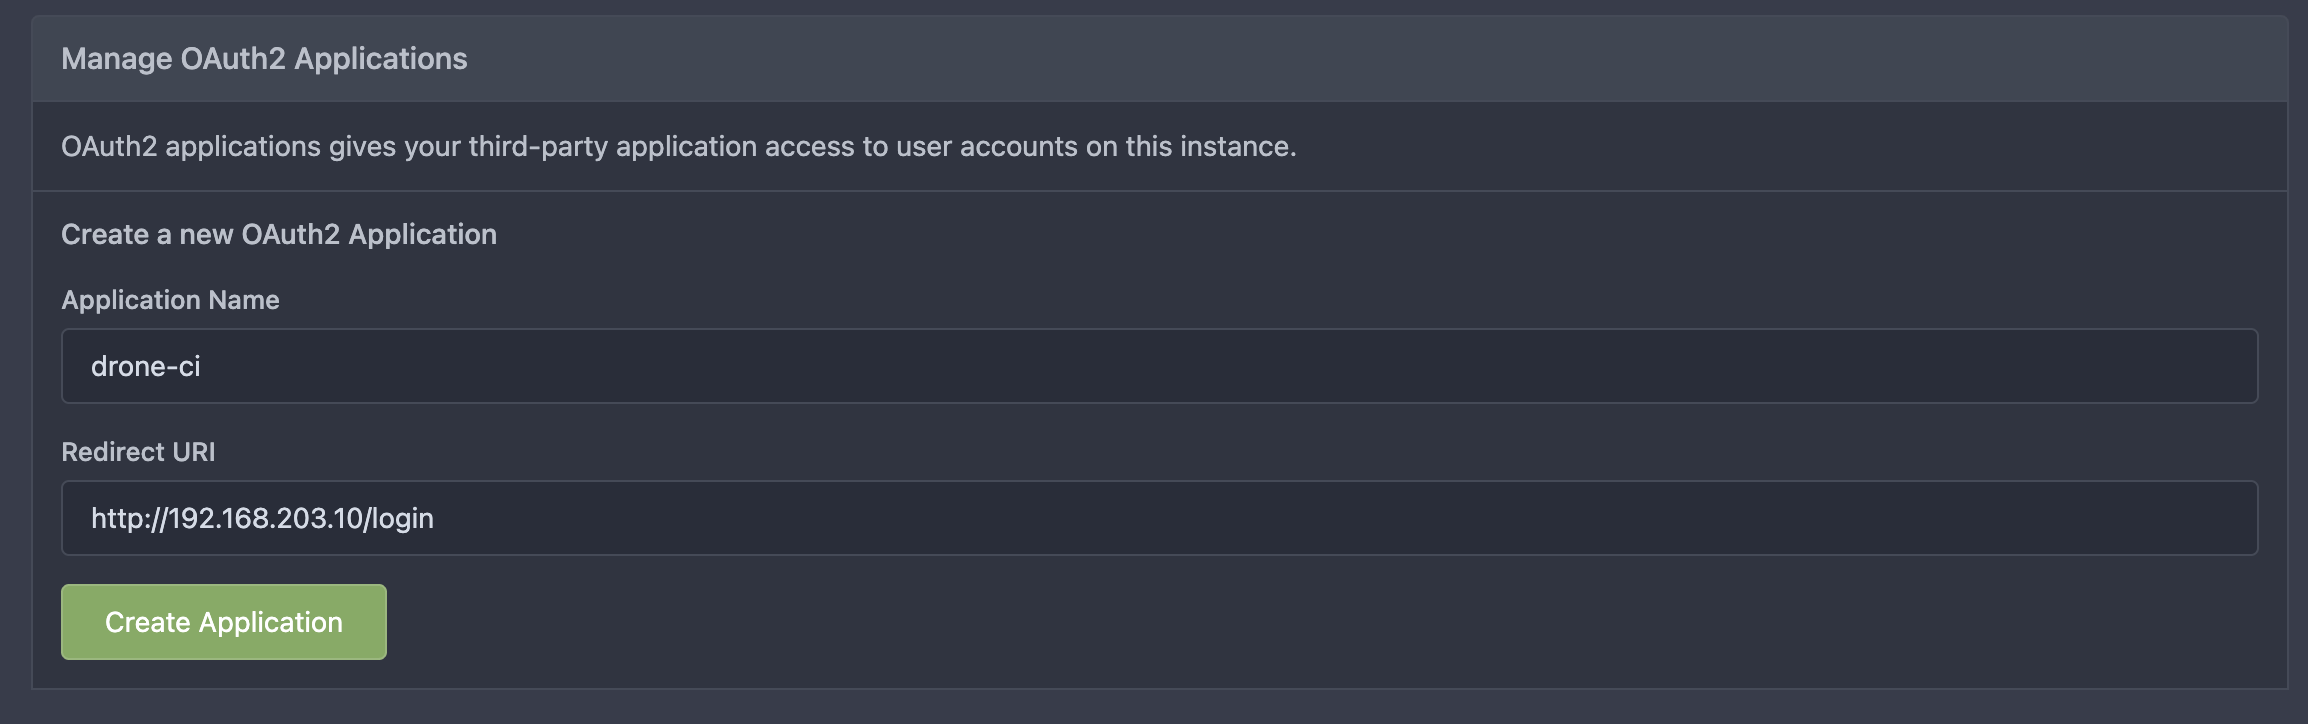
Click create application, save the Client ID and Client Secret provided, and we can now install Drone!
Installing Drone
To install Drone, we need a machine that is running Docker. I am running this on a Debian Bullseye machine (Docker Installation docs here), but any machine that can run Docker, Podman, or other OCI-compatible runtimes will probably be fine.
As per the Drone documentation, you need to create a shared secret that will be used for communication between the Drone server and the runners. The documentation suggests to use OpenSSL like so: -
$ openssl rand -hex 16
bea26a2221fd8090ea38720fc445eca6
This isn’t a requirement though. If you want to use pwgen, a password store, or making up your own secret, all are fine.
The documentation then says to pull down the Drone image and then run a Docker command directly to install it.
Personally, I prefer using something like Docker Compose for this so that I always have the container declarations ready to use.
If you want to run this on Kubernetes you can, although I won’t detail that in this post (maybe in the future if and when I move my infrastructure to Kubernetes). My docker-compose.yml file looks like the below: -
version: '3.4'
services:
    drone:
        ports:
            - '80:80'
            - '443:443'
        restart: always
        container_name: drone
        volumes:
            - drone-storage:/data
        environment:
          - DRONE_GITEA_CLIENT_ID=###CLIENT_ID###
          - DRONE_GITEA_CLIENT_SECRET=###CLIENT_SECRET###
          - DRONE_GITEA_SERVER=http://192.168.203.10:3000
          - DRONE_RPC_SECRET=###RPC_SECRET###
          - DRONE_SERVER_HOST=192.168.203.10
          - DRONE_SERVER_PROTO=http
          - DRONE_USER_CREATE=username:stuh84,admin:true
        image: drone/drone:2
        networks:
          - drone
networks:
  drone:
    external: false

volumes:
  drone-storage:
    external: false
In a production scenario, you would want to replace the DRONE_GITEA_SERVER variable with a URL (e.g. https://git.noisepalace.co.uk), and the same for the DRONE_SERVER_HOST (e.g. https://drone.noisepalace.co.uk).
Place this docker-compose.yaml file in a directory (I have it in a directory called drone), run docker-compose up -d, and you should then have a functioning Drone server: -
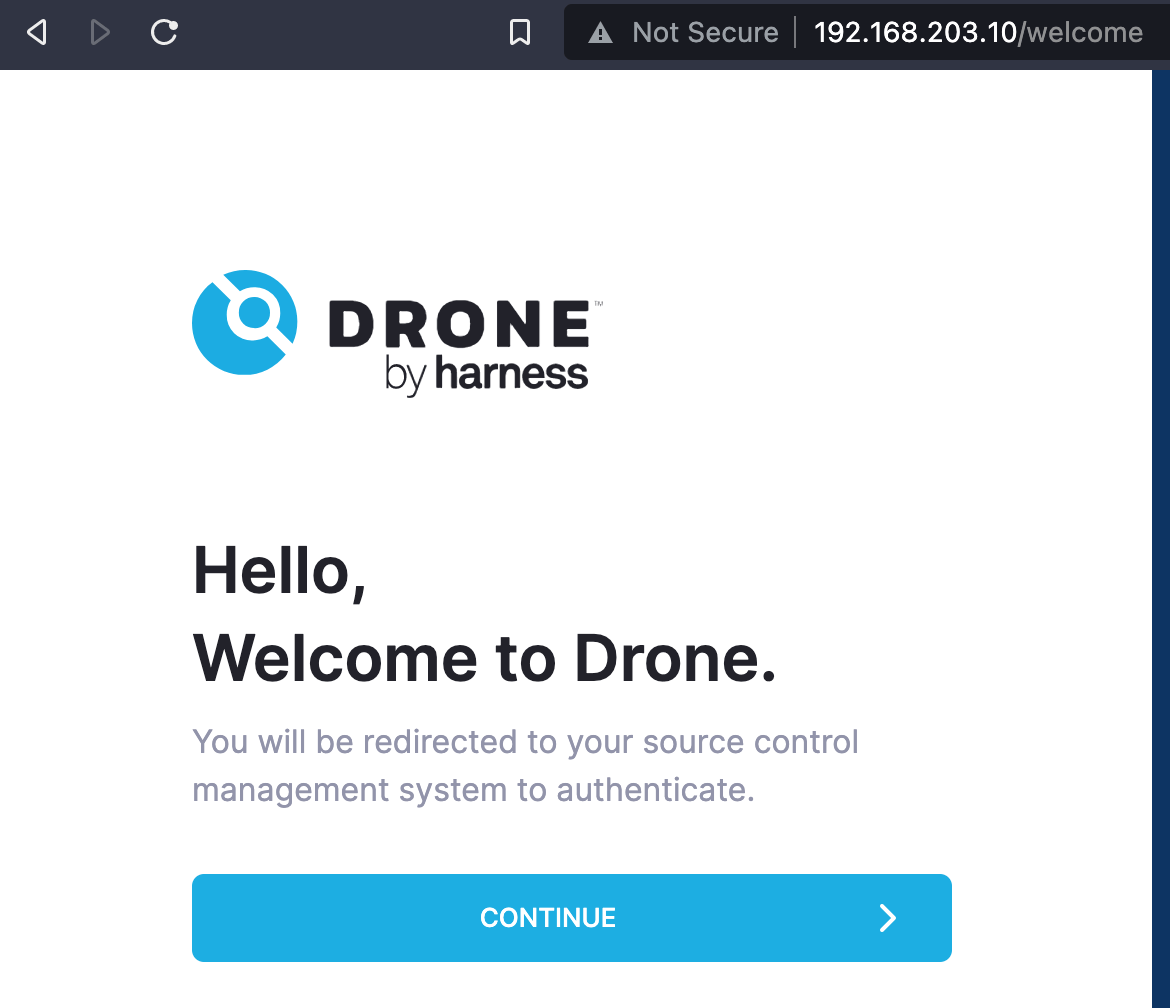
The nice part about setting up a Gitea OAuth2 application is that you can then login with your Gitea credentials.
Now that we have the Drone server setup, we need some runners to run our CI jobs.
Setting up Drone Runners
There are a few different options for runners with Drone. Some are infrastructure specific (e.g. Digital Ocean, AWS, MacStadium), whereas others are more generic. I currently use three different kinds of runners: -
- Docker Runner - This runner interacts with the Docker daemon on a host to run containers that will execute the actions specified in the CI jobs
- This is my most used runner, with most tasks being suited to running in a container
- Exec Runner - This runner will run commands directly on a host rather than via containers
- I use this for my Salt workflow, for reasons I will cover later
- SSH Runner - This runner will use SSH to login to a host and run commands on it
- I use this for some OpenBSD-specific tasks, as I haven’t been able to get the Exec Runner working on OpenBSD
Docker Runner
As before, the Drone documentation uses Docker commands directly to create a runner. I again use Docker Compose to achieve this, so that everything is declared and stored in a Git repository for when I need it again in future.
The docker-compose.yaml looks like the below: -
version: '3.4'
services:
    drone-runner:
        ports:
            - '3000:3000'
        restart: always
        container_name: drone-runner
        volumes:
            - /var/run/docker.sock:/var/run/docker.sock
        environment:
          - DRONE_RPC_SECRET=###RPC_SECRET###
          - DRONE_RPC_HOST=192.168.203.10
          - DRONE_RPC_PROTO=http
          - DRONE_RUNNER_CAPACITY=2
          - DRONE_RUNNER_NAME=docker-runner
        image: drone/drone-runner-docker:1
        networks:
          - drone

networks:
  drone:
    external: false
Drone recommend that the runner runs on a different host from the Drone server itself.
At this point, we can run docker-compose up -d and see if it registers with the Drone server: -
$ docker-compose up -d
Creating network "drone-runner_drone" with the default driver
Pulling drone-runner (drone/drone-runner-docker:1)...
1: Pulling from drone/drone-runner-docker
97518928ae5f: Pull complete
4af047b71fe6: Pull complete
de9b7e52f3f6: Pull complete
679d1ec5770c: Pull complete
Digest: sha256:70da970bb76a62567edbea1ac8002d9484664267f4cbb49fbd7c87a753d02260
Status: Downloaded newer image for drone/drone-runner-docker:1
Creating drone-runner ... done

$ docker logs drone-runner
time="2022-02-04T16:19:46Z" level=info msg="starting the server" addr=":3000"
time="2022-02-04T16:19:46Z" level=info msg="successfully pinged the remote server"
time="2022-02-04T16:19:46Z" level=info msg="polling the remote server" arch=amd64 capacity=2 endpoint="http://192.168.203.10" kind=pipeline os=linux type=docker
Looks good!
Exec Runner
The Exec Runner runs directly on the host, so first we need to get the Exec Runner binary: -
$ curl -L https://github.com/drone-runners/drone-runner-exec/releases/latest/download/drone_runner_exec_linux_amd64.tar.gz | tar zx
$ sudo mv drone_runner_exec /usr/local/bin
Other architectures and operating systems are available from here.
Next, we need to create a configuration file for Drone. I place this in /etc/drone-runner-exec/config: -
DRONE_RPC_SECRET=###RPC_SECRET###
DRONE_RPC_HOST=192.168.203.10
DRONE_RPC_PROTO=http
DRONE_LOG_FILE=/var/log/drone-runner-exec/log.txt
DRONE_RUNNER_LABELS=exec:test
The configuration is similar to what we used in the Docker runner section. The only difference here is that we also specify DRONE_RUNNER_LABELS. These aren’t strictly necessary, but you can use these labels to restrict jobs to execute on certain Runners.
For example, if I wanted to target my Salt Master server, I could use a label of salt:server, and then refer to that in the Drone CI jobs.
Once this is created, we can then create a service file. You can do this yourself, or the Exec Runner can do this for you by running: -
$ drone-runner-exec service install
$ drone-runner-exec service start
We can then check whether this is communicating with the Drone server like so: -
$ sudo systemctl status drone-runner-exec
● drone-runner-exec.service - Drone Exec Runner
     Loaded: loaded (/etc/systemd/system/drone-runner-exec.service; enabled; vendor preset: enabled)
     Active: active (running) since Fri 2022-02-04 11:33:55 EST; 6s ago
   Main PID: 5181 (drone-runner-ex)
      Tasks: 7 (limit: 2303)
     Memory: 2.5M
        CPU: 11ms
     CGroup: /system.slice/drone-runner-exec.service
             └─5181 /usr/local/bin/drone-runner-exec service run --config /etc/drone-runner-exec/config

Feb 04 11:33:55 drone-runner systemd[1]: Started Drone Exec Runner.
Feb 04 11:33:55 drone-runner drone-runner-exec[5181]: time="2022-02-04T11:33:55-05:00" level=info msg="starting the server" addr=":3000"
Feb 04 11:33:55 drone-runner drone-runner-exec[5181]: time="2022-02-04T11:33:55-05:00" level=info msg="successfully pinged the remote server"
Feb 04 11:33:55 drone-runner drone-runner-exec[5181]: time="2022-02-04T11:33:55-05:00" level=info msg="polling the remote server" capacity=2 endpoint="http://192.168.203.10" kind=pipeline type=exec
Perfect.
SSH Runner
The SSH runner is for hosts that can be reached via SSH, but can’t necessarily run the Exec Runners themselves. Unfortunately I could not get the Exec Runner to run reliably on an OpenBSD machine, so I use the SSH runner for OpenBSD tasks instead.
Jobs that use the SSH runner require either supplying a user and password, or an SSH key pair to access the machine in question. I created a key pair for this with: -
$ ssh-keygen -t ed25519 -f drone_ssh_key
This creates the drone_ssh_key.pub and drone_ssh_key files which can then be used with the SSH runner. You just need to add the public key as an authorized key for whatever machines you want to access, at which point jobs can specify to use these keys to access the machines in question.
To setup the SSH runner, you again use Docker. The instructions refer to using Docker directly, and again I use Docker Compose for this, like so: -
version: '3.4'
services:
    drone-runner-ssh:
        ports:
            - '3100:3000'
        restart: always
        container_name: ssh-runner
        environment:
          - DRONE_RPC_SECRET=###RPC_SECRET###
          - DRONE_RPC_HOST=192.168.203.10
          - DRONE_RPC_PROTO=http
        image: drone/drone-runner-ssh
We run this as before, placing a docker-compose.yaml file in a directory of your choice (I chose drone-ssh-runner) and then run docker-compose up -d. You should see the runner connect to the Drone server: -
$ docker-compose up -d
Creating network "drone-ssh-runner_default" with the default driver
Pulling drone-runner-ssh (drone/drone-runner-ssh:)...
latest: Pulling from drone/drone-runner-ssh
5a3ea8efae5d: Pull complete
db93b31631ef: Pull complete
5dfa4717c03d: Pull complete
Digest: sha256:cfab2ecc93abb9132f37ef01edc29ac80143e5217423095bb979c310804d3513
Status: Downloaded newer image for drone/drone-runner-ssh:latest
Creating ssh-runner ... done

$ docker logs ssh-runner
time="2022-02-06T15:20:29Z" level=info msg="starting the server" addr=":3000"
time="2022-02-06T15:20:29Z" level=info msg="successfully pinged the remote server"
time="2022-02-06T15:20:29Z" level=info msg="polling the remote server" capacity=10 endpoint="http://192.168.203.10" kind=pipeline type=ssh
Now that we have our runners, we can run some jobs!
Running Drone Pipelines
Drone pipelines are configured using YAML, in a file called .drone.yml that sits in the base path of a repository. The format of this file is like the below: -
kind: pipeline
type: docker
name: default

steps:
- name: testing
  image: alpine
  commands:
  - echo "Hello from Drone"
The format is quite similar to Gitlab CI, GitHub Actions, and other CI systems that use YAML to define the steps. We need to take a couple of prerequisite steps before we can run a pipeline in Drone though.
Create a repository in Gitea
If you currently have no repositories in Gitea, you will need to create one: -
Click on the plus sign, and follow the steps to create your first repository.
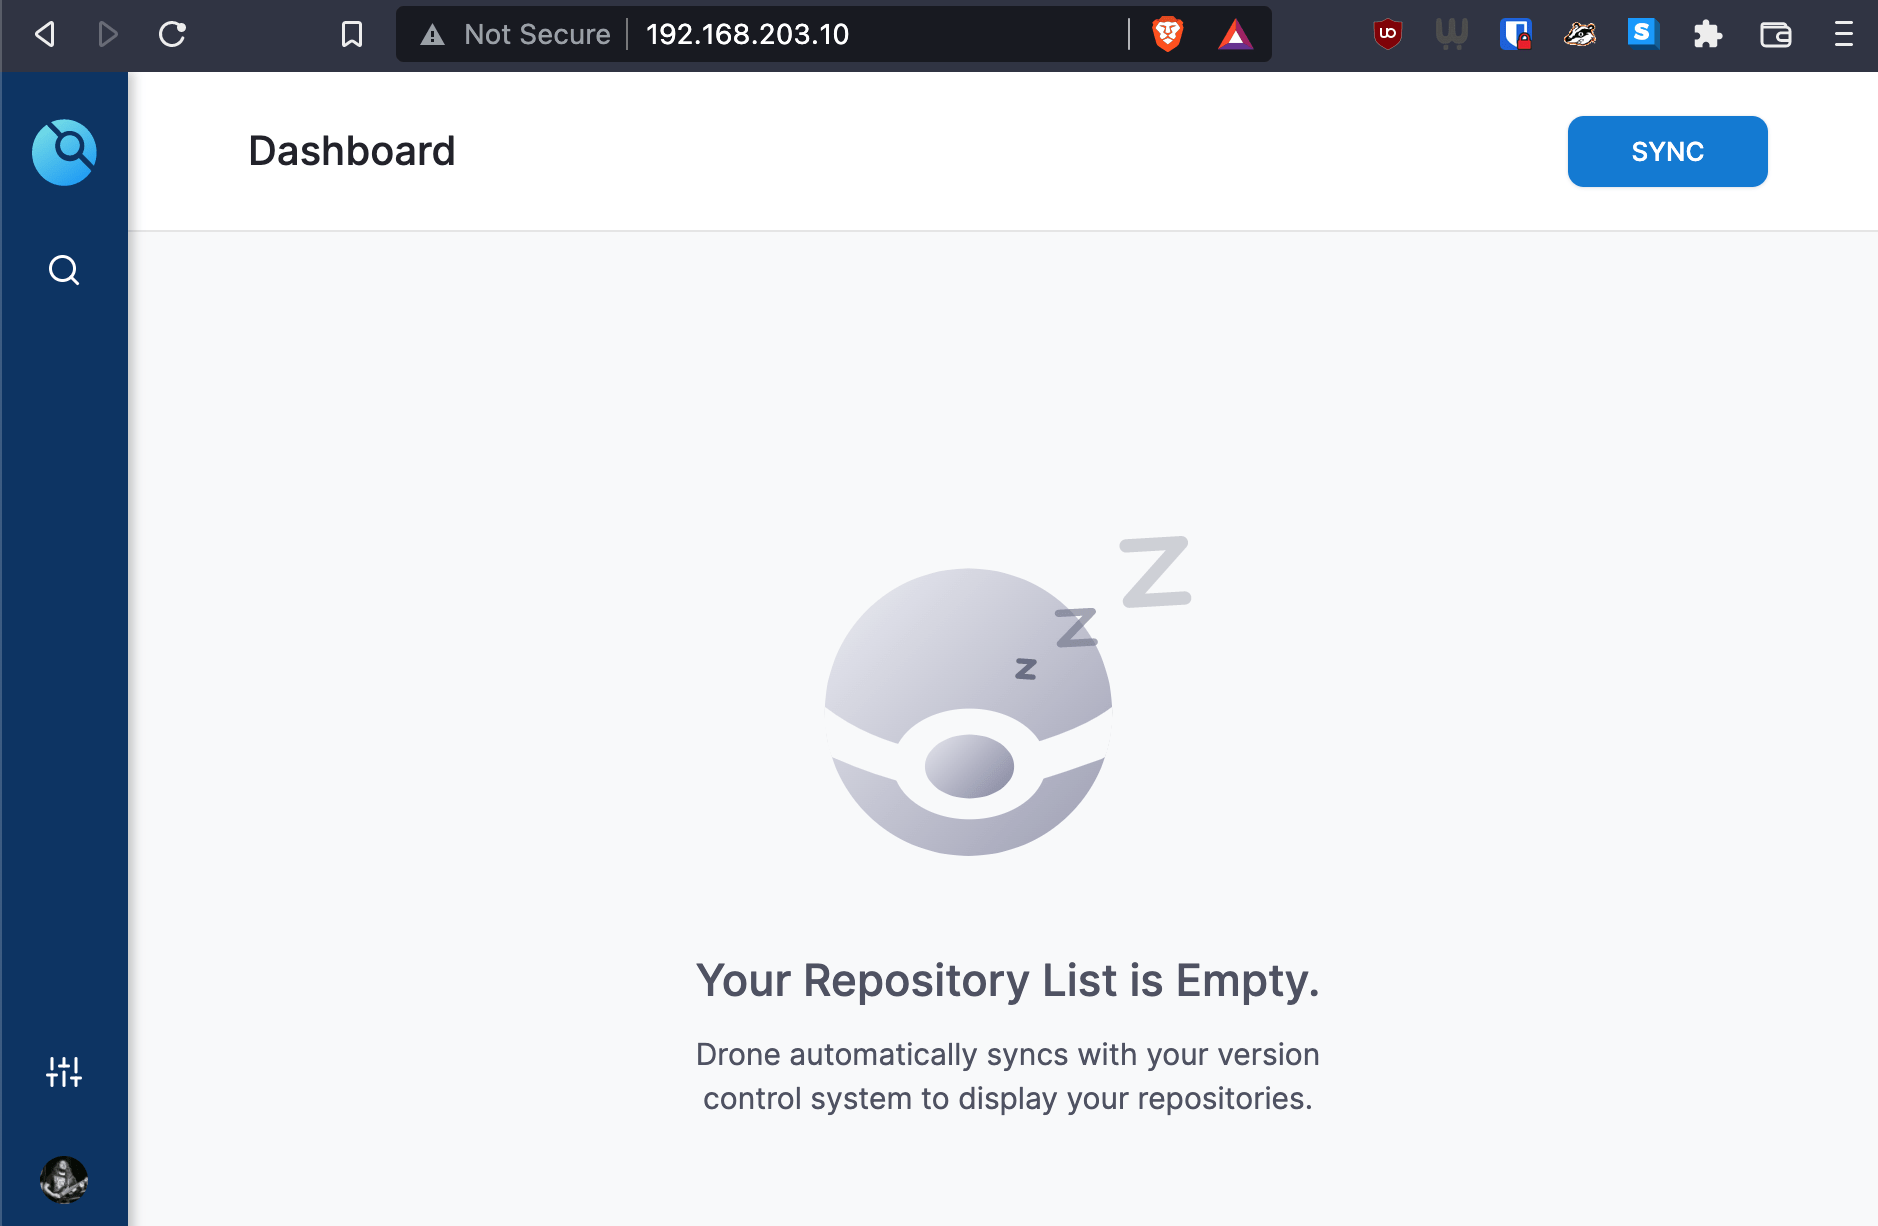
Sync Drone
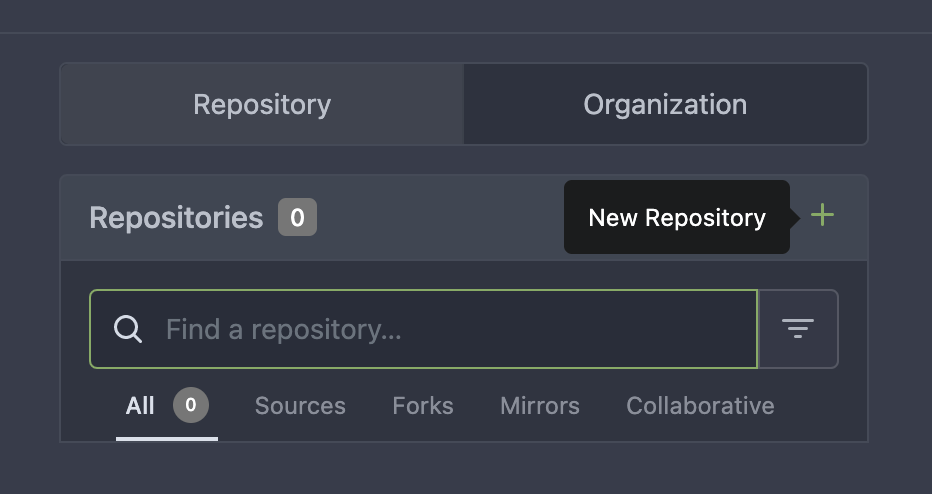
If Drone is not synchronized yet, you won’t see any repositories (or at least no new repositories if you already had some in your Gitea instance). Click on the Sync button in the top right hand corner, and Drone will get a list of all repositories that your user has access to in Gitea: -

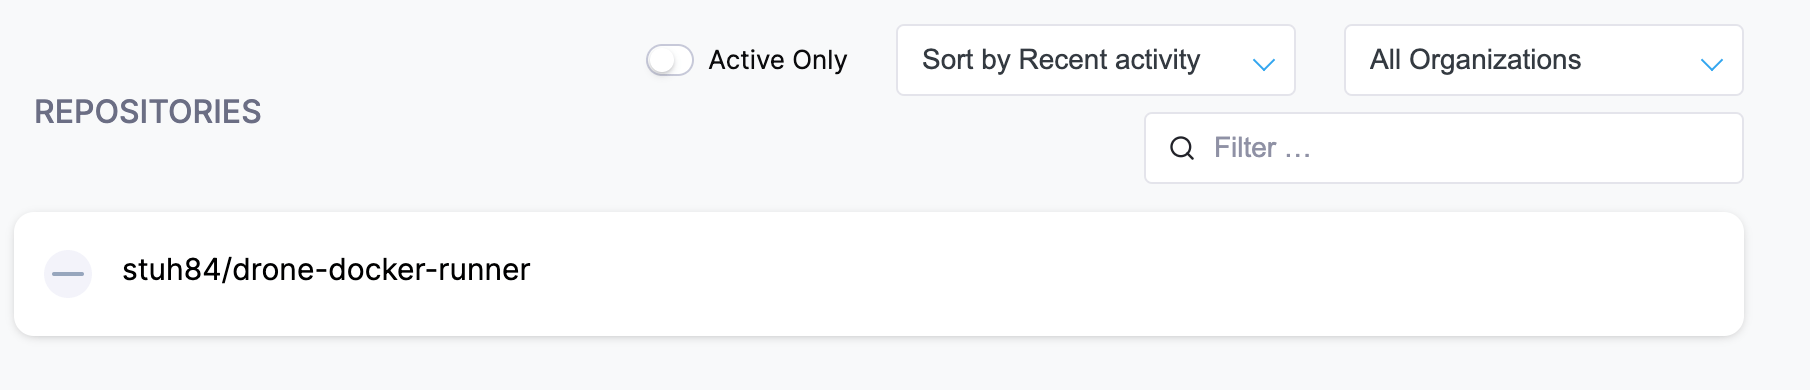
After this, you should now see your repository appear: -
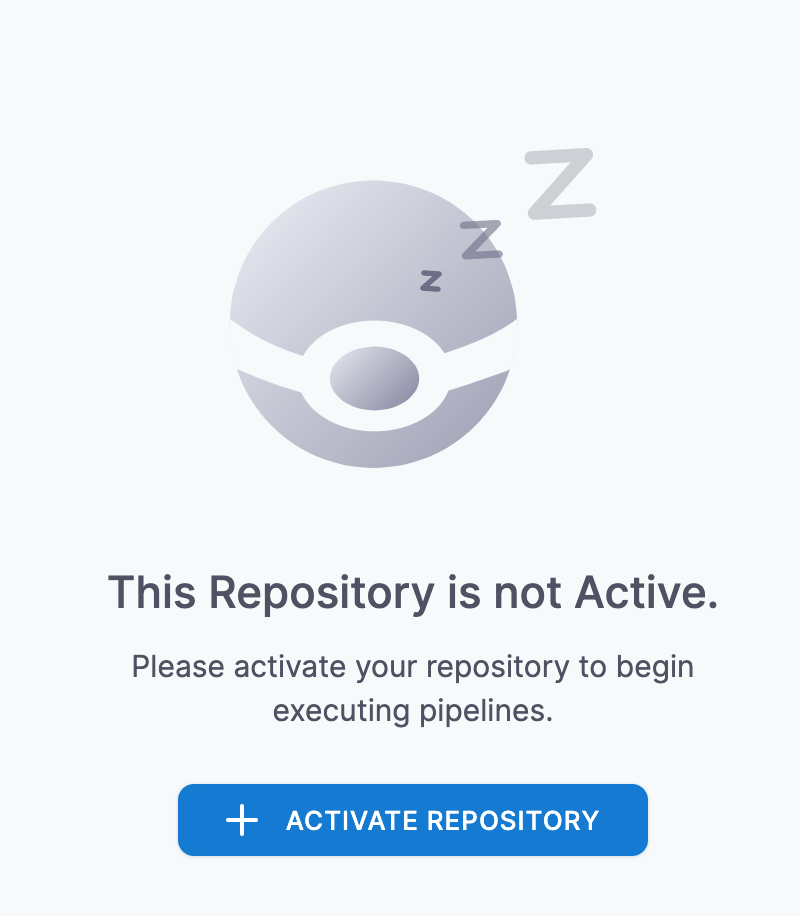
Configure repository
Click on the repository in Drone, and then click Activate Repository: -
You can now change settings like timeouts on builds (in case a build goes on too long), disabling builds that come from Pull Requests (may be useful in public repositories to stop your resources being used by drive-by commits!) and more. However to just start builds, you don’t need to do anything else.
Add the .drone.yml file to the repo
You can now add the Drone pipeline file to the repository. We’ll use our example repository here: -
$ git clone ssh://[email protected]:222/stuh84/drone-docker-runner
Cloning into 'drone-docker-runner'...
warning: You appear to have cloned an empty repository.

$ cd drone-docker-runner

$ cat > .drone.yml <<- EOF
kind: pipeline
type: docker
name: default

steps:
- name: testing
  image: alpine
  commands:
  - echo "Hello from Drone"
EOF

$ git add .drone.yml

$ git commit -m "Added .drone.yml"
[master (root-commit) 65509e6] Added .drone.yml
 1 file changed, 9 insertions(+)
 create mode 100644 .drone.yml

$ git push
Enumerating objects: 3, done.
Counting objects: 100% (3/3), done.
Compressing objects: 100% (2/2), done.
Writing objects: 100% (3/3), 322 bytes | 322.00 KiB/s, done.
Total 3 (delta 0), reused 0 (delta 0), pack-reused 0
remote: . Processing 1 references
remote: Processed 1 references in total
To ssh://192.168.203.10:222/stuh84/drone-docker-runner.git
 * [new branch]      main -> main
Now every file you add to the repository should now trigger a pipeline in Drone.
Testing the pipeline
Lets commit a random file and see what happens: -
$ echo "Test" > test

$ git add .

$ git commit -m "Test"
[main ab343da] Test build
 1 file changed, 1 insertion(+)
 create mode 100644 test

$ git push
Enumerating objects: 4, done.
Counting objects: 100% (4/4), done.
Compressing objects: 100% (2/2), done.
Writing objects: 100% (3/3), 279 bytes | 279.00 KiB/s, done.
Total 3 (delta 0), reused 0 (delta 0), pack-reused 0
remote: . Processing 1 references
remote: Processed 1 references in total
To ssh://192.168.203.10:222/stuh84/drone-docker-runner.git
   65509e6..ab343da  main -> main
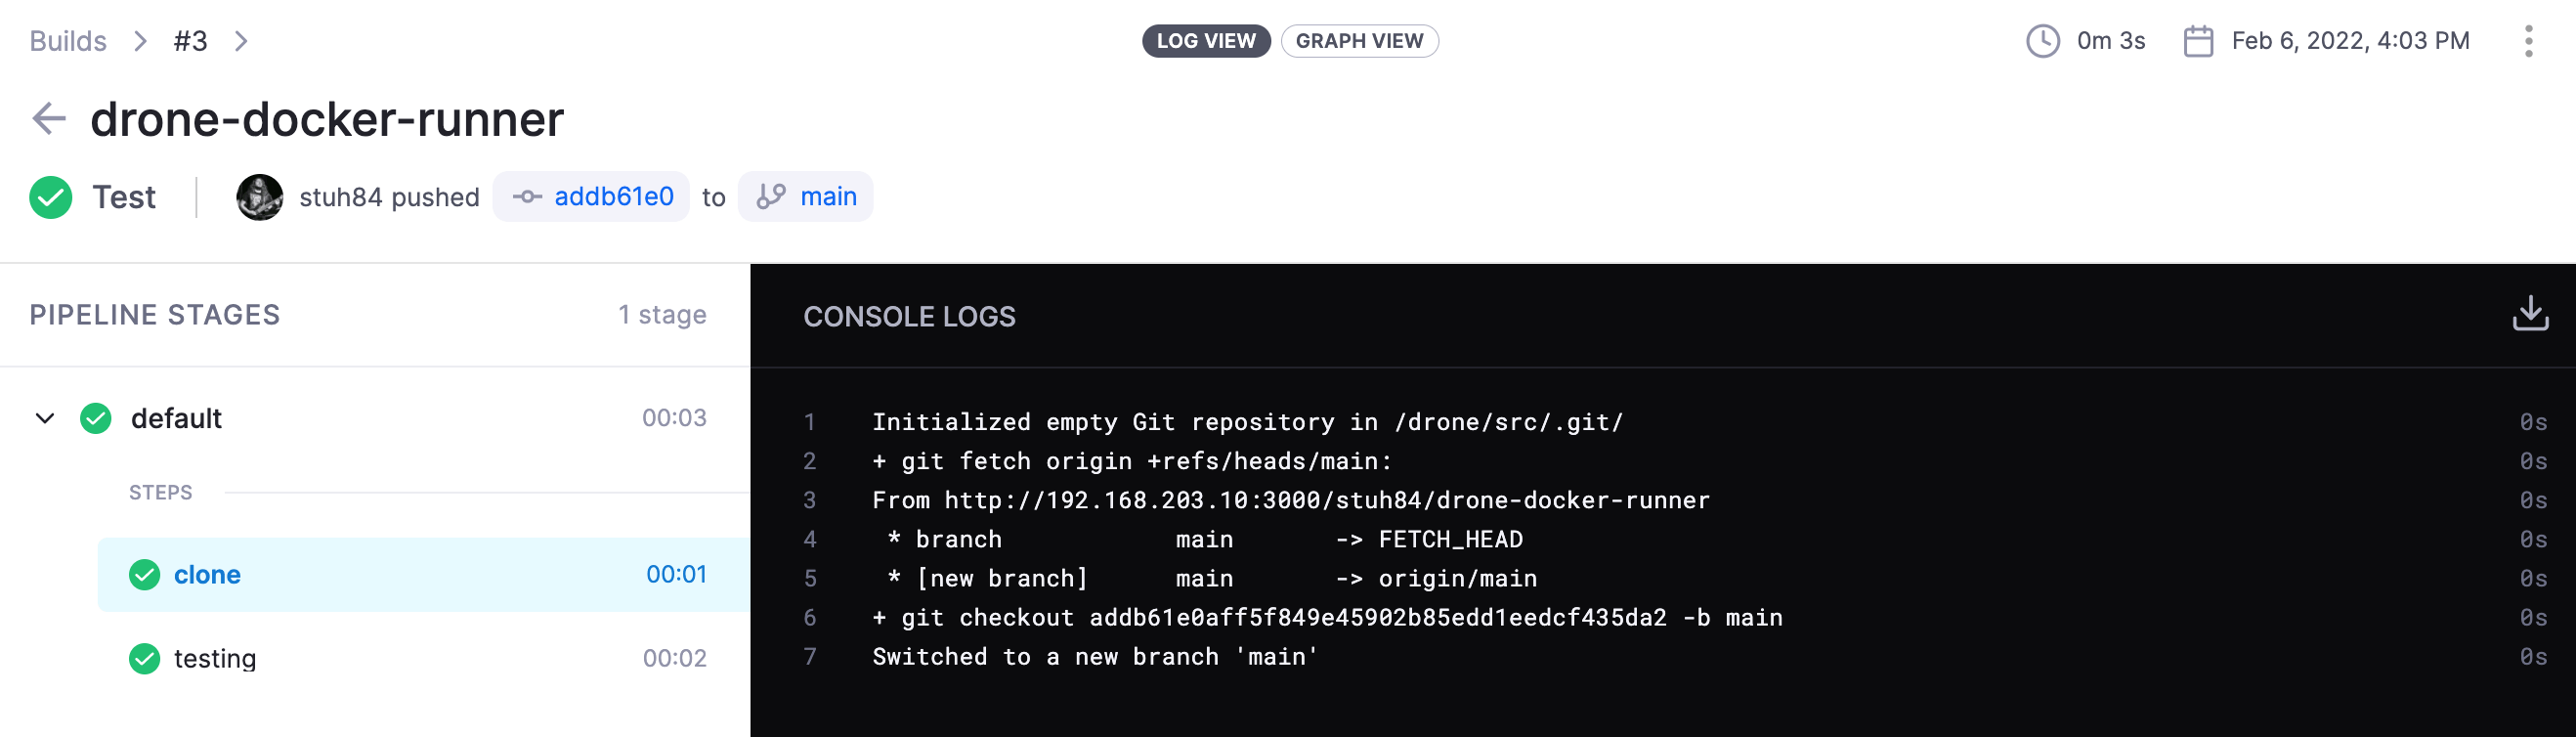
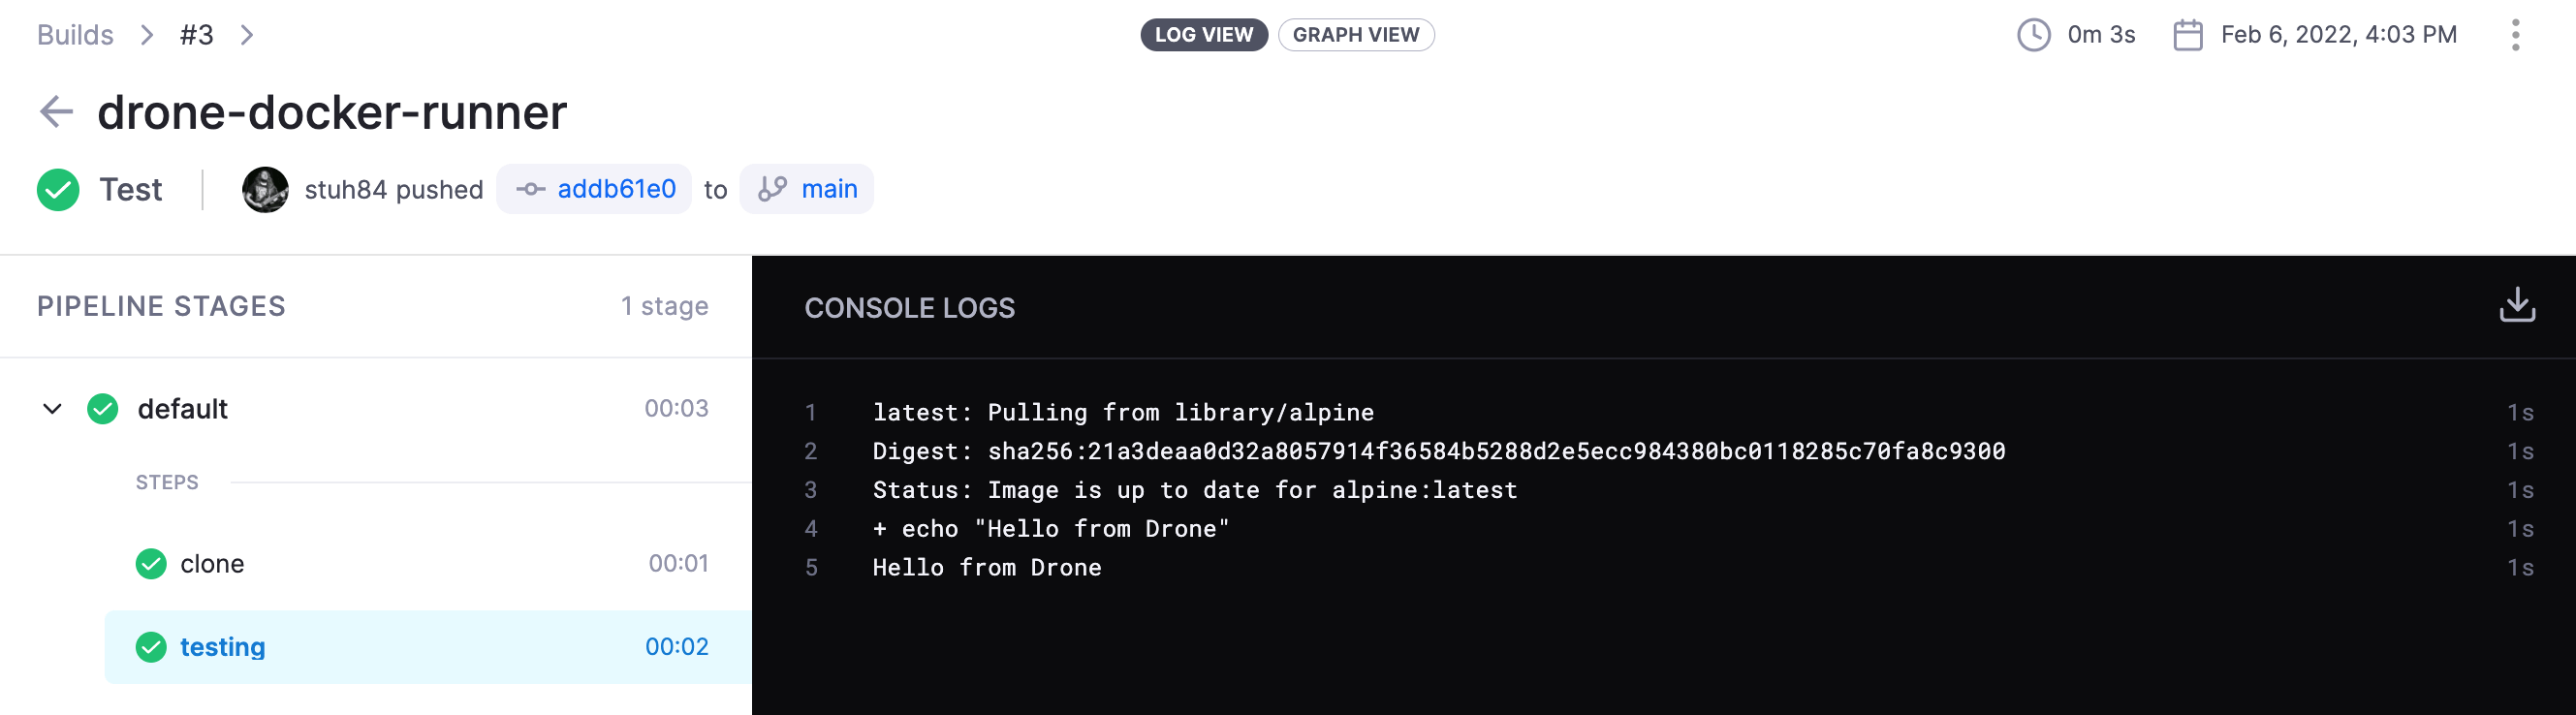
We should now see a build kick off in Drone: -
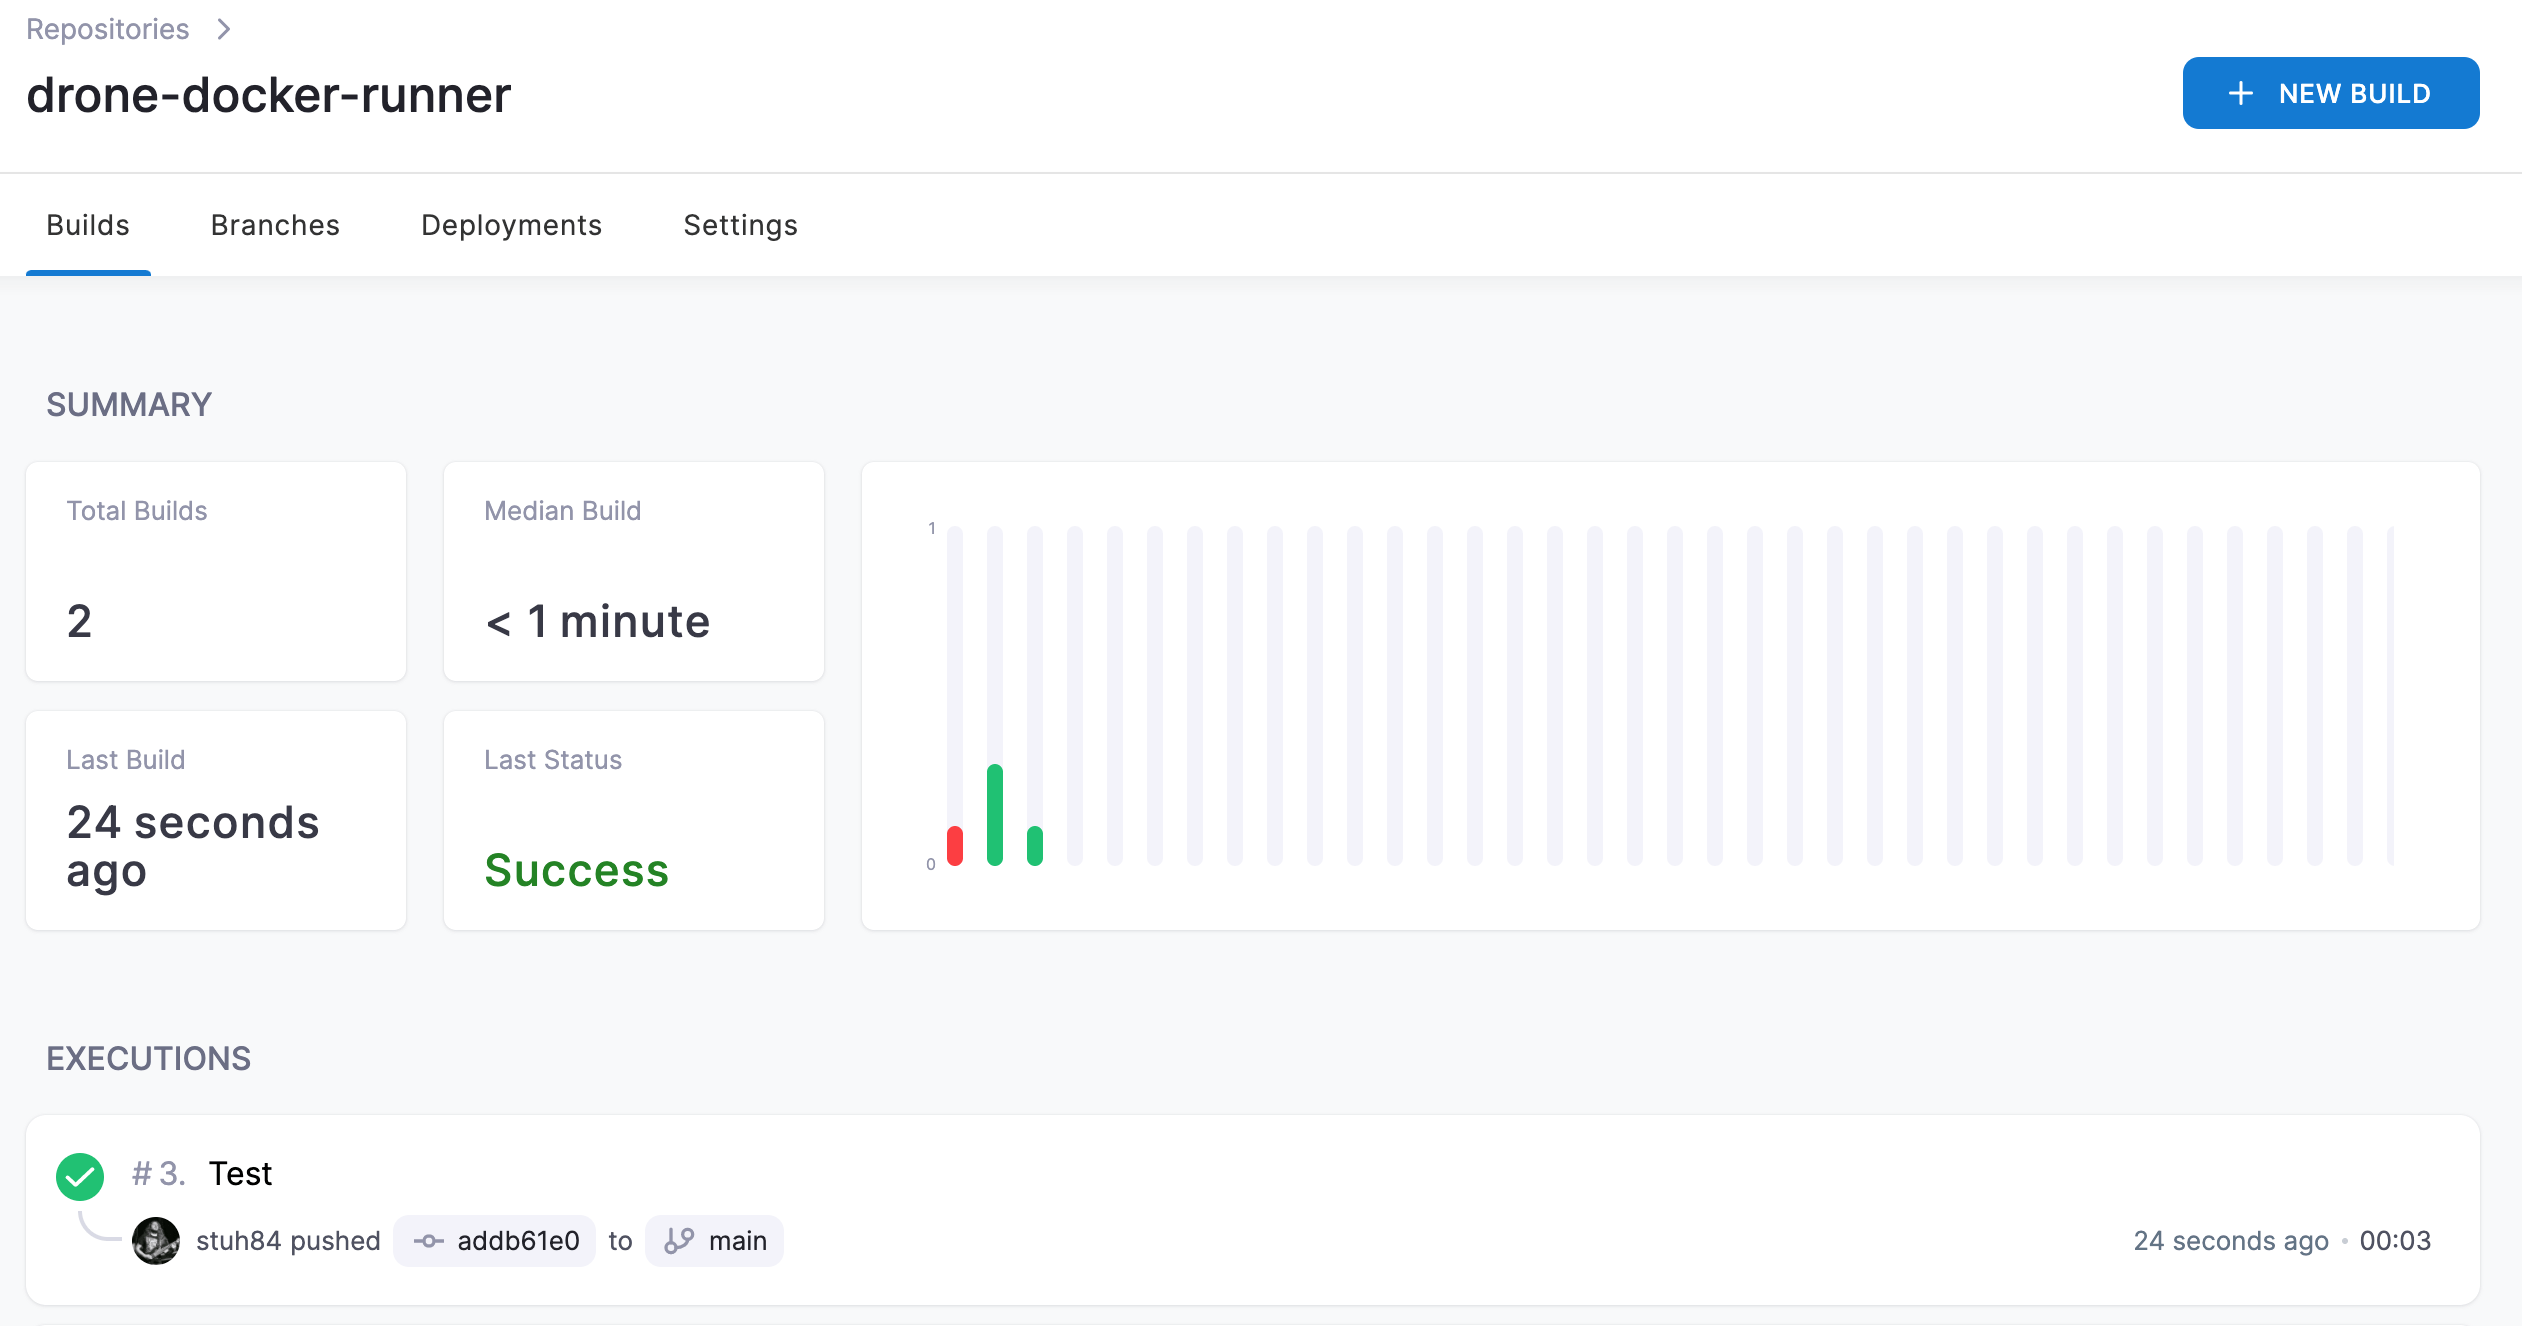
We can see the steps of the build too: -
Summary
At this point, we now have a running Drone server, as well as different kinds of runners that will be able to execute pipelines. The Drone documentation does a good job of showing how to create pipelines, different conditions to run pipelines based upon, as well as how to run pipelines across multiple different kinds of runners (whether different runners, different architectures or different operating systems).
Rather than going into too much detail in this post, I’m going to cover each kind of runner and pipeline that uses it in future posts.
Future posts
The next four posts are going to cover how to create Drone pipelines for: -
- Ansible - Using the Docker Runner for all tasks
- Saltstack - Using the Exec Runner for most tasks, and the Docker Runner for notifications
- Go building and releasing - Using the Docker Runner on
x86_64andarm64Linux, as well as using the SSH runner for OpenBSD builds and releases - Hugo - Using the Docker Runner
As we go through of these posts, we’ll see how create pipelines, how to trigger them, how to take different steps based upon Pull Requests or merges to the main branch, and how through all of this Git now becomes the main method of defining and triggering changes on my infrastructure rather than manual intervention!